[post_name how to patch drywall Dry Wall Patching - 5 Steps to Successfully Repairing a Hole in the Wall

Drywall Plastering is usually replaced with various other types of traditional plastering because it is labor intensive as well as expensive too. The old made plaster on timber needs three coats of plaster as well as it might not be within the skill of many individuals to do it, and also needs specialists most of the time to do even the repair work work.In many new houses today drywall plastering is certainly the preferred wall covering product. It costs reasonably less and performs well in many applications. It is additionally easy to set up and the finished appearance is also excellent, particularly after it is paintinged properly.There is paperless DP
too. Since there is no paper surface the drywall is covered with fiberglass. The positive functions of the fiberglass surface are water-resistance and reduction in the spread of mold.The material utilized to patch the plaster for the openings is unique. It is not as well tough to patch plaster wall surfaces, however it relies on the size of the openings to be patched. Nevertheless, it is suggested not to use drywall joint substance as patching material.There are numerous types of tools for this kind of plastering, and also they have various degrees of high quality.
If you have an interest in doing a great deal of drywall works, it is worth buying some tools like an assortment of joint blades, stilts, a taping banjo or a few other special tools.Drywall plastering is made use of to complete interior wall surfaces. But you have to be mindful to choose the best kind of plastering for the right place, as
there are different types. For damp locations there is a special kind of smudging which is moisture-resistant. If you utilize routine drywall in such areas, it could fall apart.Sometimes even if the plastering is done correctly, it obtains cracks. In such instances the joint compound could hold excessive water then fracture when it dries out up. Or, due to some motion of the walls fractures can develop.But actually DP likewise requires skill. It seems rather easy, however it requires to be exercised a few years, before it could obtain a perfect appearance. There are DIY's devices readily available on the market. Try and also stay clear of both typical errors made.
Never ever deal with bumpy joint compound and you need to live with the concept that you can not become a nit-picker in DP after having actually used only a 2nd coat.Drywall finishing strategies can help you to obtain an expert coating. They are not as straightforward as they appear to be on TELEVISION or in the DIY's manual. You must obtain adequate technique collaborating with joint substance as well as drywall insulation. Actually it requires a great deal of hand-eye co-ordination as well.There are
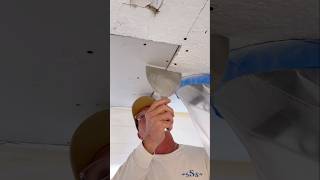
some common troubles connected with drywall plastering and these are blisters on the plastering, and the tape also often tends to fall off at places. The sores occur generally when there isn't adequate joint substance between the tape as well as the drywall surface. Here once again your hand-eye co-ordination is needed. Besides that the mixing of the joint substance is very important, because it needs to have the best consistency. As well as you should additionally have the right tools to stop the sores.
Repairing Chips and Scratches in Dryall and Wood Work
There's a catch to drywall repair work that everyone must know before attempting to "diy" for the very first time. Drywall repair is simple, however it is likewise easy to do a tremendously negative task. For this factor, a basic introduction to drywall repair service materials as well as tools is a fantastic area to start on your course towards patching and also paint your residential property's interior structural damages. However bear in mind, it's not just practice that makes ideal, it is additionally knowledge, specifically in terms of drywall repair service. So proceed your research as well as find out all that you can around drywall job prior to starting on your personal tasks. Continue reading to evaluate some typical sector understanding for drywall repair.Drywall Substance Likewise called drywall"mud ", there are 2 usual types of joint compound used to repair as well as patch: light-weight and also all-purpose. Both are very easy to deal with as well as keep a room-temperature shelf-life of 9 months. The most vital suggestion for acquiring drywall compound is to get sufficient. For large tasks, expect to buy 4.5 gallon container of material.For smaller sized projects, you can get away with a one gallon bucket, however you may be paying close to the very same
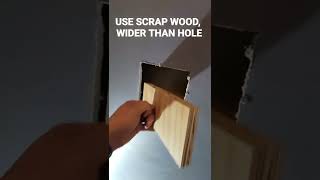
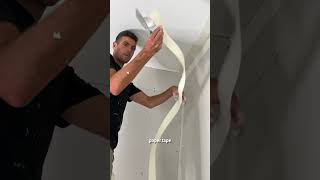
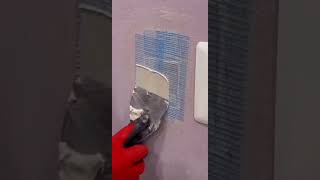
quantity for a larger container. If you think you might have future operate in the next 9 months, it is more cost-effective to opt for the larger pail. Otherwise, opt for the smaller sized quantity so to not lose any type of material.Spackle and also Plaster Numerous people are puzzled regarding the distinction among drywall substance, spackle, as well as plaster. The differences are subtle, and also barelyvisible to the typical nonprofessional, yet they do exist. Substance, joint substance, or drywall mud all refer to the exact same product, and also used mainly for bigger drywall and also plaster board jobs that call for more durability, specifically to cover joints in between panels.Spackle is extremely much like joint compound, yet used mostly for little house fixings for plaster and drywall. Plaster is a kind of wall surface material discovered primarily in older or historical buildings. It is a more lengthy technique to wall fixing in comparison to spackle.Drywall Repair Devices You can acquire drywall repair work packages that come with practically all the essentials for drywall patching and repair work. Sets range in quantity, dimension, as well as rate, but typical ones generally consist of 2-3 versatile blades, an energy knife, an insider-corner blade, hammer, screwdriver, saw, drill, nails, and also screws. Yet drywall repair works additionally require additional products relying on the demands of the job, including: Compound Self-Adhering Mesh Tape Paper Tape Drywall 1x4 Block of Pine Timber Hand Sander Toenail Bar Level Hack Saw Sandpaper Miter Box Guide Paint Paint Brush or Roller You can acquire all of the above-listed materials at any kind of local hardware or residence improvement shop. Ask a store attendant to
the weight off your shoulders by finishing the job faster, much better, as well as at a price that will not make you hesitate!