Drywall repair Palm Bay – drywall repair

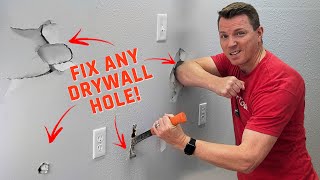
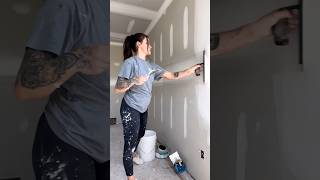
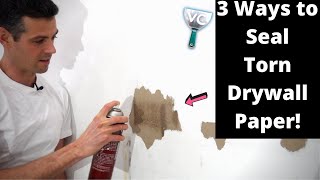
[post_name how to repair drywall 

DIY Versus Professional Drywall Installation and Repair

drywall repair large section

It is not unusual to locate fractures in a concrete foundation of a home. This goes with brand-new homes as well as older ones. While some cracks could indicate a significant problem with the residence, lots of are thought about normal contraction fractures. Let's talk about the problem of cracks in a foundation and also exactly what it suggests to you.Minor shrinking fractures are usual in new in addition to older house foundations. Poured concrete reduces as it treatments, or clears up. As the concrete shrinks, small upright or 45 degree cracks could develop over time at basement home windows, door openings, or corners. We call these stress or surface area splits. These splits are 1/4"wide or less and also do not impact the structure of the structure. If you see little cracks in a new foundation, or an old structure for that matter, do not panic. The concern below is moisture invasion right into the basement or crawlspace. This is a fairly very easy fix with epoxy insertion or concrete caulk. On older houses these splits might return, especially if the wall surfaces are made from lath and plaster. But, don't be distressed, it's simply the house remaining to settle.The very same can be true of splits in the drywall of the home. Stress or resolving splits will be tiny in size, concerning a 1/4 inch, and also address a 45 level angle from the edge of the door structure or window. Once more, do not worry as this is not an architectural issue yet even more cosmetic. Repair service of the split entail conveniently carried out drywall repair service, which can be achieved in little time.More extreme splits in the structure or wall surfaces do need the attention of a certified specialist to check out as well as fix. The kind of fracture that regards interest is the horizontal crack. These cracks are usually accompanied by bowing, building, or leaning of the foundation wall. These sorts of fractures may suggest a structure concern, which could be pricey to fix or if it can be corrected.There are likewise additional kinds of splits that might be associated with architectural motion. Included in the serious fracture group are cracks that have deflection. By this we indicate that one side of the split is greater or past the opposite side of the split. Likewise cracks that run diagonally across a wall, or in a stair step style. And also last but not least, fractures on the indoor coating (drywall or turret and also plaster )that remain in the same area as fractures on the exterior of the home.Repair of these structural movement or structural damages fractures can include several various opportunities. Most of them will include repair of the outside as well as to the indoor portion of the

home.That in a nutshell is a discussion of foundation or wall surface cracks in a home. If you see these kinds of fractures, it may be best to have a qualified professional check

the cracks. The expert can then provide you a suggestion if they are normal resolving splits or ones of a more serious nature.

Drywall Plastering - A Great New Method

So you have a brand-new residence and also every little thing looks fantastic. Someday, late in the mid-day, you are late to meet a good friend. You hurriedly throw your coat on as well as start toward the door. Coming down the long corridor you discover that the sunlight is setting and also the light is coming with the window that makes you so delighted you have such a nice residence, but you likewise discover something that you haven't discovered before; the walls look rougher and uneven in some areas. On your way residence you begin to think about just what you had noticed as you were leaving for your conference, and you wish to take a more detailed check out it when you get back.As you arrive home and also search for the rough areas of wall surface that you had observed, to your awe, you can not locate them.Were you visualizing things?Not actually;

these are concerns that newer houses have currently. With the newer larger home windows situated sometimes from floor to ceiling, and also more and brighter lights, the opportunities of this taking place is much greater.Welcome to the globe of

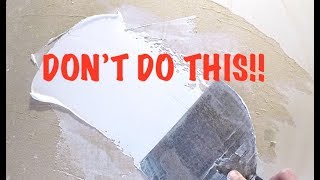
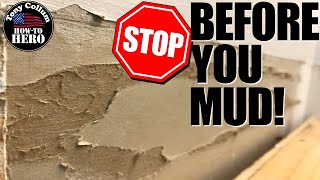
drywall finishing as well as vital lighting issues. A designer could establish a wall or ceiling surface area for a certain layout result, or simply by coincidence you could discover areas of your home or workplace that fall under what is called serious vital illumination areas. These locations are located in locations such as a long corridor, an entrance hall wall surface, or smooth ceiling where the light from any kind of source comes streaming across the face of the wall or ceiling at just the best angle.The mix of any type of kind of gloss paint and also smooth walls will certainly make these blemishes a lot more exaggerated. This might make the viewed appearance unacceptable to the individual, or house owner, after the ideal craftsmanship. Source of light, structure of wall, as well as luster of paint are key variables affecting the appearance of drywall and also surface area. Similar to any type of framework male builds, with a quality setup and appropriate paint procedures the end result typically transforms out penalty, but allow's consider this.The whole nature of drywall setup is unrefined at best. Four foot wide areas of drywall are butted together over the timber framing members, then toenailed and screwed to the framing, and afterwards drywall mud is used to complete all the nails and also joints. All this and the walls are expected to end up looking like one continual smooth wall surface sections, without visual issues. As we specified earlier, in most situations you will not see problems, but we are speaking about essential lighting areas, where situation you will see some defects, also from the most effective drywall surface work.So now we understand that walls are not completely right, as well as there is actually no chance we could make them ideal in some lighting scenarios.

What can we do to make them look as smooth as well as level as we can? 1. Removal any lights situated in the ceiling at the very least 3 feet far from any intersecting walls.2. Walls as well as ceiling in vital light locations need to have a little amount of appearance on the surface such as orange peel, or brocade. This will certainly separate the representation of light right into several directions, allowing the walls to look smoother and straighter.3. Wall surfaces should never be repainted with any type of sort of gloss paint, not even velvet, or eggshell sheen.4. Add drapes that could limit, or transform the instructions of light being available in from huge windows.5. Use plants to break up long wall surfaces.6. Make use of a cozy off-white flat luster paint on ceilings. Paint manufactures make specifically created flat sheen

paints for ceilings.7. Usage source of lights from many areas in the space to neutralize one large light source.These are

just a few ideas.

You will need to play around with the best ways to breakup the lights in these areas. Bear in mind lots of sources of light in an area will certainly be much better that resource. John Howell House Paint Vancouver, WA drywall repair near me

How About That Drywall Repair?

how to repair drywall

Best Drywall Repair Services Florida

Drywall repair Weston – drywall installation

[post_name how to fix a hole in the wall 

Does Your Concrete Foundation or Drywall Have Cracks?

drywall repair quick dry

Drywall patching needs perseverance and persistence. I am going to break the procedure down conveniently so you will be extra notified prior to you begin your following dry wall surface patch.One thing you should take into consideration when dealing with drywall is the DUST. If you are delicate to the drywall dirt or gypsum you may want to obtain a fragment mask, safety goggles or handwear covers as well as put on a lengthy sleeve tee shirt for defense. Do not forget to secure any kind of home furnishings that you wish to keep dust free, too!Step1: prep the

hole or location to be patched.If the opening or area to be patched has loose wall surface board paper you will have to get rid of the loosened paper as well as gypsum. Currently if the wall surface board paper intends to proceed destroying the side of the wall, a means to quit this is the take a razor knife and cut down from the loose area regarding an inch approximately. What you are doing is racking up the wall surface so when you tear of the loosened paper it will certainly involve the racked up line as well as not tear further creating a bigger area to need spot work. If after you have eliminated the loosened paper and the gypsum board below is fallen apart as well as hardly hanging to the wall surface, you require to knock out all the loosened gypsum. Loosened paper and also plaster will create the drywall compound to not bond strongly and might produce a bubble you will see just after finishing with substance. As part of the prep, you might intend to settle up the opening so you can extra conveniently reduce the item of sheetrock that will load the void.OK so the location is prepped as well as currently we will certainly need to transfer to tip 2, which will certainly advise you on

how you can appropriately attach a piece of sheetrock cut to fill the hole in your wall or ceiling.Step 2: back framing the hole to attach the sheetrock you will certainly reduce to fill up the void.Just like with brand-new building you will require to have wood mounting to screw the sheetrock right into. To explain, I will certainly make use of an instance

spot area of one foot by one foot. You will require to cut a 2x4 right into 2 16 "lengths. You will require to gather a cordless or electric drill and also regarding a lots 1 1/4" timber screws. Take one of the 2x4's you have cut and slide it in the opening and also behind the existing sheetrock, along one side of the opening. The reason the 2x4 is longer(16 ")compared to the 12"hole is since we will prolong it a couple of inches past the top as well as bottom. So now you have a 2x4 inside the wall on one side, the 2x4 should be laying flat against the in of the wall surface, it will not be turned so the 4 "size of the 2x4 is flat against the in, this will provide us a bigger surface for attachment as apposed to the basic means of framing which would certainly be with the 2"width encountering the sheetrock. You will intend to eyeball, best as feasible the 2x4 as well as divided the difference of the board size between the existing sheetrock and also where you will certainly connect the item of sheetrock you will reduce for the spot. Currently that the 2x4 is held in the correct placement you will certainly need to screw the 2x4 right into the existing drywall by holding firmly to the board and also screwing right into it through the face of the existing sheetrock. You will certainly put 2 screws along the side and also one on the top as well as bottom of the existing sheetrock to highly safeguard the 2x4 to accept item of sheetrock you will certainly reduce. As soon as you have actually completed one side, repeat the same procedure beyond. So when you have completed back mounting you now have a solid frame to affix the patch item of sheetrock. * Note-if you have a hole to spot where there are framing, electric or mechanical issues in the manner in which maintain you from moving the 2x4 behind the wall surface to screw down the side, you can screw in the top and also base of the 2x4 and also this will be sufficient. You might additionally think about attaching the 2x4 back mounting across the top and also bottom of the hole as apposed to connecting the 2x4's on the sides, simply use the very same instructions of accessory for the sides or top as well as bottom.Now that the prep and framing are full next we will reduce a piece of sheetrock to put right into the framed opening symphonious 3. Step 3: take a dimension of the opening and also cut a piece of sheetrock to

fit as well as safeguard it.It does not have to fit incredibly tight however it will have to fit and also be screwed to the

back framing you mounted. You ought to place 2-3 screws down each side attaching the piece of sheetrock you reduced to the framing. * Note-all the screws will certainly have to be "set"listed below the surface area of the sheetrock yet not deep enough that the screw head rips the paper face on the sheetrock, unset screws will show and also hinder the next step. ** Note sheetrock comes in 2 densities for the majority of residential building and construction -1/ 2" and 5/8 ". 1/2"is typically on the interior walls/ceilings as well as 5/8"is used on bottom of stairways and also in the garage.Well you're making development and also you have filled the void with sheetrock, currently we will certainly carry on to the

layer or ending up stage of the dry wall compound(mud )clarified in step 4. Step 4: covering the spot with drywall compound (mud). As I was claiming in step 3 the item of sheetrock you cut to fill up the hole does not have to fit super limited. If the sheetrock you cut has a space around the

border/joint of it and where it satisfies the existing wall board, you ought to pre fill the area prior to using the drywall tape. So just take a little substance and fill in the edges as well as smooth the excess flat wit the wall, enable to completely dry. Following is to apply the drywall tape so that after we are all completed there will not be a crack around the joint of the patched hole. For patch job I such as to use a"mesh "or "fiber" tape, it gives a more powerful hold as well as the mesh tape is much extra flexible compared to normal drywall tape, in the considering that you do not have to pre mud the wall surface to adhere the tape. The mash tape has a sticky support, so all you do is cut the mesh tape to the size you need, stick it on the wall surface with the center of the mesh tape running right in accordance with the joint or split. The mesh tape ought to always run past the joint at least an inch. Repeat this procedure for all four sides of the spot. Next apply a layer of compound around the perimeter of the patch, over the mesh tape. The mesh will certainly be a little visible after just one coat. * Note-If you put on much compound(mud )you will have a hump in the surface. Enable this coat to completely dry, sand gently, mostly to knock of any blade edges that dried out in the substance and can create the next layer to accumulate to much. You do not want to attempt as well as mud the spot in just 1 layer, it is much better to use a moderate/thin coat permit to dry, sand and also layer once again. Nevertheless the layers( at the very least 2) have actually dried as well as you are completely satisfied that the surface is coated uniformly, sand the mud to even the surface. * Note -a much less than best coating work could be ravelled with sanding. Fining sand along the outdoors side of the mud also, will certainly mix the patched location better into the existing surface area. An actually cool trick desires you have actually fined sand the patch, take a wet sponge or rag as well as"wash" the outside mud of the spot mixing it also much better into the existing surface area, this technique will certainly help you stay clear of seeing a mud line around the spot when it is completed. If your residence has a smooth appearance, this is the last step, your prepared to painting. If you do not have a smooth appearance you will require to review on.Only one even more step and the drywall component of your spot will certainly be total, texture. We will go over various structures as well as how to apply the in step 5. Tip 5: there are many structures and you need to initially know the best ways to identify your existing texture before going forward.Older houses may have a swirl, crows foot, hand or smooth structure. More recent homes generally make use of smooth, orange peel, knockdown as well as hand textures. For a crows foot you will certainly need a crows foot or stomp texture brush. For swirl texture you might have to get in touch with a dry wall surface provider store for the proper texture brush or explore a couple of different brushes. For a hand appearance you can make use of a dry wall knife or trowel. Every one of the above discussed structures need a tool or brush to apply drywall substance to achieve the texture. The following two appearances could be bought in a spray can, orange peel and tear down. * Note- with all appearances it is excellent to obtain an old item of plywood or cardboard as well as experiment initially to find the ideal amount of stress, thickness of mud, technique as well as established up time to create the right seek to finest hide that a fixing was ever made. As always if you texture the wall and are not delighted with the results you can was the structure of instantly with a damp sponge of dustcloth, enable to completely dry and attempt texturing again or sand of a negative structure if you are not satisfied with it after it has been allowed to completely dry. * Note- Knockdown structure dimension could be manipulated by letting the sprayed on texture established or dry for much less or more time depending upon the desired look.We have reviewed the 5 steps needed to properly repair a drywall patch. 1 )effectively prep the area to be covered. 2)back frame the opening. 3 )size as well as cut the sheetrock to fill the opening. 4 )use mesh tape and mud to smooth the surface area. 5)pick and also apply ideal texture.So go out and" obtain your drywall on". You could take a look at my article on paint walls if you need help with the paint. Feel totally free to leave a comment regarding any kind of various other subject you would certainly like me to compose on referring to drywall. Please check out our site, dennardbloss.com, it

is all about our building coatings.

Sheetrock - What Is It?

By the time you finish reviewing this short article, you will have the ability to execute basic fixings to damaged drywall. There are some standard devices that you must keep around the home, if you have an active family and are prone to get dings in the walls. This short article will not provide enough info to do significant repair works to drywall. Major fixings are basic, but you must learn the fundamentals first.Here is a checklist of some devices you will certainly need. Your local big box can supply you with some standard devices. They run in cost variety from cheap to professional quality. They have plastic putty blades for less compared to a buck all the method up to stainless-steel that with care, will last a lifetime. If you expect an extremely handful of repair works, the plastic will certainly suffice. Likewise, get a carriage bolt, a little hammer, a container of drywall joint compound, 150 to 220 grit sandpaper and also a paint brush. These standard devices will certainly repair most little dings and also dents in drywall.An instance of a ding would certainly be where the locking

button on a door handle has actually left a perception in the wall surface behind it. This is common of a quick as well as very easy repair service. Check out the damages. Is there anything extending over the wall surface? If so, use the carriage screw to push the outcropping listed below the wall surface area. Use the hammer to assist persuade the protrusion to go listed below the surface area of the wall and also round the sides. Next off, take the putty blade and also some joint compound or as it is typically called, drywall mud, as well as fill the opening. Wait till the mud dries, sand gently as well as fill up the opening once more to bring the product to the very same level as the wall. Sand the surface once more till the wall is smooth and level. Do not over sand. This will certainly rough up the drywall permitting the paper to fray and also needing even more mud to seal the rough surface area. There ought to not be any kind of distinctions in the surface. Numerous little applications will last much longer compared to one large application and also give you far better results.Is every little thing smooth? Otherwise, apply some more drywall mud to even the wall surfaces. Sand once again. When the wall is smooth, apply the paint guide. When the paint primer is dry, apply your normal wall paint. The paint guide is to secure the wall so the brand-new paint does moist too rapidly permitting the spot to be visible.That is the fundamental technique of repairing damaged drywall. drywall repair dent

Repairing a Hole in Drywall

how to fix a hole in the wall

Best Drywall Repair Services Florida

Drywall repair Pensacola – drywall installation

[post_name drywall texture 

Drywall Issues at Home: DIY Fixes Vs Professional Drywall Repair

drywall repair near me

The strategy for ways to get rid of drywall structure depends on the product being gotten rid of and the condition of the wall surface. One of the most usual technique for eliminating texture from repainted drywall needs sanding off the high parts of the texture as well as filling it in with at the very least two thin layers of joint compound - called skim finishing. Another technique for unpainted textured wall surfaces and also ceilings, including snacks ceilings, is spraying water externally to loosen the structure so you can scratch it off.When a wall surface has

considerable fractures, peeling paint or water damages, it may be less complicated to cover the existing wall with 1/4 -inch drywall or eliminate the existing wall completely and also change it.Whatever technique you make use of to eliminate a textured surface from drywall, shield on your own from direct exposure to building and construction dirt, lead and also asbestos.Removing textured wall surface surfaces is an exacting process that takes patience.

Here's how you can take on some usual issues so your wall surfaces will certainly be smooth as well as your work, profitable.How to remove drywall texture by skim finishing Problem: Unequal surface.Solution To stay clear of developing an uneven wall surface when you're removing the texture, do not use a belt sander. It will dig up the texture.

Instead, get rid of high peaks in the texture

using a pole sander with 120 grit or a 5-inch flooring scraper.Problem: Bulgy looking patches.Solution Eliminate any kind of loose material with a tight brush, scuff high areas and also clean with a damp towel. To use the first coat of joint substance, begin at the leading and job across as well as down.

"The most essential point is not to utilize way too much

material

,"states Ivan Solis, president of Chicago-based Solis Building and construction."If you use excessive joint compound, it will be difficult to attain a smooth surface area. You'll have to do a great deal of sanding.

"Do not worry about ripples, simply attempt to cover the structure and get an even coat on the wall. Hold the joint blade at a 30-degree angle as well as press it in. "Keep it limited and also smooth,"claims Solis, who recommends making use of a 10 -or 12-inch joint knife.Alternate the instructions of the skimming strokes with each brand-new coat of mud. If you use the very first coat horizontally, apply the 2nd layer up and down. Return excess mud from the surface to the rim of the pan, keeping the blade of the blade clean.When the initial coat is completely dry, use the second layer to complete the surges. Again, start at the top in the edge and work across as well as down. As you work, knife off any kind of huge chunks of the initial layer, using your blade. If there are still low and also high areas, you could need a 3rd layer. When the layer is dry, surface

with a last sanding.Problem: Joint compound that sets too quickly or is as well tough to sand.Solution Select the right substance for the task. When a wall structure will certainly require a number of layers of joint compound to smooth the surface, make use of a setup compound like Sheetrock Easy Sand for the very first coat."Easy Sand 90 is a chemically setting substance that will offer you roughly

90 mins to work before it establishes,"claims Jeff Hartin, product manager for

USG's Ready Mixed products. The product is perfect for heavy fills up and also sands conveniently."The nice feature of a setup compound is that you can apply the first layer and also start a 2nd coat when the first one has actually hardened,"states Solis.For the second or last coat, Hartin and also Solis advise a ready-mixed joint compound, such as Sheetrock And also 3. The lightweight product is much easier to spread out, permits a thinner application, as well as is much easier to sand.Problem: Spots seep through the joint compound.Solution These issues are often due to improper attachment and are typical on numerous Do It Yourself paint tasks. If the distinctive wall surface is peeling or plaster as well as distinctive joint substance are diminishing,

eliminate loosened material with a scraper, sand as well as coat the surface area with primer/sealer before skim coating.Problem: Fractures as well as dents reappear.Solution Repair splits as well as damages prior to skim covering. To repair them, tape over the fractures with drywall tape and protect them with joint compound. When the wall is smooth, a drywall guide and also sealant will certainly seal the

wall surface and assistance stop splits and also dents from reappearing. Guide additionally neutralizes the pH of the wall for an extra also appearance.Problem: Peeling paint and also bubbling in the paint finish.Solution These problems are commonly as a result of incorrect bond. If the textured wall surface is peeling off or plaster and also textured joint substance are diminishing, get rid of loose product with

a scrape, sand and layer the surface area with primer/sealer prior to skim coating.Problem: Pitting.Solution Pits on the

surface area of the drywall are air bubbles that were not correctly filled up or that were exposed throughout sanding. Air bubbles outcome from over -or under-mixing the joint substance. Apply stress to the bubbles with the joint knife, up until the pits are gone. If you do not observe them up until the wall surface is dry, cover them with joint compound and also sand.Problem: Over-sanding; missing out on high as well as reduced

spots.Solution Sand as well much and you take the chance of damaging the surface area paper. If that

occurs,

cover the location once again with joint substance. To prevent missing out on high and low spots, utilize a clamp-light or various other source of light near the wall surface to find problem locations. Sand systematically, working from the ceiling to the floor in narrow sections.How to get rid of a textured surface area from drywall by scratching

Problem:

Wall harmed by water and scrapers.Solution Experts advise wetting wall appearances with a spray bottle to loosen up the material. After that utilize a scrape with a level, wide blade to get rid of the appearance. Use only enough water to loosen the material or you can damage the drywall. If you mark the sheetrock with the edge of your scuffing blade, spot it with joint compound.How to eliminate a textured surface area from drywall by covering wall surfaces with drywall Problem: Reinstalling trim.Solution "One point to remember when using 1/4-inch drywall over an existing

wall is that not just will your baseboard, door and home window casing look a 1/4- inch thinner however every one of the "joints"will certainly have to be full of joint compound and caulked, "says Solis. You might have to remove trim and re-install it, and also electric outlets could require extensions to bring them flush to the wall surface.

Drywall Hole Repair Made Easy!

There's a catch to drywall repair work that everyone ought to understand before attempting to "diy" for the very first time. Drywall fixing is very easy to do, yet it is additionally easy to do a greatly bad task. Consequently, a simple intro to drywall repair materials as well as devices is a terrific location to begin on your course toward patching and also paint your home's indoor architectural problems. But keep in mind, it's not just exercise that makes excellent, it is additionally understanding, especially in regards to drywall repair service. So proceed your research study as well as discover all that you can around drywall work before obtaining begun on your individual tasks. Continue reading to review some typical market knowledge for drywall repair.Drywall Compound Also called drywall"mud ", there are two common sorts of joint compound made use of to repair as well as patch: light-weight as well as all-purpose. Both are easy to deal with and preserve a room-temperature shelf-life of 9 months. One of the most essential tip for acquiring drywall compound is to get enough. For big projects, expect to purchase 4.5 gallon pail of material.For smaller tasks, you could get away with a one gallon container, however you could be paying near to the exact same

quantity for a larger bucket. If you believe you might have future job in the following 9 months, it is extra cost-efficient to go with the bigger container. If not, choose the smaller quantity so to not waste any kind of material.Spackle and Plaster Many people are puzzled regarding the distinction amongst drywall compound, spackle, and also plaster. The distinctions are refined, and also hardlynoticeable to the average nonprofessional,

yet they do exist. Substance, joint substance, or drywall mud all describe the exact same product, and also used mainly for larger drywall and plaster board projects that need even more durability, specifically to cover joints between panels.Spackle is very much like joint substance, but made use of mostly for little house fixings for plaster and also drywall. Plaster is a type of wall material located mainly in older or historic structures.

It is a more taxing strategy to wall repair in comparison to spackle.Drywall Repair Tools You can purchase drywall fixing packages that include basically all the essentials for drywall patching and also repair service. Kits range in quantity, size, as well as rate, yet typical ones normally include 2-3 adaptable knives, an utility blade, an insider-corner blade, hammer, screwdriver, saw, drill, nails, as well as screws. Yet drywall repair works additionally require added products depending on the needs of the job, including: Substance Self-Adhering Mesh Tape Paper Tape Drywall 1x4 Block of Pine Wood Hand Sander Fingernail Bar Level Hack Saw Sandpaper Miter Box Guide Repaint Painting Brush or Roller You can buy every one of the above-listed products at any kind of neighborhood equipment or residence enhancement store. Ask a store attendant to

  • aim you
  • in the ideal instructions
  • , and give guidance on
  • the most
  • trusted products. Talk
  • to a certified drywall specialist for
  • skilled advice on family drywall
  • repair works, drywall
  • projects,
  • drywall replacement, and also
  • a lot more. They can also take
  • the weight off your shoulders by obtaining the work done quicker, much better, as well as at a rate that will not make you hesitate! drywall repair dent

    How to Repair Wet Drywall

    drywall texture

    Best Drywall Repair Services Florida

    Drywall repair Ormond Beach – drywall

    [post_name drywall supply 

    Drywall Plastering - A Great New Method

    drywall repair tips

    Drywall acts like a sponge, taking in wetness at every possibility. When drywall obtains damp, it swells as well as buckles, endangering the honesty of your wall surface. This enables the underlying structures to experience prolonged exposure to moisture and starts the decay procedure, ultimately decomposing the whole framework. Drywall is a versatile structure material, however. Drywall that has actually obtained damp could be repaired with a little recognize how.In order to repair wet drywall, comply with the below steps:

    o Cut out around the influenced drywall with a drywall saw. These handsaws are sold reasonably at any kind of neighborhood hardware store. Make certain that you reduce away all affected drywall by preserving broad margins around the defect.o Determine the source of the water. This action is somewhat simple if your drywall was impacted by an outside force like rain, flooding, or a damaged water heating unit, yet may be a little bit extra evasive if you have a roofing or plumbing issue. If you could not determine the source of the water, make sure you call a professional.o Replace the damp

    drywall with completely dry. On a new item of drywall, define a patch of brand-new drywall in the same dimensions as the old and also reduced out with a razor blade or drywall saw and screw right into the open opening. If there is no wall stud behind the open area, removed the existing drywall up until there is a subjected stud on either side of your repair.o Apply drywall mud. Joint compound of drywall mud is applied in layers. Make the initial layer the thickest, covering all of the joints completely as well as permit to dry. Do not worry as well much concerning making the substance completely smooth as there will be several layers of mud and fining sand before you reach your completed layer. All the mud to dry and after that sand smooth. Run your hand over the joints, really feeling for low or high spots and also mark with a pencil. Continue sanding high spots and after that include a brand-new layer of mud over the whole repair service, focusing on including compound to the reduced areas. Repeat this process until your repair is level with the existing wall.o Pointer: Take your time with this step, as your mud work is the essential to having a smooth

    wall later.o Paint-Repaint your whole wall so that the shade suits. Even if you have actually the paint tinted to match your

    existing wall, the colors may not match 100 %, providing you a blazing pointer of where the fixing took place. While you do not have to, you may elect to paint the whole space to guarantee shade evenness.This method functions well for little drywall fixing tasks, yet in scenarios where there are huge locations of drywall to replace, such as a flooding circumstance, it might be suggested to contact a professional.http:// www.rightwayrestoration.com

    How to Repair Drywall Or Plasterboard Walls

    Drywall is the standard in wall building and construction for a lot of residences and also businesses in the U.S. Its affordable, broad accessibility as well as ease of setup makes it an affordable choice for both home builders as well as house owners. Although drywall has numerous advantages, it has some disadvantages also. Particularly, the material does not stand up well to effects and also water leakages leave huge, unattractive bubbles as well as creases. Relying on the seriousness of the damages, property owners could usually execute drywall repair works themselves. In other cases, it makes good sense to allow a drywall specialist do the work.DIY Drywall Repairs Conserving loan is the primary factor that homeowners attempt to repair drywall themselves. If the damage is small, such as a small opening, the majority of property owners can do the task well. Hardware stores also market patching kits for these small tasks that include every little thing you should repair the drywall. Added assistance can be obtained from Net video clips, as well as home repair books.If the broken location is bigger, such as from a broken water pipe, house owners should very carefully

    think about the advantages and disadvantages of fixing it themselves. Those seeking to build an entirely brand-new residence addition ought to additionally take into consideration the downsides of mounting the drywall themselves. In these situations, hiring a professional might be a much better option. Professionals are also a much better selection for difficult or hard to get to locations, such as ceilings or around plumbing pipes where cutting the drywall is required.Hiring an Expert Drywall Specialist Specialists that help drywall companies may cost you more, however they use numerous benefits over doing it on your own.

    Largely, a completely dry wall surface specialist can complete

    the repair much faster than a nonprofessional. Additionally, they already own all the devices had to finish the work. Many house owners do not have the required tools, which brings about expensive services or purchases. Another advantage is that professionals are adhered as well as insured, which indicates that if they harm your house their insurance coverage spends for it. Fixing do-it-yourself mistakes appears of the resident's pocket.Prices Rates vary extensively when employing drywall companies to carry out repairs, with a lot of the expense being labor. If the repair work is tiny, take into consideration working with a handyman or a general

    fixing

    individual who could perform other house fixings as well. For bigger jobs, such as brand-new additions, ceiling repairs or full wall replacements, work with a drywall firm who focuses on just this kind of work.While drywall installation could look easy, it can in fact be challenging to create a smooth, seamless surface. While some homeowners may enjoy the contentment of taking on the task themselves, others could finish up producing additional troubles to deal with. In a lot of instances, house owners should save themselves effort and time by hiring a specialist to obtain the task done right. drywall repair panel

    Dry Wall Patching - 5 Steps to Successfully Repairing a Hole in the Wall

    drywall supply

    Best Drywall Repair Services Florida

    Drywall repair Riviera Beach – drywall supply

    [post_name drywall patch 

    Repairing a Hole in Drywall

    drywall repair large section

    There are a great deal of benefits of having drywall building in your house. Drywall is basic to place; it is affordable as well as has fire-resistant high qualities. The important things is this sort of wall surface could be painted, backgrounded and textured as well, in addition to it is very easy to repair.The maintenance

    of completely dry wall is trouble-free and also Dry wall Repair service could be done by you. You don't have to employ specialized people, it's that simple!When you are confronted with Dry wall surface Repair work issues like splits on the drywall, holes, damages with leakage of water, troubles of drywall tape, or damage on the ceiling, don't lose sleep. You could recover it and also that too on your own!To repair openings there is a very easy strategy. You will certainly need the fundamental fixing devices like additional drywall panel, sharp knives, joint substance also referred to as drywall mud, measurement range and paint or appearance matching your wall surface. Step the opening to be patched, as well as cut dry wall surface about four inches bigger compared to it. Then, reduced off two inches from all 4 sides of the wall patch, utilizing the gauging scale and blade. Currently, positioning this patch over the opening cut the opening bigger as each the size of the patch.Now all you require to do is layer the edges of the hole with joint substance as well as repair the patch into the opening. Offer the finishing touches like cleaning up the additional substance as well as leave the dry wall to dry. You need to leave it over night. After that apply an additional layer of the compound and also paint once dry.The repair work of splits is also a straightforward issue.

    How to Repair Wet Drywall

    I do not care what your drywall water damage actually is, the initial thing that were going to should do is to learn where the water damage is really coming from. The most usual offender, will certainly be a roofing leak or a pipes supply of water pipeline that is leaking. Allow's come down to the bottom, actually. That's where the majority of the drywall water damage repairs will certainly require to be done.If you have water dripping from your roofing system, there's a great possibility that the drywall ceiling will certainly be harmed and also if it has an acoustical or popcorn kind ceiling structure on it, a large area of the ceiling texture will should be scratched off or gotten rid of as well as after that re-sprayed after the water damages fixings have actually been made.If your ceiling is smooth, this will be the most convenient ceiling fixing that you could make, the majority of the time. Occasionally people get the impression that a smooth water damaged ceiling from a roof covering leakage, will be easier to fix and their right. The issue is, after the repair service has been made, if it isn't done appropriately, the fixing will stand out like a sore thumb.Now what concerning a water damage ceiling that has a light appearance or a heavy appearance. This will typically be the hardest ceiling repair work making. It's hard to match some types of ceiling structures. The heavier the texture, the harder it will be to fix. If you have actually a lightly sprayed orange peel type appearance, you could count on your own lucky. This repair service will usually be simpler to complete than a smooth ceiling repair.You repair the water damages ceiling, and you don't such as exactly how it looks. Right here's the ideal means to repair this issue. You will have to ravel the entire ceiling, making use of drywall joint compound, up until it is completely flat or smooth or scrape all the acoustic old ceiling structure off and also start from scratch.Once the whole ceiling is smooth, you can apply your brand-new structure or acoustic ceiling. Some contractors will in fact figured the task in this way, simply to save themselves a sight of migraines later.If there is various other water damages to the ceiling, you might also think of removing all of the drywall, replacing it as well as re-texturing the whole ceiling. drywall repair large section

    How to Remove Drywall Texture

    drywall patch

    Best Drywall Repair Services Florida

    Drywall repair Hialeah Gardens – drywall

    [post_name drywall 

    Drywall Repair Considerations

    drywall repair how to video

    There are countless reasons that a person would be looking for drywall repairs. Just today I was obtaining a sandwich at a neighborhood eatery and a team of young adults were bragging concerning how they had just completed repairing the walls from a party that obtained out of hand as well as were really hoping that their parents would not discover when they returned; I wonder who will be much more surprised.Doors are well-known for having an animosity against drywall. Individuals have been known to poke, punch and even fall through sheetrock at numerous phases of life. If you have determined to lease a home, you could be obtaining a hard education and learning in just the number of odd as well as motley problems can take place to wall surfaces. Maybe you have acquired your very first home as well as are seeing some fracturing or nail pops -inspect your agreement, a great section of that needs to be covered in your preliminary warranty.Regardless of the source of the damage to your drywall, you now need to

    choose whether it deserves investing your time to repair these areas or if you will certainly work with another person to complete the job for you. Whether you are doing the fixings on your own or reviewing the price with service providers, you might discover these factors practical:1)Absolutely nothing is perfect, largely you are producing the perception of perfection

    , when fixing even a tiny damages you will desire to flare your repair service area so as to obtain a greater surface absorbing the repair. This will certainly aid to draw away the eye from variances that also the best repair service could leave behind.2)If the sheetrock is broken, heavily split or noticeably unequal you probably will require to eliminate as well as re-inforce a section behind the wall board. I have actually located that 1"x3"want is an excellent resource in giving a firm support as well as a lot of space to attach the fixed section to existing drywall. There are some re-inforced surface area patching products, but unless you are made use of to collaborating with these they could be challenging to appearance.3)Hot muds (joint compounds that have actually an established drying out time)as well as aerosol structures are wonderful for smaller sized areas.

    When functioning with hot mud, check the label as well as offer yourself a lot of time before the product solidifies due to the fact that they have the tendency to be a little tougher to tool and tough to sand. The aerosol appearances are wonderful for tiny repairs as they save you from having to obtain your texturing tools out as well as completely dry much faster compared to traditional structure.

    DIY - How to Repair Drywall Seams

    If you have actually been a residence painter for long you have actually definitely entered into some type of drywall repair service on every interior painting job. Actually, if you don't get excellent at understanding drywall repair, your paint works will not be as specialist as they might be.In this write-up I want to reveal just how small drywall repair work works could indicate huge profits for you. I am chatting regarding making $350 to $500 typically for simply 7 - 10 hours of job. Each job is different naturally as well as could become just a $200 repair service or perhaps a $1,500 repair.The fact is that when it involves drywall repair service people constantly call someone to do the work. As a house painter I know that most individuals believe they know ways to painting and also the keyword phrase right here is "believe ". Yet when it concerns things like drywall fixing they go running house to momma.And this is why you can make great money doing small repair jobs like plumbings and also electrical experts do. Things that lots of people are unskilled to do themselves are simple and also very easy for us that choose to focus on them.Some individuals have the loan however do not have the moment and would certainly instead have another person do the work anyway. 99 %of the time though, individuals just aren't sure the trade. Drywall repair work is a secret art. As for the ones that attempt to repair their very own drywall themselves, the task always ends up lousy.Where is the target audience for obtaining organisation? The response is property, light business, rental residential or commercial properties, etc. As a home painter you can be limited to a greater end market if you desire to make professional painters incomes. But no so with drywall fixing. Your market can be low end to luxury merely as a result of the remarkable profits in smaller sized jobs that lots of people can afford.Most of the time you get calls from individuals when they have water damages. Occasionally it is from negligent teenagers roughhousing.

    I had one work where consumed a hole in the ceiling. I would claim that 95 %of drywall repair is from water damage as well as half of that can be from negative plumbing, a dripping shower that should be re-grouted, etc. A dripping roof is normally the other reason.Sometimes you can obtain jobs hanging and also taping small projects like a garage or component of a basement. You do not need to tackle these bigger tasks though. Lots of times individuals wish to market their residence so they are encouraged to repair their walls or ceilings finally.You may ask on your own, if drywall repair works are so straightforward exactly how can I obtain great at doing them? First, You have to learn ways to duplicate a couple of common appearances, which is simple once you determine which

    device was made use of to make it. You will certainly additionally obtain repairs for common drywall holes of all dimensions, that includes plaster( thin collection as well as lathe). And you will certainly have to recognize the best ways to fix loose tape seams.And think it or otherwise, that has to do with all there is to successful drywall repair service. These methods are hidden to the public however easy for you and also I. If you ever have actually seen just what homeowners try to do to fix their very own drywall you will certainly know promptly that this is a simple profitable business.Here is the amazing component. Most drywall fixings that I see look dreadful. Yet the home owner seems happy with it. The task resembles a person can be found in and also slopped a little mud on the ceiling as well as left. Yet the repair guy ran off with something like$200 and the home owner for some odd reason generally assumes the job was done O.K. I have seen this also often.On a major note though, doing good professional looking operate at economical rates will give you lots of referrals and repeat business. If you can find out the basics of appropriate drywall repair service or even do a little repair painting afterward you will certainly do just great. You can indeed earn$30 -$70 each hour as a result of the nature of the work.How can I get company? Buyer overviews, classified ads in position like Craig's Checklist, local on the internet advertisements, small Yellow Pages ads, word-of-mouth, etc. Why should I begin a tiny drywall repair business? Exists a huge future in it? Yes for two reasons. Initially, self-employment is coming to be the new labor force

    and secondly, home repair work will always be with us.Who can do this sort of job? Any individual who likes to bring back points could do well. People who are gifted at home repairs, home painters, drywall, etc. Any person that discovers a few keys to successful drywall repair work. drywall repair boise

    Dry Wall Patching - 5 Steps to Successfully Repairing a Hole in the Wall

    drywall

    Best Drywall Repair Services Florida

    Drywall repair Eustis – drywall patch

    [post_name drywall 

    How to Remove Drywall Texture

    drywall repair self adhesive wall patch

    By the time you complete reading this article, you will have the ability to perform standard repairs to harmed drywall. There are some fundamental tools that you ought to keep around your house, if you have an active household and also are prone to obtain dings in the walls. This write-up will certainly not offer adequate information to do major repairs to drywall. Significant repair services are easy, yet you must find out the fundamentals first.Here is a listing of some devices you will need. Your local large box could supply you with some basic devices. They run in rate range from affordable to professional top quality. They have plastic putty knives for less than a dollar right up to stainless steel that with care, will certainly last a lifetime. If you expect a very small number of repairs, the plastic will certainly be enough. Also, get a carriage screw, a little hammer, a can of drywall joint substance, 150 to 220 grit sandpaper and a paint brush. These standard tools will repair most little dings and dents in drywall.An example of a ding would be where the locking

    switch on a door handle has left an impact in the wall surface behind it. This is common of a quick as well as simple fixing. Check out the damage. Is there anything extending over the wall surface area? If so, use the carriage bolt to press the projection below the wall surface area. Make use of the hammer to assist persuade the protrusion to go listed below the surface of the wall surface and also round the sides. Next off, take the putty blade and some joint compound or as it is frequently called, drywall mud, and fill the opening. Wait till the mud dries out, sand lightly and fill up the opening once again to bring the product to the very same level as the wall. Sand the surface area once more until the wall is smooth as well as degree. Do not over sand. This will harsh up the drywall allowing the paper to battle royal and calling for even more mud to seal the harsh surface area. There should not be any kind of differences in the surface. A number of tiny applications will last a lot longer than one large application as well as give you far better results.Is every little thing smooth? If not, use some even more drywall mud to also the wall surfaces. Sand again. When the wall is smooth, apply the paint guide. When the paint guide is completely dry, apply your routine wall paint. The paint guide is to seal the wall surface so the new paint does moist as well rapidly permitting the patch to be visible.That is the basic method of fixing harmed drywall.

    Repairing Chips and Scratches in Dryall and Wood Work

    There many reasons a person would certainly be trying to find drywall fixings. Just today I was obtaining a sandwich at a neighborhood restaurant as well as a team of young adults were bragging about exactly how they had actually just completed repairing the walls from a celebration that got out of hand and also were wishing that their parents wouldn't see when they returned; I question who will certainly be a lot more surprised.Doors are notorious for having a grudge against drywall. People have actually been known to poke, punch and even fail sheetrock at various stages of life. If you have decided to rent a building, you might be obtaining a hard education in simply exactly how several weird and sundry damages can occur to wall surfaces. Probably you have acquired your first house and are discovering some fracturing or nail pops -check your contract, a good portion of that ought to be covered in your initial warranty.Regardless of the source of the damages to your drywall, you now need to

    decide whether it deserves spending your time to fix these areas or if you will certainly employ someone else to finish the job for you. Whether you are doing the repairs on your own or discussing the cost with specialists, you could locate these points practical:1)Nothing is ideal, mostly you are developing the assumption of perfection

    , when fixing also a little damage you will desire to flare your repair service location so regarding get a higher surface area absorbing the repair work. This will help to draw away the eye from incongruities that even the very best repair can leave behind.2)If the sheetrock is damaged, greatly broken or visibly irregular you more than likely will should remove as well as re-inforce a section behind the wall surface board. I have actually located that 1"x3"ache is an excellent resource in offering a firm backing and lots of area to attach the fixed area to existing drywall. There are some re-inforced surface patching products, however unless you are used to collaborating with these they could be hard to structure.3)Hot muds (joint compounds that have actually an established drying time)as well as aerosol textures are wonderful for smaller sized areas.

    When collaborating with hot mud, inspect the label as well as offer on your own lots of time prior to the product solidifies because they have a tendency to be a little more difficult to tool and also tough to sand. The aerosol structures are wonderful for tiny repair works as they conserve you from needing to get your texturing equipment out as well as dry much faster compared to standard texture. drywall repair dent

    Drywall Repair Tips

    drywall

    Best Drywall Repair Services Florida

    Drywall repair Callaway – sheetrock repair

    [post_name how to repair drywall 

    Drywall Hole Repair Made Easy!

    drywall repair quick dry

    I do not care exactly what your drywall water damage in fact is, the initial thing that were mosting likely to need to do is to locate out where the water damages is really originating from. One of the most usual offender, will be a roof leak or a pipes water pipeline that is dripping. Allow's come down to the base, essentially. That's where most of the drywall water damages repair works will need to be done.If you have water leaking from your roof, there's a likelihood that the drywall ceiling will be harmed and if it has an acoustical or snacks kind ceiling texture on it, a big area of the ceiling appearance will need to be scuffed off or gotten rid of and after that re-sprayed after the water damages repair services have actually been made.If your ceiling is smooth, this will certainly be the easiest ceiling repair work that you can make, the majority of the time. Sometimes individuals obtain the impression that a smooth water harmed ceiling from a roof leakage, will certainly be much easier to fix as well as their right. The trouble is, after the repair service has actually been made, if it isn't really done correctly, the fixing will certainly stand out like a sore thumb.Now what concerning a water damage ceiling that has a light texture or a heavy structure. This will usually be the hardest ceiling repair making. It's difficult to match some kinds of ceiling textures. The heavier the texture, the harder it will certainly be to repair. If you have actually a gently splashed orange peel type texture, you could count yourself lucky. This repair service will typically be much easier to complete than a smooth ceiling repair.You repair work the water damage ceiling, as well as you don't such as how it looks. Right here's the finest method to fix this problem. You will certainly need to ravel the entire ceiling, making use of drywall joint substance, up until it is totally level or smooth or scuff all the acoustic old ceiling texture off as well as begin from scratch.Once the whole ceiling is smooth, you could use your brand-new structure or acoustic ceiling. Some specialists will in fact figured the job by doing this, simply to save themselves a view of migraines later.If there is various other water damages to the ceiling, you might even think of removing every one of the drywall, replacing it and also re-texturing the whole ceiling.

    DIY - How to Repair Drywall Seams

    Drywall is one of the most typical wall lining of the the contemporary house. The drywall is glued as well as nailed/screwed to the hardwood structure of your home and afterwards the joins are after that plastered as well as sander. Throughout the life of any house damage to the drywall will occur usually when the removaling furnishings or playing inside. There are 2 ways to repair this damages - ring a professional and also pay them to fix it or discover how you can fix it yourself. Many fixings are quick and simple to do with a few devices to do the task

    Plaster Kinds

    The first thing you have to know is the kinds of plaster that are made use of to do the Job. There are three main types:

    - Base Layer - A powder that is blended with clean water to make a paste and made use of in joints and also loading holes - collections difficult as well as is difficult to sand.

    - Cornice Concrete - A powder that is combined with water making a paste to adhesive on cornice - smooth gaudy paste that set extremely difficult and is difficult to sand.

    - Ending up Substance - This is premixed in pails and also prepares to make use of straight from the pail - dries (does not set) as well as is extremely simple to sand.

    - Glass fiber tape - This tape is self adhesive and offers strength to the filling plaster or skim coat - only required on larger openings

    To repair a hole of damages to a wall you Will only need skim coat as well as ending up compound.Tools: There a couple of devices that you will certainly need

    to acquire to do the work however these are straightforward and cost-effective --One broad knife 250mm(10inch)broad

    ( looks like a broad paint scarper), one 100mm( 4inch) wide knife, one 100mm (4inch) x 250mm (10inch )towel.You will likewise require to mix the skim coat for bigger

    openings so an electric drill and paint blending accessory is best. Nevertheless the base coat can be blended by hand yet this is slow.For Instance: A hole regarding the size of a tennis round was made while

    moving furniture.Step one: Ensure the opening in the drywall is clean (no sticking out drywall or paint)

    mix your base layer power with clean faucet water to a paste much like toothpaste. Note: if the base layer is as well wet the base layer will certainly befall of the opening. If you find the base coat constantly falls right into the wall surface cavity load the behind the hole with newspaper to sustain the skim coat while it sets. Fill the hole utilizing the smaller wide knife ensuring the opening is filled and also the base coat is flush with the drywall.Step 2: When the first coat of skim coat is set, Cut a tiny quantity of glass fiber tape to simply cover the opening and also carefully put right into area. Blend a little quantity of skim coat and also spread over the tape seeing to it that you spread out the base layer past the tape. The smoother and flatter the 2nd layer is the better the result will certainly be. Let it established from 45 -60 Minutes's. Tip 3: Spread a slim coat of ending up substance with the huge wide blade and let this completely dry.

    The completing substance needs to be spread a minimum of 100mm (4inches )past the base coat.Step 4: Sand your deal with 180 grit sand paper making certain you feather or mix the edges with the existing painted wall surface to ensure that the fixing will not be seen when paintinged. The goal is to sand the repair service as flat as you could and assimilate the sides. After that your repair is ended up as well as prepared to paint.Tip: Remember to clean you devices off with clean water between steps so the plaster does not established on your tools. drywall repair or replace

    Drywall Finishing and Critical Lighting Problems

    how to repair drywall

    Best Drywall Repair Services Florida

    Drywall repair Mount Dora – repairing drywall

    [post_name how to repair 

    How to Repair a Large Hole in a Sheetrock Wall

    drywall repair bradenton

    To fix and also area of drywall that has actually been harmed you will need sheet rock, an energy blade, fast dry-low dust joint substance, mesh tape for drywall, one inch galvanized drywall screws, a drill, drywall knife and also a drywall sanding block. When dealing with joint compound wear handwear covers as well as follow taking care of guidelines for the product when using it for any style ideas.Holes To fix a hole or little to

    tool clinical depression in the drywall, pull out the anxiety and eliminate any loosened items of debris thoroughly. To get behind the wall you may should make use of a wire pole to draw it out. A pole can be made from a strong garments hanger straightened out with a bend at the bottom in the shape of an L. When the clinical depression has been carefully pulled ahead apply the mesh tape throughout the area gently. Use one coat of joint compound in smooth also strokes with spackling device. Enable the joint compound to completely dry inning accordance with item recommendations. Repeat this application until the tape and damage surface is completely covered. If it looks beefy in areas, that's ALRIGHT you could smooth out the irregular areas with a wet cloth once it's completely dried out. After the location has actually healed for a minimum of 1 Day use the sanding block to gently smooth and even out the surface, brush away joint compound dirt with a completely dry fabric as well as use paint. The excellent repair work for room and washroom designs where the doorknob strikes the wall.Sections Cut away damaged sections of

    sheet rock with an energy knife to reveal the mounting stud inside the wall. Complete the raw sides as well as them out with the blade or sanding block. Making use of an item of paper, eliminated a pattern of the location requiring replacement or save the cut away as this will make it easier to measure and also remove the new item of drywall. When the new piece has actually been measured and also cut, put it in the opening and meticulously adjust the sides for a tight fit. Set up brand-new drywall with screws gradually as to not harm the drywall. Apply mesh tape around the raw edges of the joints and also start applying joint substance in smooth even strokes as instructed over. Apply a little dab of joint substance to the screw goes to cover them up. As soon as once again after the joint compound has actually healed, smooth the surface with fining sand block as well as paint with a flat guide layer then use last matching paint for the supreme repair in the washroom, room or living area designs.Dings and also Damages To resurface tiny patches of wall surface that have actually been a little

    damaged initially, gently"harsh"the location with a sanding block, then with a dry cloth, brush away the dirt. Cut a piece of mesh tape to cover just the broken area. Apply joint substance in smooth also strokes, permit remedy time and paint. This fix works fantastic in youngster's bedrooms as well as recreation room layouts.

    Introduction to Drywall Repair Materials

    Drywall Plastering is usually replaced with other kinds of traditional plastering since it is labor intensive as well as costly also. The old made plaster on timber needs 3 layers of plaster and it might not be within the ability of lots of people to do it, and needs specialists a lot of the moment to do even the fixing work.In many new houses today drywall plastering is certainly the preferred wall covering product. It costs relatively less and executes well in many applications. It is likewise simple to mount and the ended up appearance is likewise good, particularly after it is repainted properly.There is paperless DP

    as well. Because there is no paper surface the drywall is covered with fiberglass. The favorable features of the fiberglass surface area are water-resistance and also decrease in the spread of mold.The material utilized to spot the plaster for the openings is special. It is not too challenging to patch plaster walls, yet it relies on the dimension of the holes to be covered. Nonetheless, it is advised not to make use of drywall joint compound as patching material.There are numerous types of devices for this kind of plastering, and they have different degrees of quality.

    If you are interested in doing a great deal of drywall jobs, it deserves purchasing some devices like a variety of joint knives, stilts, a taping banjo or some other unique tools.Drywall plastering is used to end up interior wall surfaces. Yet you have to beware to pick the appropriate sort of smudging for the right place, as

    there are different types. For wet areas there is a special kind of smudging which is moisture-resistant. If you use routine drywall in such areas, it could drop apart.Sometimes even if the plastering is done appropriately, it gets fractures. In such instances the joint substance may hold excessive water as well as then split when it dries out up. Or, because of some movement of the walls cracks can develop.But in fact DP also requires ability. It seems quite easy, but it has to be exercised a few years, prior to it can obtain an excellent look. There are DIY's devices available in the marketplace. Attempt and also avoid the 2 typical mistakes made.

    Never ever deal with bumpy joint substance as well as you need to cope with the suggestion that you could not become a perfectionist in DP after having actually used just a second coat.Drywall ending up techniques could aid you to obtain a professional surface. They are not as simple as they appear to be on TELEVISION or in the Do It Yourself's guidebook. You must obtain sufficient practice collaborating with joint compound and drywall insulation. Actually it needs a great deal of hand-eye co-ordination as well.There are

    some common issues connected with drywall plastering as well as these are sores on the plastering, and also the tape also tends to diminish at places. The blisters take place typically when there isn't really enough joint substance in between the tape and the drywall surface. Here again your hand-eye co-ordination is required. Besides that the mixing of the joint compound is essential, because it should have the ideal consistency. As well as you should also have the right devices to avoid the blisters. drywall repair tips

    Repairing Drywall Water Damage

    how to repair

    Best Drywall Repair Services Florida

    Drywall repair Sebring – drywall

    [post_name how to repair drywall 

    Drywall Water Damage Ceiling Repairs

    drywall repair or replace

    These pointers have to do with how to fix scars and painting chips around the house. Normal wear and also tear creates chips, nicks, and swellings on the walls and timber job when they are encountered. These pointers will certainly help extend the life of your interior paint, as well as prolong the life of the paint to ensure that you do not have to totally paint the inside of the residence as often. Below you will discover some tips on repairing paint chips around your home.How Deep is the

    Chip You need to assess

    the deepness of the chip prior to you just repaint over it. Deep cuts will be nearly as noticeable whether it has matching paint in it or otherwise. There are a variety of items on the market that you could make use of to fill up gouges in drywall or plaster on your wall surfaces and also ceilings. If your gouge is under 1/4 deep use a lightweight spackle, roll the product right into the grove making certain the spackle is happy of the existing drywall. When the spackle is completely dry sand the afflicted area with a fining sand block, about 150 grit. There are likewise simple patches that are readily available if there is a large hole in the wall (more compared to 1 inch in diameter) that can be used, layered with joint substance, fined sand then textured. Generally you will wish to utilize either spackle or joint substance to load these acnes. Joint compound completely dry's slower and shrinks when dry but it is more affordable as well as functions much better with larger spots. Sand them to the degree of the remainder of the wall. As soon as the patch is level you could texture with among those appearance in a could. Make use of the latex one it will certainly make your life a lot simpler with your companion if you do, the various other one has a whole lot of awful solvents in it as well as can make the home extremely unpleasant. See to it you drink it well prior to you use. Use even strokes and make several lite passes as opposed to one heavy pass.Paint chips

    in timber job needs to have the paint that is damaged gotten rid of and after that fined sand down, plume the edges to ensure that there is no ridges from the paint chip. Take care not to sand as well deep, one method is to utilize a sanding backer board, this will spread out the sanding over a broader location and also it will certainly not "dish" the location that is being treated. Prime with a oil base guide, when completely dry, sand with 220 grit paper until smooth as well as flat. Wipe clean with a tack fabric and also paint the surface layer on the timber work. If your patch requires a second layer sand with 220 grit and recoat.Matching Color Paint keeps for many years, so when you do

    paint purchase an added gallon when you are purchasing your paint and also save it for touch ups. Most property owners will keep extra paint, so even if you bought your house with the existing shade on the walls, look around for additional paint. Another way of having the ability to reproduce your paint is by copying down the color code that is placed on the side of paint can. When you go as well as get the brand-new paint blended ensure you get the very same luster, as well as manufacture. Different codes for different makes, they do not always cross reference the various colors. You could utilize this paint to touch up chips and also dings in the paint around the residence. If you do not have accessibility to matching paint, draw a paint chip bizarre regarding the size of a silver dollar and take it to your neighborhood paint store or house improvement shop. They will, usually, have the ability to match the paint color practically specifically, or at the very least close sufficient that any distinction is not noticeable. One of the advantages of taking in an example is that the color of your wall surfaces will alter with time, the sunlight discolors the wall surface and tiny hands have the tendency to darken them.Old Repaint While paint does maintain for an extended period of time, you may have to doa little service

    the paint to make it usable once again. First, you will intend to completely stir the paint. A mixer made use of with your drill or also an affordable hand mixer could make brief work of extensively mixing the paint and also remixing any parts that have actually separated. If you have lumps and dried bits in the paint, pour it with a cheese towel to strain out lumps.Brushes and Rollers When painting and priming drywall and also plaster use a roller, bristle brushes frequently

    leave brush strokes where ever before you make use of

    them, as well as this could be an obvious indication that there has actually been a repair task done. Make use of an excellent PVA guide on any kind of drywall patches that you have actually made. The bare drywall takes paint at a different price compared to the unpainted area. PVA primer permits the surface paint to be taken in at the same price. A little paint roller or a sponge brush will leave a structure that will certainly much more easily assimilate with any kind of bordering texture, extra properly hiding any kind of imperfections. After the major component of the spot has been paintinged make use of the roller, without adding anymore paint to it, to dry present around the spot. This will blend the colors into the existing wall paint as well as further concealing your patch.Paint your timber deal with a top quality bristle brush, brush with the grain, not against it. For the ideal results a spray finish is needed, yet that is for another article.Good good luck on your patching and painting, and also keep in mind, if you don't such as the outcomes you could constantly call a professional to do the job.

    How to Install Your Own Drywall

    An opening in your roof covering is a whole lot even worse compared to one in the wall. When it comes time to deal with a hole on the in of your home, calm down, it's not all that bad or that hard to fix it if you have some devices as well as the moment to persevere. Drywall repair service could seem unreachable to the property owner, especially if you have never done it in the past. Allows assembled a fast check listing of products you will have to obtain this done ...

    • An item of drywall a little larger than the opening itself, take notice of the thickness
    • A drywall saw, a sharp kind saw that you could push into the wall to cut
    • Scrap item of thin timber or various other product to screw right into
    • Handful obviously drywall screws
    • A putty knife 2" - 4", metal or plastic
    • Drywall substance or 'Mud'
    • 100 grit sandpaper

    Usually, repairing drywall is a numerous step procedure. Suggesting that the very first step is getting a substitute item of drywall to fit over the hole dimension depending exactly how huge it might be. That was the very first step ... sounded like a great deal of job ...

    The staying steps are utilizing drywall compound (mud) to putty knife over the screws that are sunk just listed below the surface area as well as the seams of the repair piece. Use just enough mud to a little load the dimples due to the fact that you will mud over them once more after they dry ... typically over night (perhaps much faster).

    When you make sure the openings are loaded you will certainly have to sand the excess mud down flush with the wall. Slide your turn over your job ... does it feel smooth/ equivalent or does it have a bump to it? Get the surface to match the surrounding area as well as you are done with the exception of the paint to match your wall.This technique

    takes a few times to obtain the hang of it yet, it is absolutely do-able by the homeowner. Larger holes are approached likewise ... you are simply covering more location and you will certainly have the framework in the wall surface to attach the drywall to. I hope this was effective as though you may wish to attempt this kind of repair work on your very own eventually. For a more thorough check out this repair, check out the website listed below.

    drywall repair average cost

    Does Your Concrete Foundation or Drywall Have Cracks?

    how to repair drywall

    Best Drywall Repair Services Florida