[post_name drywall mud How to Repair Drywall Or Plasterboard Walls

Drywall patching calls for persistence and determination. I am going to break the procedure down easily so you will certainly be much more notified prior to you begin your following completely dry wall surface patch.One point you must consider when functioning with drywall is the DIRT. If you are sensitive to the drywall dirt or gypsum you may wish to obtain a particle mask, safety goggles or handwear covers as well as wear a long sleeve shirt for defense. Remember to safeguard any kind of furniture that you wish to keep dirt cost-free, too!Step1: prep the
opening or location to be patched.If the opening or area to be patched has loose wall board paper you will need to remove the loosened paper and gypsum. Now if the wall surface board paper intends to continue wrecking the side of the wall, a method to stop this is the take a razor blade as well as cut down from the loose location concerning an inch or two. What you are doing is racking up the wall so when you tear of the loose paper it will certainly concern the racked up line and not tear further causing a larger location to need spot job. If after you have removed the loosened paper and also the gypsum board beneath is crumbled and also barely hanging to the wall surface, you need to knock senseless all the loose plaster. Loosened paper and plaster will certainly create the drywall compound to not bond highly and may produce a bubble you will see just after covering with substance. As component of the prep, you may wish to square up the opening so you could extra easily reduce the piece of sheetrock that will certainly fill the void.OK so the area is prepped as well as now we will certainly need to relocate to step 2, which will advise you on
ways to appropriately connect an item of sheetrock cut to fill up the opening in your wall or ceiling.Step 2: back framing the opening to affix the sheetrock you will reduce to load the void.Just like with new building and construction you will certainly have to have timber framing to screw the sheetrock into. To describe, I will utilize an example
patch location of one foot by one foot. You will certainly have to reduce a 2x4 into 2 16 "lengths. You will certainly require to gather a cordless or electrical drill as well as regarding a loads 1 1/4" wood screws. Take among the 2x4's you have actually cut as well as glide it in the hole as well as behind the existing sheetrock, along one side of the opening. The factor the 2x4 is much longer(16 ")compared to the 12"hole is since we will certainly extend it a few inches beyond the top as well as base. So currently you have a 2x4 inside the wall on one side, the 2x4 should be laying flat versus the in of the wall surface, it will not be transformed so the 4 "width of the 2x4 is flat against the inside, this will offer us a larger surface area for add-on as apposed to the typical method of mounting which would certainly be with the 2"width encountering the sheetrock. You will intend to eyeball, best as feasible the 2x4 and also divided the difference of the board width between the existing sheetrock as well as where you will attach the item of sheetrock you will certainly reduce for the patch. Now that the 2x4 is kept in the appropriate position you will require to screw the 2x4 right into the existing drywall by holding firmly to the board as well as screwing right into it with the face of the existing sheetrock. You will put two screws along the edge and one on the top and base of the existing sheetrock to highly safeguard the 2x4 to approve piece of sheetrock you will certainly cut. Once you have finished one side, repeat the exact same procedure beyond. So when you have actually completed back framing you currently have a strong structure to connect the patch piece of sheetrock. * Note-if you have a hole to spot where there are framing, electrical or mechanical concerns in the manner in which keep you from moving the 2x4 behind the wall surface to screw down the side, you can screw in the top and base of the 2x4 and this will certainly suffice. You could also consider attaching the 2x4 back framing throughout the top as well as bottom of the hole as apposed to attaching the 2x4's on the sides, simply use the same instructions of accessory for the sides or top as well as bottom.Now that the prep and framework are full next we will certainly reduce a piece of sheetrock to place into the mounted opening symphonious 3. Action 3: take a dimension of the hole and also cut an item of sheetrock to
fit and also protect it.It does not have to fit extremely limited however it will should fit and be screwed to the
back framing you mounted. You should put 2-3 screws down each side attaching the item of sheetrock you reduced to the framing. * Note-all the screws will certainly should be "established"below the surface area of the sheetrock however not deep sufficient that the screw head rips the paper face on the sheetrock, unset screws will certainly reveal and also hinder the following step. ** Note sheetrock can be found in two thicknesses for the majority of household building -1/ 2" and also 5/8 ". 1/2"is typically on the indoor walls/ceilings and 5/8"is made use of on underside of stairways and also in the garage.Well you're making progress as well as you have actually filled deep space with sheetrock, currently we will move on to the
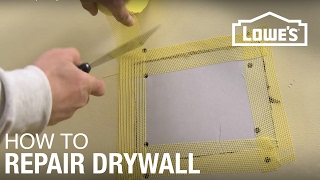
finishing or completing phase of the completely dry wall compound(mud )clarified symphonious 4. Step 4: coating the patch with drywall substance (mud). As I was claiming symphonious 3 the piece of sheetrock you cut to load the opening does not need to fit very limited. If the sheetrock you cut has a void around the
border/joint of it and also where it fulfills the existing wall board, you ought to pre fill the area before applying the drywall tape. So just take a little substance and fill in the edges and smooth the excess level wit the wall surface, enable to completely dry. Following is to use the drywall tape so that after we are all finished there will not be a crack around the joint of the patched opening. For spot work I prefer to make use of a"mesh "or "fiber" tape, it provides a more powerful hold and also the mesh tape is a lot more flexible than regular drywall tape, in the because you do not have to pre mud the wall to adhere the tape. The mash tape has a sticky support, so all you do is reduced the mesh tape to the length you need, stick it on the wall with the center of the mesh tape running right in accordance with the joint or fracture. The mesh tape must always run past the joint at the very least an inch. Repeat this procedure for all four sides of the spot. Following use a coat of substance around the boundary of the patch, over the mesh tape. The mesh will be slightly noticeable after only one layer. * Note-If you relate to much compound(mud )you will certainly have a bulge in the surface. Permit this layer to dry, sand lightly, mostly to knock of any kind of blade edges that dried in the compound and also could trigger the following layer to develop to much. You do not intend to try and mud the spot in simply 1 layer, it is much better to use a moderate/thin layer allow to completely dry, sand and coat once more. Besides the coats( at least two) have actually dried out and you are pleased that the surface area is coated uniformly, sand the mud to even the surface. * Note -a less compared to ideal layer job can be smoothed out with sanding. Fining sand along the outside side of the mud too, will certainly blend the patched area better right into the existing surface area. An actually neat technique seeks you have sanded the spot, take a damp sponge or cloth as well as"clean" the outside mud of the spot mixing it even much better right into the existing surface area, this technique will aid you avoid seeing a mud line around the patch when it is completed. If your home has a smooth structure, this is the last action, your prepared to painting. If you do not have a smooth appearance you will certainly should check out on.Only another step and also the drywall component of your patch will certainly be complete, structure. We will discuss various textures and the best ways to apply the symphonious 5. Tip 5: there are several appearances and you must first recognize the best ways to recognize your existing texture before going forward.Older houses could have a swirl, crows foot, hand or smooth texture. Newer residences essentially make use of smooth, orange peel, knockdown and hand appearances. For a crows foot you will require a crows foot or trample texture brush. For swirl texture you might need to seek advice from a dry wall supplier store for the proper appearance brush or trying out a few different brushes. For a hand appearance you could make use of a completely dry wall blade or trowel. All of the above discussed textures require a device or brush to use drywall substance to accomplish the structure. The following 2 textures could be purchased in a spray can, orange peel as well as tear down. * Note- with all appearances it is great to get an old piece of plywood or cardboard as well as experiment first to locate the appropriate quantity of pressure, density of mud, strategy and established time to create the ideal planning to ideal conceal that a repair was ever before made. As constantly if you texture the wall surface and also are not delighted with the outcomes you could was the texture of right away with a damp sponge of cloth, enable to completely dry as well as try texturing once again or sand of a bad texture if you are not pleased with it after it has actually been permitted to dry. * Note- Knockdown appearance size could be adjusted by allowing the splashed on texture established up or completely dry for much less or even more time depending upon the desired look.We have gone over the 5 steps needed to professionally fix a drywall patch. 1 )correctly prep the location to be covered. 2)back mount the opening. 3 )size and cut the sheetrock to load the opening. 4 )use mesh tape as well as mud to smooth the surface. 5)pick and apply proper texture.So head out and" obtain your drywall on". You can have a look at my post on paint wall surfaces if you need assistance with the painting. Feel cost-free to leave a remark about other subject you would like me to compose on relating to drywall. Please have a look at our website, dennardbloss.com, it
is everything about our construction coatings.
Drywall Repairs Made Simple
Should you attempt to do-it-yourself or employ a drywall contractor? The response depends upon the dimension as well as sort of the required repair work. If the task is big and also needs specialized expertise, equipment and a significant investment of your time, you could desire to employ a drywall contractor. However, scratches, damages as well as small to medium sized opening fixings could be easily mastered by even the beginner.Drywall is really among the biggest innovations ahead along within the last 80 years. And for some great factors; it is an affordable wall surface covering that increases quickly. It is neutral as well as can be enhanced to specific preference. The creation of drywall conserved professionals and also homeowners hundreds of bucks in building and construction costs and repairs.Drywall, or gypsum board, is constructed from a crumbly fire immune compound that is covered in a thick paper covering. It is extremely sturdy as well as could be conveniently cut, sawed, pierced, curved, nailed, glued, screwed, painted on as well as papered over. It even assists to appear proof and insulate an area. But also as sturdy as it is, eventually, you'll have to spot some area of drywall in you home or business.Commonly, you will be dealing with one or more of 3 various types of wall surface openings-nail holes as well as damages, small doorknob dimension holes and bigger openings brought on by fists and furnishings. In this write-up I'll clarify a really straightforward repair service method for a small drywall holes. This will work wonderful on openings less compared to 6 inches, such as doorknob holes.THE "HAT PATCH"REPAIR WORK METHOD Utilizing a keyhole saw, cut a square around the hole(the hole is now square ). Keep it as small as possible. Sand the sides to the hole lightly to eliminate burrs from the sawing. From a new item of drywall, reduced a square item of drywall concerning 3 inches larger than the opening that you're trying to cover. (Now follow me very closely here, due to the fact that in this next step you're going to remove some of the drywall support from your brand-new patch.)TURN THE NEW PATCH OVER as well as reduce 1-1/2 inches on each side with a razor knife. Be very mindful not to cut completely via the face paper (you desire to leave the dealing with paper undamaged). Now thoroughly peal the 1-1/2 inch items off the face paper and also throw out. Clean the rear of the face paper on the spot to remove small bits still attached.Place joint compound around the sides of the opening for at least 2 inches on each side. Make certain to mud the raw sides of the old drywall. Place the patch right into the opening as well as drag mud down each side. Now cover the entire location with a very slim coat of mud and let it dry. When completely dry sand the area extremely lightly.If necessary, use a 2nd layer as well as allow it to completely dry. Sand the area lightly and you prepare to paint.If this appears extra difficult that you 'd like, your neighborhood equipment store will certainly offer you a drywall repair service set. The packages are available in numerous dimensions and kinds for different applications. Just follow the supplier's instructions and also you ought to be ready.

DIY Versus Professional Drywall Installation and Repair
Drywall repair Orlando - how to repair drywall