[post_name how to fix a hole in the wall Drywall Plastering - A Great New Method

Sheetrock is a sort of drywall as well as is produced and also a trademarked item by US Gypsum Firm, one of the leading vendors of drywall worldwide. It is also described as plaster wallboard. Sheetrock is a mix of natural plaster, water, and sand that is pressed between 2 hefty sheets of paper. It is a building material that is used globally to construct building elements like ceilings as well as wall surfaces. It was created in 1916 however it took one more thirty to forty years prior to it caught on with builders, that had traditionally built walls from plaster.Benefits of sheetwork vs plaster & bull; It is faster to install sheetrock compared to it is to
• mount plaster & bull; Sheetrock could be repainted or primaried right away after• it has actually been set up so the building of the office or home can be continued with no hold-up. With plaster it requires days or even weeks to entirely dry & bull; Plaster considers greater than sheetrock so there is much less deterioration on the
• structure's structure as well as architectural systems & bull; There is a higher degree of fire-resistance with sheetrock compared to there is with platter. This could provide the ones in the building more time to leave the structure safely in an emergency situation like a fire.Size of sheetrock The conventional sheet of sheetrock measures four feet by eight feet yet for structures with specialty requirements
or have high ceilings the contractor can get bigger areas. Generally, the indoor wall surfaces of a structure are constructed from drywall that is one-half inch thick. If the building's wall surfaces are going to undergo even more damage, the builder could find thicker sheets of five-eights thick. If there is a rounded wall surface, a building contractor can make use of sheetrock that is quarter inch thick. The sheets of sheetrock could be shaped because they are reasonably flexible.Types of sheetrock There are various sorts of sheetrock that can be used for different applications. & bull; Traditional-it is normally fire-resistant however the builder could pick Type-X,
which is fire-rated sheetrock. This sheetrock is boosted with vermiculite as well as perlite to boost its resistance to fires and also heat.
• Building contractors utilize Type-X drywall in business buildings, which has fire-rated ratings from twenty to one hundred eighty minutes. & bull; Greenboard-this gets its name from its eco-friendly paper finishing, which is a product that is moisture-proof as well as is used in restrooms and also cooking areas. & bull; Blueboard-this is the type that a home builder would certainly select if the owners want the wall surfaces to have the appearance of plaster. & bull; Soundboard-this sort of sheetrock is created to obstruct the transmission of audio between different rooms.
• It could be mounted in numerous layers making sure that the degrees of noise could be kept.
Does Your Concrete Foundation or Drywall Have Cracks?
Drywall patching calls for persistence as well as determination. I am mosting likely to damage the process down quickly so you will be more notified before you begin your following completely dry wall patch.One point you must take into consideration when dealing with drywall is the DUST. If you are sensitive to the drywall dirt or plaster you might want to get a bit mask, safety and security goggles or gloves and also put on a lengthy sleeve tee shirt for defense. Do not forget to protect any type of decor that you wish to keep dust complimentary, too!Step1: prep the
opening or area to be patched.If the opening or location to be patched has loose wall board paper you will should eliminate the loose paper and also gypsum. Now if the wall surface board paper wishes to continue wrecking the side of the wall surface, a way to quit this is the take a razor knife as well as cut down from the loose area concerning an inch or two. Just what you are doing is racking up the wall surface so when you tear of the loose paper it will certainly concern the scored line as well as not tear additional creating a larger area to need patch job. If after you have removed the loose paper and also the gypsum board underneath is crumbled as well as hardly hanging to the wall surface, you require to knock senseless all the loosened gypsum. Loose paper and also gypsum will cause the drywall substance to not bond strongly and may create a bubble you will see just after layer with compound. As component of the preparation, you might wish to square up the hole so you could more conveniently cut the piece of sheetrock that will fill the void.OK so the location is prepped as well as currently we will certainly have to relocate to tip 2, which will advise you on
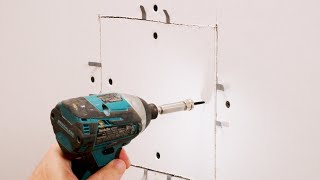
the best ways to appropriately attach an item of sheetrock cut to fill the hole in your wall or ceiling.Step 2: back framing the opening to connect the sheetrock you will reduce to fill up the void.Just like with new building you will certainly need to have wood framing to screw the sheetrock into. To explain, I will certainly utilize an example
patch location of one foot by one foot. You will certainly require to cut a 2x4 right into two 16 "lengths. You will should gather a cordless or electrical drill as well as concerning a dozen 1 1/4" wood screws. Take among the 2x4's you have actually cut as well as slide it in the hole and also behind the existing sheetrock, along one side of the opening. The factor the 2x4 is longer(16 ")than the 12"hole is due to the fact that we will certainly expand it a number of inches beyond the top as well as base. So now you have a 2x4 inside the wall surface on one side, the 2x4 needs to be laying flat versus the within of the wall surface, it will certainly not be turned so the 4 "width of the 2x4 is flat versus the in, this will certainly give us a larger surface for add-on as apposed to the basic means of framing which would certainly be with the 2"width facing the sheetrock. You will desire to eyeball, best as possible the 2x4 and split the difference of the board size between the existing sheetrock and also where you will attach the piece of sheetrock you will reduce for the spot. Since the 2x4 is held in the correct position you will need to screw the 2x4 right into the existing drywall by holding securely to the board as well as screwing right into it through the face of the existing sheetrock. You will put 2 screws along the side as well as one on the top as well as bottom of the existing sheetrock to highly protect the 2x4 to approve piece of sheetrock you will certainly cut. When you have actually finished one side, repeat the exact same treatment on the various other side. So when you have actually ended up back mounting you currently have a strong structure to affix the patch piece of sheetrock. * Note-if you have a hole to spot where there are framing, electric or mechanical issues in the means that keep you from moving the 2x4 behind the wall to screw down the side, you can screw in the top and also base of the 2x4 and this will suffice. You may additionally think about affixing the 2x4 back mounting across the top and base of the opening as apposed to connecting the 2x4's on the sides, simply make use of the exact same instructions of attachment for the sides or top as well as bottom.Now that the preparation and framing are total next we will certainly reduce an item of sheetrock to put into the mounted opening in step 3. Step 3: take a dimension of the hole as well as reduced an item of sheetrock to
fit and also protect it.It does not need to fit very limited yet it will certainly have to fit and be screwed to the
back framework you installed. You must put 2-3 screws down each side affixing the item of sheetrock you reduced to the framework. * Note-all the screws will require to be "set"below the surface area of the sheetrock but not deep sufficient that the screw head rips the paper face on the sheetrock, unset screws will certainly show and also interfere with the following action. ** Note sheetrock is available in 2 thicknesses for the majority of household construction -1/ 2" as well as 5/8 ". 1/2"is typically on the interior walls/ceilings as well as 5/8"is made use of on underside of stairs and also in the garage.Well you're making progression and also you have actually loaded the space with sheetrock, currently we will certainly go on to the
finish or ending up phase of the completely dry wall surface compound(mud )clarified symphonious 4. Step 4: covering the spot with drywall compound (mud). As I was saying symphonious 3 the item of sheetrock you reduced to load the opening does not need to fit super limited. If the sheetrock you reduced has a void around the
border/joint of it and where it fulfills the existing wall surface board, you ought to pre fill the location before using the drywall tape. So simply take a little compound as well as fill in the edges as well as smooth the excess level wit the wall surface, enable to completely dry. Following is to apply the drywall tape to ensure that after we are all finished there will certainly not be a split around the joint of the patched hole. For patch job I prefer to utilize a"mesh "or "fiber" tape, it supplies a more powerful hold and the mesh tape is a lot more flexible than routine drywall tape, in the since you do not have to pre mud the wall to stick the tape. The mash tape has a sticky backing, so all you do is cut the mesh tape to the size you require, stick it on the wall surface with the center of the mesh tape running right in line with the joint or split. The mesh tape should always run past the joint a minimum of an inch. Repeat this process for all four sides of the spot. Following apply a coat of compound around the border of the patch, over the mesh tape. The mesh will certainly be a little noticeable after just one layer. * Note-If you put on much substance(mud )you will have a bulge in the surface. Permit this layer to dry, sand lightly, mostly to knock of any kind of blade borders that dried out in the compound and also could cause the following coat to accumulate to much. You do not intend to attempt as well as mud the patch in just 1 coat, it is better to use a moderate/thin coat allow to dry, sand and layer once again. Besides the coats( a minimum of two) have actually dried out and also you are satisfied that the surface is coated uniformly, sand the mud to even the surface area. * Note -a much less than excellent layer work could be smoothed out with sanding. Fining sand along the outdoors edge of the mud also, will certainly mix the patched area much better right into the existing surface area. An actually neat method seeks you have actually fined sand the spot, take a damp sponge or cloth and"laundry" the outside mud of the patch mixing it also better into the existing surface area, this trick will certainly help you avoid seeing a mud line around the spot when it is completed. If your house has a smooth appearance, this is the last action, your all set to painting. If you do not have a smooth appearance you will should read on.Only one more step as well as the drywall part of your spot will certainly be total, structure. We will certainly discuss different structures as well as how to apply the in action 5. Step 5: there are several appearances as well as you must first understand the best ways to recognize your existing texture before going forward.Older residences could have a swirl, crows foot, hand or smooth texture. More recent houses for the many part utilize smooth, orange peel, knockdown as well as hand appearances. For a crows foot you will certainly need a crows foot or stomp structure brush. For swirl texture you could have to get in touch with a completely dry wall distributor shop for the correct appearance brush or experiment with a few different brushes. For a hand structure you could make use of a dry wall knife or trowel. All the above stated textures call for a device or brush to use drywall substance to achieve the texture. The next 2 textures can be bought in a spray can, orange peel and tear down. * Note- with all appearances it is good to obtain an old piece of plywood or cardboard and also experiment first to find the best quantity of pressure, thickness of mud, strategy and also established up time to develop the right seek to ideal hide that a repair was ever before made. As constantly if you structure the wall surface and also are not pleased with the results you could was the appearance of promptly with a damp sponge of dustcloth, permit to completely dry as well as try texturing once again or sand of a bad texture if you are not pleased with it after it has been enabled to completely dry. * Note- Knockdown appearance dimension can be adjusted by allowing the sprayed on structure established or completely dry for much less or more time relying on the wanted look.We have actually gone over the 5 actions should expertly repair a drywall patch. 1 )correctly prep the area to be patched. 2)back frame the opening. 3 )dimension and also reduced the sheetrock to fill the opening. 4 )apply mesh tape as well as mud to smooth the surface. 5)pick as well as apply suitable texture.So head out as well as" obtain your drywall on". You could have a look at my short article on paint wall surfaces if you require assistance with the painting. Do not hesitate to leave a comment concerning any kind of other subject you would like me to write on referring to drywall. Please have a look at our site, dennardbloss.com, it
is all regarding our building surfaces.

DIY - How to Repair Drywall Seams
Drywall repair Largo - drywall patch