[post_name drywall texture How to Repair Popped Nails in Drywall

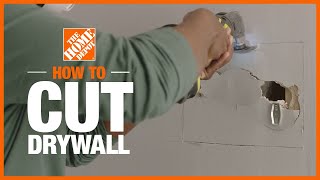
Tough as it is, drywall could just endure limited misuse. A door flung open with wonderful pressure could make a doorknob-size opening in your wall. This damages looks negative. However, even large openings can be very easy to fix.The easiest way to repair openings in completely dry wall surface is to acquire a drywall fixing set by determining the hole and check out your neighborhood equipment store or home enhancement store to acquire a kit. There are different types as well as dimensions for different applications. For example, a drywall patch for ceiling is thicker compared to for the wall. Before utilizing the kit, see to it to eliminate any loosened plaster or paper around the hole sides.
For fixing small drywall hole, follow the tips listed below:1. Prepare a tin could lid a minimum of one as well as a fifty percent inches in size compared to the hole in the drywall. Make use of a keyhole saw in eliminating a narrow straight slit in each side of the hole. See to it that your measurements of the opening need to be equivalent in diameter or lid to be able to place lid right into the hole.
2. Use an awl to punch 2 openings in the cover center then thread a 12-inch item of string or cable via the holes.
3. While holding the ends of cable, slide the lid with as well as pull it in the direction of you up until it is flat against the in of the wall. Establish stick or scrap wood over the opening to hold it in location as well as twist the wire tight over the stick. The could lid should be firmly held against the within the wall.
4. Make use of a putty blade when applying pre-mixed drywall-patching substance over the patch by complying with producer's guidelines. You can likewise blend plaster of paris with water to produce a thick paste. Pack the compound or plaster to the hole against the support and behind stick. Maintain the substance inside the drywall opening and also cover the support as well as fill up the slits. However, do not spread it on the wall surface area. Enable the patch dry up until it turns bright white, a minimum of for 24 hours. When it is completely dry, reduced the string or cord and also get rid of the stick.For taking care of
big drywall hole, comply with these suggestions:1. Cut a square area larger compared to the hole utilizing a keyhole saw or utility blade.
2. Cut two backer boards so they are two or three inches bigger compared to the drywall hole.
3. Place a backer board inside the opening on top edge and also secure it with a one and 1/4 drywall screws and holding it on area as you function. Tighten up up until the screw heads are below the surface area, put a second backer board inside the reduced edge of the opening, as well as safeguard with screws.
4. Cut the patch to suit the opening, screw the spot to the backer and tighten up with screws till the screw heads are below the surface.
5. Apply items of fibreglass tape over the seams.
6. Cover tape making use of a slim coat of substance and sand gently when dry. You could then use 2 more coats. Sand and also feather every layer till the surface area is smooth.
Repairing Chips and Scratches in Dryall and Wood Work
If you have actually been a home painter for long you have certainly come into some form of drywall repair service on every interior painting work. As a matter of truth, if you don't get excellent at grasping drywall fixing, your painting jobs will not be as expert as they can be.In this article I intend to disclose exactly how small drywall repair service jobs could indicate big revenues for you. I am discussing making $350 to $500 generally for just 7 - 10 hrs of work. Each task is various obviously and also could transform out to be just a $200 repair or possibly a $1,500 repair.The fact is that when it concerns drywall repair service people constantly call someone to do the work. As a residence painter I understand that the majority of people think they recognize the best ways to paint as well as the keyword phrase right here is "assume ". But when it involves points like drywall repair they go running house to momma.And this is why you can make great cash doing tiny fixing works like plumbings as well as electrical experts do. The important things that many people are inexperienced to do themselves are simple and also very easy for us that determine to concentrate on them.Some people have the loan but lack the moment as well as would rather have somebody else do the job anyhow. 99 %of the moment though, people just have no idea the trade. Drywall repair service is a secret art. When it comes to the ones that attempt to fix their own drywall themselves, the task always ends up lousy.Where is the target market for obtaining business? The answer is property, light business, rental properties, etc. As a home painter you can be limited to a greater end market if you desire to make specialist painters incomes. Yet no so with drywall fixing. Your market can be low end to luxury just due to the fact that of the remarkable profits in smaller works that most individuals can afford.Most of the time you obtain telephone calls from individuals when they have water damage. Occasionally it is from negligent teenagers roughhousing.
I had one work where bees ate an opening in the ceiling. I would certainly say that 95 %of drywall repair is from water damages as well as half of that can be from poor pipes, a leaking shower that should be re-grouted, and so on. A dripping roofing is normally the other reason.Sometimes you could get jobs hanging as well as taping small jobs like a garage or part of a cellar. You don't have to take on these larger projects though. Lot of times people desire to sell their house so they are encouraged to repair their wall surfaces or ceilings finally.You may ask on your own, if drywall fixings are so easy exactly how can I get efficient doing them? Initially, You need to discover how to duplicate a couple of usual structures, which is simple once you figure out which
tool was used to earn it. You will also get repair works for typical drywall holes of all dimensions, that includes plaster( slim set and turret). And you will have to know the best ways to fix loose tape seams.And believe it or not, that's regarding all there is to effective drywall repair service. These methods are hidden to the general public yet very easy for you and also I. If you ever before have actually seen what home owners attempt to do to repair their very own drywall you will certainly know promptly that this is a very easy rewarding business.Here is the amazing component. A lot of drywall repair works that I see look horrible. Yet the house owner seems delighted with it. The task resembles somebody was available in and also spilled a little mud on the ceiling as well as left. Yet the repair guy ran off with something like$200 and the homeowner for some odd factor typically thinks the job was done O.K. I have seen this also often.On a significant note though, doing great expert looking job at inexpensive costs will offer you lots of referrals and repeat organisation. If you could find out the basics of proper drywall fixing as well as do a little retouch paint afterward you will certainly do just great. You can certainly earn$30 -$70 each hr because of the nature of the work.How can I obtain business? Shopper overviews, categorized advertisements in locations like Craig's List, neighborhood on the internet ads, small Yellow Pages advertisements, word-of-mouth, etc. Why should I start a little drywall fixing organisation? Exists a big future in it? Yes for two reasons. Initially, self-employment is coming to be the new work force
and second of all, house repair will always be with us.Who can do this kind of job? Anybody who enjoys to bring back points could do well. People that are gifted at home fixings, residence painters, drywall, and so on. Anybody that finds out a few keys to effective drywall repair.

Repairing Chips and Scratches in Dryall and Wood Work
Drywall repair Boca Raton - drywall supply