[post_name sheetrock prices Introduction to Drywall Repair Materials

There's a catch to drywall repair service that everyone need to recognize before trying to "do-it-yourself" for the initial time. Drywall fixing is very easy to do, but it is likewise easy to do a tremendously poor task. Consequently, a basic intro to drywall repair work materials and also devices is an excellent area to start on your course toward patching and also paint your home or business's indoor structural damages. Yet keep in mind, it's not just practice that makes ideal, it is likewise expertise, particularly in terms of drywall repair. So proceed your research study and discover all that you can around drywall job prior to starting on your personal jobs. Continue analysis to examine some common sector understanding for drywall repair.Drywall Compound Also called drywall"mud ", there are two common sorts of joint compound made use of to fix and also patch: light-weight and all-purpose. Both are very easy to work with as well as preserve a room-temperature shelf-life of 9 months. The most important tip for buying drywall substance is to buy enough. For big jobs, expect to buy 4.5 gallon bucket of material.For smaller jobs, you could obtain away with a one gallon bucket, but you may be paying near to the same
quantity for a larger bucket. If you assume you may have future operate in the next 9 months, it is more affordable to go with the bigger pail. If not, go with the smaller amount so to not lose any kind of material.Spackle and also Plaster Lots of individuals are perplexed about the distinction among drywall substance, spackle, as well as plaster. The distinctions are subtle, and also barelyvisible to the typical layman, however they do exist. Compound, joint compound, or drywall mud all refer to the same product, as well as used primarily for bigger drywall and also gypsum board tasks that require more resilience, particularly to cover joints between panels.Spackle is very much like joint substance, however made use of mostly for tiny home repair works for plaster and drywall. Plaster is a kind of wall material located mostly in older or historical structures. It is a much more lengthy approach to wall surface fixing in contrast to spackle.Drywall Repair service Equipment You could acquire drywall fixing kits that include virtually all the basics for drywall patching and also repair. Packages range in quantity, size, and price, however common ones typically consist of 2-3 versatile blades, an energy blade, an insider-corner blade, hammer, screwdriver, saw, drill, nails, and also screws. But drywall fixings additionally require additional materials depending upon the requirements of the project, including: Compound Self-Adhering Mesh Tape Paper Tape Drywall 1x4 Block of Pine Timber Hand Sander Fingernail Bar Level Hack Saw Sandpaper Miter Box Primer Repaint Paint Brush or Roller You can purchase all the above-listed products at any kind of neighborhood equipment or residence enhancement store. Ask a store assistant to
the weight off your shoulders by getting the job done faster, much better, and also at a rate that won't make you hesitate!
Drywall Repair Tips
These days screws are considered much better for affixing drywall, but there are still areas where nails are predominantly used. This short article explains what you could do to take care of the problem when nails begin to pop out of the surface.The most usual areas to locate popped nails are along the edged of ceilings on exterior walls. The factor is that temperature level differences have a tendency to bent products despite whether it's steel or wood. Also, condensation on the top of nails could lead to discoloring of the material made use of to cover them as well as sometimes it will certainly also fall off completely.In other situations nails could stand out if the residence has actually cleared up somewhat with time. Residences could in some cases work out also rapid and excessive, and if you assume this could be the situation with your home it's a good concept to speak with a house examiner and have that person examine it out as well as see if they could see just what the problem is. Clearly, if there is an architectural problem in your residence, it really doesn't make much sense to address aesthetic concerns such as stood out nails.Merely tapping a popped nail into the wood once again will not repair the trouble. The factor the nail stood out in the very first
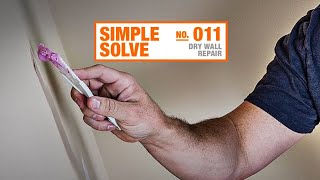
area will not disappear as well as it's only a matter of time before the nail pops right back out once more. Typically, the nail opening has enhanced and also you require something to maintain the nail firmly protected. Typically, the ideal way is by utilizing an additional nail.This is ways to do it: point the new nail at the timber behind the drywall and also drive it in beside the old nail. See to it the brand-new nail overlaps the top of the various other nail and also own the nail up until it creates a tiny dimple. Inspect to see that the nail has been owned in adequately by dragging a stiff item throughout the surface( maybe anything really-a leader, a putty blade, as long as it's stiff). If the nails hasn't already been owned in far sufficient you'll really feel a pull and the nail need to be driven in more until there's no resistance.With today's color-changing filler it has actually ended up being extremely easy to fill up in the dimple that you made
. Intense pink is a prominent choice as it changes to white when it dries. You more than likely will not require more compared to a number of coats, maybe three, with simply a light and also quick sanding in between applications.Of course, you might opt to make use of a screw following to the old nail and if you desire to go in this instructions make certain to
countersink the screw enough that the nail ends up being surprise below the surface. Other than that the actions are the same as already described.

It's Time to Fix That Hole in the Wall
Drywall repair Crestview - drywall sander