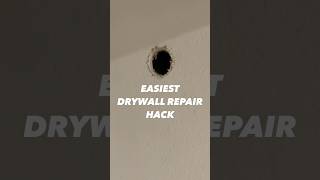
[post_name ceiling texture Drywall Repair Tips

Do it yourself drywall installation is among the more practical jobs you could tackle as a property owner. Whether you have actually obtained a ceiling that's been harmed by a leaking roof or a/c frying pan, or some new walls that become part of a renovating task, at some point, you'll require drywall job on your house. The excellent thing is; with the ideal knowledge, the correct tools, as well as some method; nearly anybody can do it. The fundamental point you have to understand include:
Materials-This might appear very noticeable, but there are a couple of various alternatives.
- Thickness-Drywall or sheetrock can be found in 1/4", 1/2", and also 5/8" densities. One of the most typical in household is 1/2". 5/8" is more generally utilized in business work and also is a demand of building codes in numerous locations due to it's greater fire immune score. 1/4" is primarily made use of over various other products such as paneling or plaster when a different kind of wall surface is preferred. If you're doing a spot or repair; examine the thickness of the existing drywall prior to acquiring your brand-new product to insure that it matches.
- Application-The majority of walls as well as ceilings will certainly have conventional grey sheetrock. However, in high dampness locations, such as washrooms and kitchens; use the much more water resistant eco-friendly rock. There is also, now, a drywall which contains the same sort of concrete fiber materials made use of in ceramic tile backer boards for usage on walls that will certainly completed with tile.
- Joint Compound-Likewise called sheetrock mud, this is the crucial aspect to a successful do it yourself drywall installation. This will be available in pre-mixed paste like kind in boxes or pails or powdered, in bags, that must be blended with water. There are likewise fast drying out kwikset materials that can be made use of for patches and repair services.
- Joint Tape-This can be bought in the typical paper form, which should be used with joint substance or in fiber tape, which is frequently made use of out of commission because it eliminates one step of the procedure.
- Nails or Screws-Commonly, nails have been utilized in household job and screws in industrial (because of the usage of steel studs. Nonetheless, screws have actually ended up being more in property as a result of the rate of screw guns.
- Drywall Knives-These kinds of blades are not used for reducing, however for spreading the mud, taping the joints, and floating and skimming; and also, in fact look like a spatula greater than a blade. They can be found in a variety of widths from regarding 3" (made use of for taping joints) as much as 12" (for drifting and also skimming). You will, most likely, need a minimum of 3 dimensions for any kind of job, as each skim layer obtains a little larger.
- Mud Pan-These lengthy rectangle-shaped pans can be found in steel or plastic and are used for holding the joint substance. They're narrow enough to hold with one hand, while making use of the knife with the other.
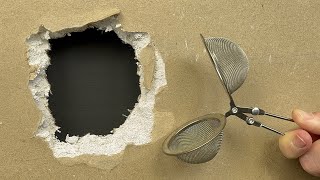
- Energy Knife/Sheetrock Saw-Most of the cutting of sheetrock is now performed with utility knives with compatible blades. Modification them as frequently as required for a clean easy cut. Sheetrock saws are lengthy (concerning 10") triangular saws with little takes care of and are utilized mainly for reducing openings for plumbing as well as electric.
- High Powered Drill & & Paddle Little bit-If you're doing a tiny fixing; you can blend the mud manually with a drywall blade. However for larger do it on your own drywall installation tasks, it's important that you have a strong adequate drill to blend the mud with a paddle for the proper uniformity and also to remove swellings.
- Protect it Good-Don't cut corners on nails or screws. You do not desire movement when someone raids the wall. Cannot effectively fasten it will certainly result in fractures in the mud.
- Expect Intermediaries-Maintain a close eye on buttons, plugs, and phone jacks. They're very easy to hide and also hard to discover later.
- Have Enough Help-Sheetrock is heavy. Make certain you have somebody to aid you hold it while you get the screws or nails in. This is particularly true when hanging ceilings.
- Countersink the Bolts-See to it the nails or screws permeate past the surface area to make sure that they can be covered with mud.
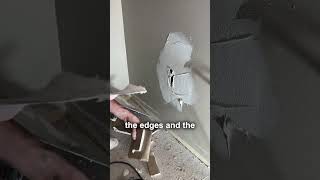
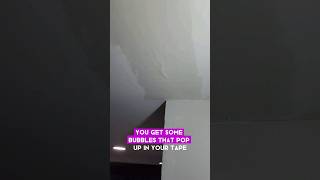
- Tape the Seams-This could be finished with either the paper or fiber tape. With paper, spread out a slim layer of mud over the seam, the, utilizing a drywall blade; press the tape into the mud and also over the joint. After that utilize the blade to remove the excess mud. When this procedure is completed; you have to wait for the mud to dry prior to using the very first skim coat. The benefit of the fiber tape is; it sticks to the sheetrock without the need for mud. So, you could quickly apply a skim layer.
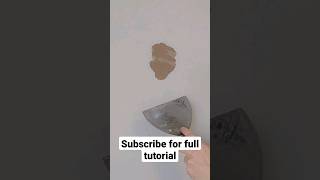
- Drift and Skim-This could be performed in one layer or it could take 2 or 3. The concept is to have an even surface area without surges, bumps, and dips. One of the secrets to a successful do it on your own drywall installment is blending the mud to the best consistency so it spreads out quickly. The other is just good old made method. Some individuals take to it quicker than others. But, the extra you do it, the better you'll be.
Drywall Repair - How to Make an Extra $300, $600 and More Per Week Specializing in Drywall Repair
Drywall installment is one of the most usual house renovation tasks many home owners find themselves confronted with. Whether you're changing drywall in your residence or adding a brand-new wall surface as part of a bigger house enhancement task, you could locate on your own in a situation where you have to change drywall in your house. This article covers a few pointers for ensuring the finish on your drywall repair is done appropriately so it will certainly blend in with the remainder of your home.Gather the Right Equipments and also Materials There are a few devices as well as
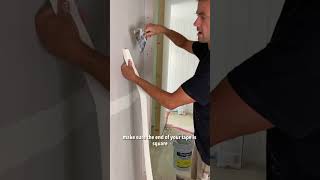
products you'll have to tackle your drywall job. Initially, you wish to have enough joint compound for the task ... approximately 1 gallon for each 100 square feed of location. Obviously, you'll additionally need a mud pan or similar container to hold the joint compound as you use it. Furthermore, you'll need a number of taping knives or putty knives. I recommend having a narrow one as well as one that's a little bit broader for feathering out the seam. You'll likewise need drywall tape to leave the joint. Finally, you'll need sandpaper or something much like sand down the joint substance between coats after it dries.Applying the First Coat of Mud The first thing you intend to do is apply the drywall tape along the seam between the 2 items of drywall or sheetrock. Aim to do this so the joint leaves the facility of the tap. Once the tape remains in area, you could begin using joint substance utilizing one of the putty blades. Freely apply the joint substance as you run along the size of the seam as well as make certain the joint substance gets pressed right into the seam to fill up the gap. Likewise, make certain you cover all of the tape with joint compound. You could wish to stumble upon the length of the seam numerous times with joint compound, feathering out the mud as you remain to do so. You could take care of the corners similarly, by taping as well as applying joint substance to the joint that forms the corner in between both pieces of drywall. Last, you'll want to likewise apply joint compound to any type of nails holding up the items of drywall. Merely use your putty blade for this while using a liberal quantity, then smoothing it out with the edge of the blade. After that let the joint substance dry.Applying the 2nd as well as 3rd Coats You'll intend to apply concerning 3 layers of joint substance. After the very first coat dries out, make sure to sand down the joint substance on the joints and the nails before proceeding. This will certainly make sure that the surface area is smooth asyou use the next layer. After that apply a second coat of joint substance to the seams likewise as the initial layer , however spreading out the joint substance out broader as you leave the seam. Do the same for the nails as well as let this layer dry . As you most likely presumed, using the 3rd layer is the precise same process.Getting Ready to Paint When you have actually used the 3rd coat of joint substance as well as allow it completely dry, make certain to sand around the edges of the seams as well as nails one last time to guarantee the surface is as smooth as feasible. You'll additionally wish to clean down the wall with a completely dry dustcloth to obtain eliminate any dirt that is on the surface.Now you prepare to prime and painting your wall surfaces.

Is It Time To Do Some Repair Work On Your Drywall?