Drywall repair Lake Park town – hanging drywall

[post_name drywall texture 

DIY - How to Repair Drywall Seams

drywall repair video

An opening in drywall might show up to many people to be hard to fix, but in reality it is a basic fix that the majority of home owners could fix themselves. The fixing strategy outlined in this write-up takes a few hours, but if done properly will leave you with a level, smooth wall. There are 7 steps that you should follow in order to accomplish a terrific repair work on your drywall.1.

Mark off the location to be covered. Utilize a square to note off a location a little bigger compared to the opening that you are fixing.2.

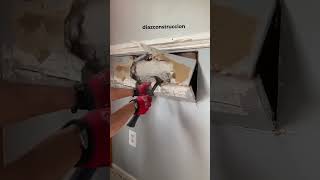
Making use of a drywall knife, cut around the 4 sides that you have already noted off, leaving you with a square opening in the wall.3.

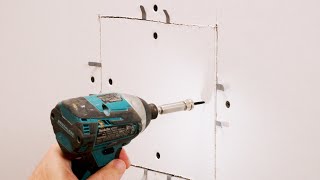
Prepare a piece of wood to enhance the spot. To do this, reduced a thin strip of 1x2 or 1x4 a little larger compared to the elevation of the opening. Slide the timber into the hole as well as position it so that the timber extends equally above and also listed below the opening. Attach the wood using drywall screws attached through the surrounding drywall.4.

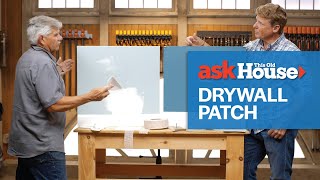
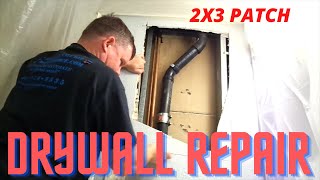
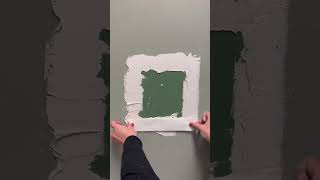
Create a drywall patch for the hole. Utilizing a measuring tape, utility blade and also a square cut an item of drywall to fit within the hole.5.

Protect the spot making use of drywall screws attached via the reinforcement board that you have currently installed. Screw down the spot up until it is flush with the surrounding wall surface.6.

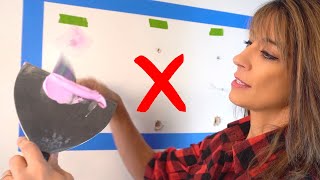
Spread a slim coat of joint compound on the spot using a drywall knife. If necessary, use drywall tape around the perimeter as well as spread on one more slim coat of joint substance. Let the area dry and then sand the location making use of a fine grit sandpaper.7.

After the joint compound is entirely dry, apply another coat of joint substance utilizing the drywall blade, assimilating the fixed area with the bordering wall surface. Enable to completely dry completely and also sand again with fine grit sandpaper. When you have actually completed the steps, you must have a smooth patch.All that is

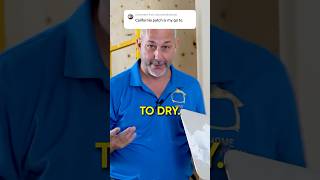
left to do now is paint the fixed location and your job is full. To do this you should prime the recently repaired location initially. You could use a latex based primer to do this such as Kilz or Zinsser. After topping the fixed location and permitting it to completely dry, you are all set for the finish layer. If you have retouch paint it could not match perfectly since even indoor paint will certainly discolor over an amount of time. If your paint does not match, there are two different alternatives. The initial alternative is to paint the entire room which is another task entirely or you can painting from corner to edge of the fixed wall surface. I would certainly suggest you to attempt as well as paint from corner to edge of the repaired wall first as well as if it does not match with the rest of the room you can always paint the whole room.So the following time you have some damage to your sheetrock, if you adhere to these actions you need to have no problem repairing it to its original state. Excellent good luck.

Sheetrock - What Is It?

Drywall is the standard in wall surface construction for a lot of houses and organisations in the United States Its reduced expense, large availability and simplicity of installment makes it an inexpensive alternative for both building contractors and property owner. Although drywall has many benefits, it has some drawbacks also. In certain, the product does not stand up well to effects as well as water leakages leave huge, unappealing bubbles as well as creases. Relying on the extent of the damages, house owners can often perform drywall repair services themselves. In other instances, it makes good sense to allow a drywall contractor do the work.DIY Drywall Services Saving money is the primary reason that homeowners try to fix drywall themselves. If the damages is minor, such as a little hole, the majority of house owners can perform the task well. Hardware stores also sell patching kits for these little works that include everything you require to repair the drywall. Extra assistance can be gotten from Web videos, and also residence repair books.If the damaged location is larger, such as from a busted water pipeline, homeowners should carefully

consider the advantages and disadvantages of repairing it themselves. Those seeking to build an entirely brand-new home enhancement ought to also think about the disadvantages of setting up the drywall themselves. In these instances, working with a specialist may be a much better selection. Specialists are additionally a better option for difficult or hard to reach locations, such as ceilings or around plumbing pipelines where reducing the drywall is required.Hiring an Expert Drywall Specialist Experts that work for drywall firms may cost you a lot more, but they offer many advantages over doing it yourself.

Primarily, a completely dry wall professional can finish

the repair much faster than a nonprofessional. Furthermore, they currently own all the tools should complete the task. A lot of homeowners don't have the essential devices, which causes expensive services or acquisitions. Another benefit is that professionals are adhered as well as guaranteed, which implies that if they damage your house their insurance coverage spends for it. Fixing do-it-yourself errors comes out of the resident's pocket.Prices Rates differ commonly when hiring drywall firms to carry out repairs, with the majority of the cost being labor. If the fixing is tiny, consider employing a handyman or a basic

repair

person who could do various other household repair services as well. For bigger tasks, such as new enhancements, ceiling repair services or complete wall substitutes, employ a drywall business that concentrates on just this kind of work.While drywall installation might look easy, it could in fact be complicated to develop a smooth, smooth surface. While some house owners might delight in the contentment of tackling the task themselves, others may wind up developing extra issues to deal with. For the most parts, home owners ought to save themselves effort and time by hiring a specialist to obtain the work done right. drywall repair on textured wall

How About That Drywall Repair?

drywall texture

Best Drywall Repair Services Florida

Drywall repair Dade – sheetrock prices

[post_name sheetrock prices 

Drywall Mudding and Taping - A Simple Process For Do-It-Yourself Homeowners

drywall repair or replace

If your residence is old or was built making use of less-than-stellar products and also workmanship, you may see cracks, openings, or water damage in your drywall. Some drywall fixings are simple to earn on your very own, if you have the right devices as well as products and a little residence renovation experience. However in various other cases, the trouble could be severe or considerable enough to necessitate employing a professional. When deciding about Do It Yourself vs. specialist repair services, consider the extent of the task, your experience degree, and just what you want to invest to obtain the job done right.DIY Drywall Fixing Small fractures and nail openings are relatively very easy to fix, if the problem is localized and also not a sign of a bigger building concern. Making use of drywall substance, drywall tape, and a drywall blade, you could patch over harmed locations. As a whole, it's ideal to use the drywall substance in a number of layers, letting each layer dry and sanding it smooth before applying the following layer. Keep in mind that you may have to fill up in splits as well as apply drywall tape prior to patching them over. If you do not have these devices as well as products handy, but you're positive you could manage the wall repair work on your own, you could check out a local residence renovation shop for guidance on just what to use as well as how to proceed.Professional Drywall Repair work A large, creeping crack or a protruding location of drywall can indicate a deeper issue within your walls. Perhaps the drywall has changed because of dampness or bad installation. Perhaps the drywall was not securely screwed in when it was first set up. There might be lots of factors for a significant drywall problem, as well as patching it over will just postpone required repairs-and could make them more considerable when the moment comes. If you have a fracture progressively proceeding down a wall, a blemished location of ceiling, an unequal bulge where there was not one before, or an actual hole in the drywall, it's time to contact a drywall repair work specialist to examine the circumstance. These pros are experienced in diagnosing and also solving ceiling and also wall concerns. They can think of a strategy of activity that entails not just visual repairs, but additionally architectural fixings, as needed.Health Factors to consider If you opt to finish wall as well as ceiling fixing on your own, you must be aware of wellness factors to consider associated with functioning with drywall components. Drywall fining sand dirt can be a respiratory system toxic irritant, so it is very important to constantly put on a mask throughout and also after sanding. Drywall particles can stick around in the air as well as on floorings as well as furnishings after the job is done, so make certain to allow everything resolve as well as to vacuum extensively. In addition, note that big pieces of drywall are really hefty; keep kids and also animals from rooms where drywall is being replaced or set up, in situation an item of drywall tips over. Take all needed safety and security precautions to shield the health of on your own, your household, and your pet dogs.

Drywall Repair Questions Answered by a Professional

Drywall is the criterion in wall surface construction for the majority of homes and also companies in the United States Its inexpensive, wide schedule and convenience of installation makes it an inexpensive alternative for both building contractors as well as house proprietors. Although drywall has several advantages, it has some disadvantages as well. In certain, the material does not stand up well to influences and water leaks leave huge, unsightly bubbles as well as wrinkles. Depending upon the seriousness of the damages, homeowners can typically do drywall fixings themselves. In other cases, it makes sense to allow a drywall specialist do the work.DIY Drywall Repair works Conserving cash is the major reason that house owners try to fix drywall themselves. If the damage is minor, such as a small opening, many homeowners could execute the job well. Equipment stores also sell patching sets for these little works that consist of everything you should fix the drywall. Added help could be acquired from Internet video clips, and also home repair work books.If the damaged area is bigger, such as from a damaged pipes, home owners ought to carefully

consider the pros and cons of repairing it themselves. Those looking for to develop an entirely new house enhancement must likewise consider the downsides of installing the drywall themselves. In these instances, working with a professional might be a much better choice. Professionals are likewise a much better choice for complicated or difficult to reach areas, such as ceilings or around plumbing pipes where reducing the drywall is required.Hiring a Specialist Drywall Professional Experts that function for drywall companies may cost you more, but they provide lots of benefits over doing it yourself.

Mostly, a dry wall specialist can complete

the repair much faster than a nonprofessional. On top of that, they already own all the devices needed to finish the job. A lot of homeowners do not have the essential tools, which brings about pricey rentals or purchases. An additional advantage is that experts are bonded as well as insured, which implies that if they harm your house their insurance spends for it. Repairing do-it-yourself blunders comes out of the resident's pocket.Prices Rates differ commonly when working with drywall companies to carry out fixings, with a lot of the cost being labor. If the fixing is tiny, think about working with a handyman or a basic

repair service

person that can perform various other household fixings as well. For bigger works, such as new additions, ceiling fixings or complete wall substitutes, employ a drywall firm that focuses on just this kind of work.While drywall installment may look very easy, it could really be challenging to create a smooth, seamless finish. While some property owners could relish the contentment of dealing with the job themselves, others might end up developing extra issues to take care of. In many cases, homeowners should save themselves time and also initiative by working with a professional to obtain the task done right. drywall repair tips

Drywall Repairs

sheetrock prices

Best Drywall Repair Services Florida

Drywall repair Okeechobee – drywall texture

[post_name drywall 

How to Repair a Large Hole in a Sheetrock Wall

drywall repair dent

Drywall imitates a sponge, taking in dampness at every possibility. When drywall splashes, it swells and bends, endangering the honesty of your wall surface. This permits the underlying structures to experience extended direct exposure to moisture and also begins the decomposition process, ultimately decomposing the whole structure. Drywall is a functional building material, though. Drywall that has actually obtained damp could be repaired with a little recognize how.In order to repair wet drywall, follow the listed below steps:

o Eliminate around the impacted drywall with a drywall saw. These handsaws are marketed reasonably at any type of neighborhood hardware shop. Make certain that you reduce away all impacted drywall by preserving wide margins around the defect.o Determine the source of the water. This action is somewhat very easy if your drywall was influenced by an outside force like rainfall, flooding, or a broken hot water heater, yet could be a little bit much more evasive if you have a roof or plumbing trouble. If you could not determine the root cause of the water, ensure you call a professional.o Replace the damp

drywall with completely dry. On a new item of drywall, define a spot of new drywall in the very same measurements as the old and cut out with a razor blade or drywall saw as well as screw into the open hole. If there is no wall stud behind the open location, removed the existing drywall up until there is a subjected stud on either side of your repair.o Apply drywall mud. Joint substance of drywall mud is used in layers. Make the first layer the thickest, covering all of the joints thoroughly and enable to completely dry. Do not stress way too much about making the compound completely smooth as there will be numerous layers of mud and also fining sand prior to you reach your finished coat. All the mud to completely dry then sand smooth. Run your hand over the joints, feeling for low or high areas as well as mark with a pencil. Continue sanding high spots then add a brand-new layer of mud over the whole repair, focusing on including compound to the low areas. Repeat this process up until your fixing is level with the existing wall.o Suggestion: Take your time with this action, as your mud job is the crucial to having a smooth

wall later.o Paint-Repaint your entire wall surface to ensure that the color suits. Also if you have the paint tinted to match your

existing wall, the colors might not match 100 %, providing you a glaring reminder of where the repair work took place. While you do not need to, you may choose to paint the whole room to make sure shade evenness.This strategy works well for small drywall repair work jobs, yet in scenarios where there are large areas of drywall to change, such as a flooding scenario, it may be suggested to speak to a professional.http:// www.rightwayrestoration.com

DIY - How to Repair Drywall Seams

These pointers have to do with how you can repair scars and also paint chips around the home. Regular deterioration develops chips, nicks, and swellings on the wall surfaces as well as timber job when they are encountered. These ideas will certainly help prolong the life of your interior paint, and also prolong the life of the paint to make sure that you do not have to entirely repaint the inside of the home as regularly. Right here you will certainly find some suggestions on fixing paint chips around your home.How Deep is the

Chip You have to examine

the depth of the chip prior to you just painting over it. Deep gouges will certainly be almost as noticeable whether it has matching paint in it or not. There are a number of products on the market that you can utilize to load cuts in drywall or plaster on your walls and also ceilings. If your gouge is under 1/4 deep use a light weight spackle, roll the item right into the grove seeing to it the spackle boasts of the existing drywall. As soon as the spackle is dry sand the affected area with a fining sand block, concerning 150 grit. There are also basic spots that are available if there is a large hole in the wall (greater than 1 inch in size) that can be used, layered with joint substance, fined sand after that textured. Generally you will certainly want to make use of either spackle or joint compound to fill up these imperfections. Joint compound dry's slower and diminishes back when dry yet it is cheaper as well as functions much better with bigger patches. Sand them down to the degree of the rest of the wall. When the spot is level you can structure with one of those texture in a canister. Utilize the latex one it will make your life a great deal easier with your mate if you do, the other one has a great deal of horrible solvents in it as well as can make the home very unpleasant. See to it you tremble it well before you apply. Use also strokes and also make a number of lite passes rather than one heavy pass.Paint chips

in timber job should have the paint that is damaged eliminated then sanded down, feather the sides so that there is no ridges from the paint chip. Make sure not to sand as well deep, one technique is to utilize a fining sand backer board, this will certainly spread the sanding over a more comprehensive area as well as it will certainly not "dish" the area that is being treated. Prime with a oil base primer, when dry, sand with 220 grit paper up until smooth and also level. Wipe tidy with a tack fabric and paint the finish coat on the wood work. If your spot requires a second layer sand with 220 grit and recoat.Matching Color Paint keeps for years, so when you do

painting acquire an added gallon when you are acquiring your paint and also wait for touch ups. A lot of homeowners will certainly keep spare paint, so also if you acquired your house with the existing shade on the walls, browse for added paint. Another way of having the ability to duplicate your paint is by replicating down the shade code that is placed on the side of paint can. When you go as well as obtain the brand-new paint blended see to it you obtain the very same sheen, as well as manufacture. Various codes for different manufactures, they do not always cross recommendation the various colors. You could utilize this paint to retouch chips and also dings in the paint around the residence. If you do not have access to matching paint, draw a paint chip off the wall surface about the size of a silver buck as well as take it to your regional paint store or house improvement store. They will, normally, have the ability to match the paint color almost exactly, or at the very least close enough that any kind of difference is not recognizable. One of the benefits of absorbing an example is that the color of your walls will alter with time, the sunlight discolors the wall surface and small hands have the tendency to dim them.Old Repaint While paint does maintain for an extended period of time, you may have to doa little work on

the paint making it usable once more. Initially, you will intend to thoroughly mix the paint. A mixer made use of with your drill or also a cheap hand mixer could make short job of completely mixing the paint and remixing any type of components that have actually divided. If you have lumps and also dried out bits in the paint, pour it via a cheese towel to stress out lumps.Brushes as well as Rollers When paint as well as priming drywall and plaster use a roller, bristle brushes regularly

leave brush strokes where ever before you utilize

them, and this could be an indication that there has been a touch up work done. Utilize a great PVA guide on any type of drywall patches that you have made. The bare drywall takes paint at a different price compared to the unpainted area. PVA primer enables the finish paint to be soaked up at the same price. A small paint roller or a sponge brush will leave a texture that will certainly more conveniently assimilate with any type of surrounding appearance, more effectively hiding any defects. After the main component of the patch has been painted utilize the roller, without adding anymore paint to it, to completely dry turn out around the spot. This will certainly mix the shades into the existing wall paint and further hiding your patch.Paint your wood collaborate with a top quality bristle brush, brush with the grain, not versus it. For the best results a spray coating is called for, but that is for an additional article.Good luck on your patching and also painting, as well as bear in mind, if you do not like the results you could always call a specialist to do the job. drywall repair boise

Is It Time To Do Some Repair Work On Your Drywall?

drywall

Best Drywall Repair Services Florida

Drywall repair West Palm Beach – wall patch

[post_name general labor 

Drywall Finishing and Critical Lighting Problems

drywall repair dent

Drywall installment is just one of one of the most typical residence renovation tasks several home owners locate themselves encountered with.  Whether you're changing drywall in your residence or adding a new wall surface as component of a larger home enhancement task, you may find yourself in a circumstance where you have to change drywall in your house.  This write-up covers a couple of pointers for ensuring the finish on your drywall repair service is done correctly so it will mix in with the remainder of your home.Gather the Right Equipments and also Products There are a couple of tools and also

materials you'll need to tackle your drywall task. Initially, you wish to have sufficient joint substance for the job ... approximately 1 gallon for every single 100 square feed of location. Naturally, you'll also need a mud frying pan or comparable container to hold the joint compound as you use it. On top of that, you'll need a few taping blades or putty knives. I suggest having a narrow one and one that's a little bit broader for feathering out the joint. You'll additionally need drywall tape to leave the seam.  Ultimately, you'll need sandpaper or something much like sand down the joint substance between coats after it dries.Applying the First Layer of Mud The initial thing you desire to do is use the drywall tape along the joint between the 2 pieces of drywall or sheetrock. Attempt to do this so the joint runs along the facility of the tap. Once the tape is in location, you can start using joint compound making use of one of the putty  knives. Freely use the joint substance as you run along the size of the joint and also make certain the joint substance gets pushed into the seam to load the  gap. Additionally, make sure you cover all the tape with joint compound. You might wish to run throughout the size of the joint a number of times with joint compound, feathering out the mud as you remain to do so. You could take care of the edges the very same way, by taping and also using joint substance to the seam that forms the edge between the two pieces of drywall. Last, you'll desire to additionally apply joint substance to any kind of nails standing up the pieces of drywall. Simply utilize your putty knife for this while using a liberal amount, then smoothing it out with the side of the blade. After that let the joint substance dry.Applying the Second and also 3rd Coats You'll wish to use about 3 coats of joint compound. After the very first layer dries out, be certain to sand down the joint compound on the joints and the nails prior to proceeding.  This will certainly make sure that the surface is smooth asyou use the next layer. Then use a second layer of joint substance to the seams similarly as the very first coat , but spreading out the joint substance out broader as you run along the seam. Do the same for the nails as well as allow this layer completely dry . As you most likely guessed, applying the 3rd layer is the exact same process.Getting Ready to Repaint When you have actually applied the third layer of joint compound and also let it dry, be certain to sand around the edges of the joints and also nails one last time to make certain the surface area is as smooth as possible.  You'll likewise desire to wipe down the wall with a completely dry dustcloth to obtain eliminate any dust that gets on the surface.Now you prepare to prime as well as paint your walls.

How to Repair a Drywall Hole

Fixing fractured drywall joints could be annoying at ideal. If there is only an extremely, really little fracture present, you may have the ability to scratch out the crack to a wider size and after that just apply brand-new spackling substance. Utilizing a sharp, sharp tool such as an old made can opener (church secret), scrape placed a groove broader and somewhat longer than the split. It should go to least 1/8" deep but much deeper is much better. There are covering compounds available today made just for covering cracks yet are not intended for big areas. If this is a repainted wall surface some quantity sanding will certainly also be required. Spackle will not adhere to a smooth painted surface. Sand the location around the crack at least a number of inches wider than the fracture then proceed and also use the patching compound making certain you force the spackle down right into the split. Right after applying the spackle, re-wipe the location with your knife to remove any kind of excess spackle from the location leaving a level surface. Depending upon what kind of compound you bought the drying out times differ rather a little bit from minutes to hours. After the spackle is entirely dry usage a 100 or 120 grit drywall fining sand paper to smooth area so it is flush with the existing wall surface. Prime the drywall as well as mount the last paint.In an instance

where the splits are a lot bigger along the seams, it may triggered by the drywall tape pulling loose, physical damage or maybe also excess wetness. Meticulously get rid of any type of and all loosened products at taped areas. You could not and also I repeat, can not re-spackle old tape. The drywall tape has minute holes that enables the spackle to pass through and also secure the tape to your seams. The spackle "wets" the tape aiding it not just to stick to the drywall yet enables the spackle to form a bond on both sides to the drywall. Once it is used, the openings are filled up thus making the tape useless. Aiming to route will only trigger the seam to re-crack later.After eliminating all loosened materials, lightly sand the harmed locations being mindful not to tear or sand with the paper layer of the drywall below. When the location is smooth to the touch make certain you have fined sand uniformly onto the surrounding area so as not to leave a side that will show through the ended up job. Making use of a 6 inch broad spackle knife, mount an also coat of new spackle over the seam. Put your brand-new drywall tape over the seam and utilizing the knife, push the tape strongly into the drywall removing all excess spackle as it ejects from under the tape and also sides of the knife. Do not get rid of way too much spackle so about leave the paper completely dry. Once the area is as smooth as you could make it, apply a second lighter layer over the exact same area making certain the brand-new tape is completely embedded in fresh spackle.After drying for eventually to assure all the spackle is completely dry, re-sand the

whole location to once more obtain a smooth feeling to the whole fixed area. Using your twelve inch blade, spread a 2nd coat to the entire repair work making certain you blend smoothly into the adjoining wall surfaces. Do not leave any kind of ridges or sharp edges where you meet the old wall surface finish.Once this 2nd layer of spackle is completely dry, which will be much less than the skim coat as it is much thinner, apply, utilizing your twelve inch blade, a 3rd extremely slim coat of fresh spackle. You will almost be able to see through this layer as it is used to fill up little indents or scrapes left by fining sand the 2nd coat. Once again after the 3rd coat dries, really lightly sand the repair for the last time to guarantee a completely smooth ended up area. Apply a coat of drywall primer to secure the recently fixed drywall location and then painting your wall.If the drywall seams have entirely cracked or divided open there could be a structural issue that has to be re-mediated before you repair the drywall joints. Building settlement, foundation issues or various other items might effect the drywall completes so make sure they are fixed first.Once you make certain there are no other problems present, as in a minor fixing, remove all loose or broken materials. If the drywall itself is fractured, reduced the drywall back to a stud and also install a brand-new item of drywall. The fixing is the very same as a small split just on a much bigger scale.Installing little pieces of drywall for patching develops just what are called butt joints which are much harder to conceal. You will certainly be forced to spread your spackle over a much larger location to

acquire a smooth look as well as not a bump in the wall. With method you can do this job and also conserve on your own a large amount of money.If you are in a rush and the repair service is relatively small, there are quick drying out materials readily available such as Durobond 90 which when contributed to spackle makes the spackle rock hard in ninety minutes. There is also a forty-five minute kind available but only masters should try and also use it. Forty-five mins zips really quick. When I state it dries rock hard, it is nearly difficult to sand when dried out so any type of tiny problems left in the surface area with your knife will certainly show later. Be careful.Remember to keep your devices clean, do not tear open coulds or covers with your blades as it will damage or chip the edges of the knives and also work as clean as you can to avoid tedious clean-up later. drywall repair in bathroom

Drywall - Methodologies and Benefits

general labor

Best Drywall Repair Services Florida

Drywall repair Fort Myers – drywall repair

[post_name general labor 

How to Repair Popped Nails in Drywall

drywall repair video

These days screws are taken into consideration much better for attaching drywall, however there are still areas where nails are primarily utilized. This article defines exactly what you could do to repair the issue when nails begin to bulge of the surface.The most usual places to locate popped nails are along the edged of ceilings on exterior wall surfaces. The factor is that temperature level distinctions often tend to turn products despite whether it's metal or wood. Additionally, condensation on the top of nails can bring about discoloring of the product utilized to cover them and in some cases it will even drop off completely.In various other situations nails may pop if the residence has actually cleared up to some degree with time. Houses could sometimes clear up also fast and also excessive, as well as if you believe this may be the case with your house it's a great idea to speak with a house inspector and have that person check it out and see if they can see what the issue is. Certainly, if there is an architectural issue in your residence, it really doesn't make much sense to resolve cosmetic problems such as stood out nails.Merely touching a popped nail right into the wood again won't fix the issue. The reason the nail appeared the initial

area won't disappear as well as it's just an issue of time before the nail pops right back out again. Generally, the nail hole has actually enhanced and you need something to keep the nail securely secured. Normally, the very best way is using an additional nail.This is ways to do it: factor the brand-new nail at the timber behind the drywall as well as drive it in alongside the old nail. See to it the new nail overlaps the top of the various other nail as well as drive the nail up until it creates a tiny dimple. Inspect to see that the nail has been driven in adequately by dragging a rigid item throughout the surface( it might be anything actually-a leader, a putty knife, as long as it's rigid). If the nails hasn't already been driven in far sufficient you'll really feel a pull and the nail must be owned in additional till there's no resistance.With today's color-changing filler it has become really simple to fill out the dimple that you made

. Intense pink is a prominent option as it alters to white when it dries. You probably will not need greater than a few layers, perhaps 3, with simply a light and also fast sanding between applications.Of training course, you might choose to use a screw beside the old nail and if you intend to go in this direction make certain to

countersink the screw enough that the nail becomes covert listed below the surface area. Aside from that the actions are the exact same as currently described.

Seven Simple Steps to Repair Drywall

Prior to picking a drywall specialist right here are a couple of response to concerns I frequently get asked in the drywall industry.Question: I have water damages to my drywall, is it still excellent? Does it need to be replaced?Answer: Water can come from various sources in your house. Roofing system leaks, air handlers, dish washers you call it. Drywall is a surprisingly durable product when it comes to water and also could hold up against a good deal of water before complete product failing occurs. Once it is dried out damage is usually only cosmetic. Usually a dark tarnish or hairline split appears along a joint line where the drywall substance has been liquified by the water and also the tape has allowed loose. Not to be afraid, a drywall professional can typically repair the damage in a couple of hrs with little to no mess. Also if the area has splashed for months, water will always find the course of least resistance and come out all in one place. In this situation all that is called for is removing the affected area, usually only a 3' -4'location as well as covering it in. In either situation cost is usually under$300. Concern: Should I be stressed regarding mold on my drywall?Answer: The most vital thing to keep in mind, without wetness mold and mildew can not endure.

So primarily remove the water resource and also the mold is background.

Although lawyers as well as so-called mold and mildew removal experts would certainly like you to believe or else and also open your checkbook, mold and mildew is seldom harmful to humans as well as could be conveniently removed. Spraying a little bleach on it will additionally suffice. If it has actually obtained so bad where the paper on the drywall has been really consumed away by the mold, after that a small spot job to eliminate as well as eliminate the affected area remains in order. Expense likely around$ 250. Question: Do I have Chinese drywall in my home?Answer: Although significantly even more major than mold and also absolutely seeking full elimination, my advice is to not panic if your worried you might have it. It's unnecessary to spend

a terrific deal of money for an additional professional that is trying

to profit on somebody else's bad lucks. Believe me; if you have Chinese drywall in your residence you will certainly understand it, no inquiry about it. The metallic burning experience in your eyes and also throat will promptly offer it away. It is evident within months of setup and also apparent. My ideal suggestions is to call a reliable drywall or structure specialist who can steer you in the best instructions. Current legal rulings are extremely details in the removal of the product and also failing to follow them exactly could lead to future resale problems.Question: Just what does it require to eliminate popcorn texture from my ceiling?Answer: As long as the ceiling has not been painted, which most have actually not been, a drywall expert could get rid of as well as re-texture an ordinary sized ceiling for just $500 -$600. The only catch is what kind of condition the existing ceiling remains in. Snacks( acoustic)texture

could hide an outstanding amount of defects, thus the factor for its popularity years back. Some ceilings may not have actually been completed to regular standards and also may need a total coating layer before using a lighter appearance. Large dips, sags, and even breaking may be concealed with this texture so care ought to be taken prior to elimination to completely comprehend how big a project you are obtaining yourself into.Question: Just what sort of texture ought to I pick?Answer: I assume this is possibly among the most significant problems my customers have problem with and also it is probably among the least vital. I have actually found most people hardly ever also notice what texture is on the walls of a home they stroll into. The only time it turns up if it's an exceptionally strong or hefty structure. These structures are typically stylish and have a tendency to use out their welcome after only

a couple of years. My suggestions is to keep it on the lighter side. Be conscious of drywall professionals aiming to talk you into hefty structures, it's likely they do not have the ability to do a high adequate top quality of work without hefty appearances to cover up the flaws.Question: What textures are available?Answer: The most common structure as well as most universal is orange peel. It's sprayed on with a machine to provide a light, washable, and very patchable finish that few people actually observe on the wall. It's used to lower the labor and for that reason the price of a perfectly smooth coating which can obtain fairly expensive. It appears similar to the texture of a multiplied orange peel when paintinged, for this reason the name. To spruce up ceilings as well as offer added

hide, knock down texture is typically utilized. It is sprayed on too, but much thicker, with bigger dots. It's a very economical texture which largely changed popcorn appearance back then. When the spray has actually added a large paddle is used to flatten or tear down the dots which give it its name. This appearance will give a huge quantity of conceal on a ceiling or wall surface and also several individuals feel its spruce up a space, but the drawback is it's incredibly hard to patch as well as challenging to clean.The last of the typical structures is skip trowel. It is a hand appearance applied with a trowel with a back and also forth motion. It could be applied hefty or light relying on your choice. Due to the fact that of its labor intensity it is typically utilized on the ceilings of higher end houses. It could give a vintage or Spanish kind of aim to a house as well.Question: How do I select a drywall specialist I can depend do a great job?Answer: This is a very hard question to respond to, yet here are a couple of points to look for that could help guide you in the best direction. The most significant warning to keep an eye out for is a drywaller who wants money up front before

they do the job. In this job it usually implies the minute they leave your eyesight there gone never to be seen once more. It's depressing, but regrettable. Take a look at their lorries, are they maintained in an affordable state. Messy, broken, or untidy lorries have the tendency to imitate their proprietors degree of craftsmanship. Everybody wishes to hear good information, however any person that informs you every little thing you desire to listen to could be a person to view out for. An example could be an appearance like knockdown, which is simply impossible to spot perfect. For 9 from 10 people it will look sufficient, but not IDEAL. The only means making it ideal is to skim out the entire ceiling smooth as well as re-spray it all. More expensive, however at the very least you have that option in advance before its painted and before you have forked over the money to fix it as soon as currently. I would certainly instead be sincere and let individuals know there are limitations to exactly what could be done compared to have a dissatisfied customer.Hopefully this write-up has actually responded to a few of the even more typically asked inquiries to help much better inform you on selecting a top quality drywall specialist. drywall repair panel

DIY - How to Repair Drywall Seams

general labor

Best Drywall Repair Services Florida

Drywall repair Sarasota – drywall

[post_name drywall finishing 

Drywall Water Damage Ceiling Repairs

drywall repair dent

Before picking a drywall professional below are a couple of response to inquiries I typically get asked in the drywall industry.Question: I have water damage to my drywall, is it still excellent? Does it have to be replaced?Answer: Water could originate from various resources in your house. Roofing system leakages, air trainers, dishwashing machines you call it. Drywall is a remarkably durable product when it involves water and also could withstand a lot of water prior to complete item failure occurs. Once it is dried out damages is typically only cosmetic. Normally a dark tarnish or hairline split shows up along a joint line where the drywall substance has been liquified by the water and also the tape has unleashed. Not to fear, a drywall professional could normally fix the damages in a couple of hrs with little to no mess. Even if the location has splashed for months, water will always find the path of the very least resistance and also come out all in one place. In this situation all that is needed is eliminating the affected area, normally only a 3' -4'area as well as patching it in. In either situation cost is normally under$300. Inquiry: Should I be fretted about mold and mildew on my drywall?Answer: The most vital point to keep in mind, without dampness mold could not endure.

So firstly get rid of the water source and the mold is background.

Although legal representatives and supposed mold and mildew elimination professionals would certainly like you to believe or else and also open your checkbook, mold and mildew is rarely dangerous to people and can be easily eradicated. Spraying a little bleach on it will certainly likewise do the technique. If it has actually obtained so negative where the paper on the drywall has actually been in fact eaten away by the mold and mildew, then a small spot work to remove and also get rid of the affected location is in order. Expense likely around$ 250. Question: Do I have Chinese drywall in my home?Answer: Although significantly more serious compared to mold as well as definitely seeking full removal, my suggestions is to not overreact if your worried you could have it. It's unnecessary to spend

a wonderful bargain of cash for another professional that is attempting

to profit on somebody else's miseries. Count on me; if you have Chinese drywall in your residence you will recognize it, no concern regarding it. The metallic burning feeling in your eyes and also throat will rapidly offer it away. It is obvious within months of installment and also distinct. My best suggestions is to call a credible drywall or building contractor that could steer you in the best direction. Recent legal judgments are really details in the elimination of the item and failing to follow them exactly can result in future resale problems.Question: What does it take to get rid of popcorn appearance from my ceiling?Answer: As long as the ceiling has actually not been paintinged, which most have actually not been, a drywall professional can eliminate and re-texture an ordinary sized ceiling for just $500 -$600. The only catch is just what type of problem the existing ceiling is in. Snacks( acoustic)structure

could conceal an incredible amount of flaws, therefore the factor for its popularity years back. Some ceilings may not have been ended up to typical requirements and may need a complete coating coat prior to applying a lighter texture. Huge dips, sags, or perhaps cracking could be concealed with this appearance so care ought to be taken prior to removal to completely understand exactly how big a task you are obtaining on your own into.Question: Just what type of structure must I pick?Answer: I believe this is probably one of the greatest issues my consumers deal with as well as it is probably among the least essential. I've found most people rarely even see exactly what appearance gets on the wall surfaces of a house they walk into. The only time it turns up if it's an exceptionally vibrant or hefty texture. These appearances are typically trendy and have the tendency to break their welcome after only

a couple of years. My guidance is to maintain it on the lighter side. Recognize drywall professionals aiming to chat you right into heavy appearances, it's likely they do not have the ability to do a high sufficient quality of job without hefty structures to conceal the flaws.Question: Exactly what appearances are available?Answer: The most usual texture and also most global is orange peel. It's splashed on with a maker to supply a light, washable, as well as very patchable coating that couple of individuals actually notice on the wall. It's used to bring down the labor and also therefore the price of a flawlessly smooth finish which could get fairly pricey. It shows up comparable to the structure of a magnified orange peel when paintinged, hence the name. To clothe up ceilings and supply added

conceal, tear down texture is commonly utilized. It is sprayed on as well, yet much thicker, with bigger dots. It's an extremely cost-efficient appearance which mostly replaced popcorn texture back in the day. When the spray has tacked a large paddle is used to squash or tear down the dots which give it its name. This structure will certainly provide a massive amount of conceal on a ceiling or wall and also lots of people feel its spruce up a room, yet the disadvantage is it's exceptionally hard to spot as well as hard to clean.The last of the usual textures is skip trowel. It is a hand texture used with a trowel with a backward and forward motion. It can be used heavy or light relying on your choice. As a result of its labor intensity it is typically used on the ceilings of greater end homes. It can give an old world or Spanish sort of appearance to a residence as well.Question: How do I select a drywall specialist I can rely on to do a great job?Answer: This is a really difficult inquiry to answer, yet below are a few points to expect that may aid steer you in the right direction. The greatest warning to watch out for is a drywaller who wants cash up front before

they do the task. In this line of job it typically indicates the minute they leave your vision there gone never ever to be seen once more. It's depressing, however unfavorable. Take a look at their lorries, are they maintained in a practical state. Messy, broken, or untidy cars tend to emulate their owners degree of craftsmanship. Every person intends to hear good information, however anyone that tells you whatever you desire to hear can be somebody to enjoy out for. An instance may be a texture like knockdown, which is just impossible to spot ideal. For 9 out of 10 people it will certainly look excellent enough, yet not PERFECT. The only means to make it best is to skim out the entire ceiling smooth as well as re-spray it all. More expensive, however at the very least you have that option up front prior to its paintinged as well as prior to you have shelled out the cash to fix it once currently. I would instead be straightforward and also let people recognize there are restrictions to just what can be done compared to have a dissatisfied customer.Hopefully this post has actually addressed a few of the even more commonly asked concerns to assist much better educate you on selecting a high quality drywall specialist.

Drywall Repair Considerations

It is not unusual to discover fractures in a concrete structure of a home. This opts for new homes as well as older ones. While some splits could show a major problem with the house, many are thought about normal shrinkage cracks. Let's discuss the problem of splits in a structure and also exactly what it indicates to you.Minor shrinkage fractures prevail in brand-new as well as older house foundations. Poured concrete shrinks as it remedies, or works out. As the concrete shrinks, little upright or 45 degree splits may create over time at basement home windows, door openings, or corners. We call these anxiety or surface area splits. These splits are 1/4"large or less as well as do not impact the structure of the building. If you see small splits in a brand-new structure, or an old structure for that issue, don't panic. The worry here is moisture invasion right into the cellar or crawlspace. This is a rather simple repair with epoxy insertion or concrete caulk. On older homes these fractures may return, especially if the walls are made of lath and also plaster. However, don't be startled, it's just the residence remaining to settle.The exact same could be real of splits in the drywall of the home. Stress or working out cracks will be little in size, regarding a 1/4 inch, as well as go at a 45 level angle from the corner of the door structure or home window. Once more, don't stress as this is not an architectural issue but even more cosmetic. Repair work of the crack entail conveniently done drywall repair work, which could be accomplished in really little time.More severe fractures in the foundation or wall surfaces do need the interest of a certified service provider to explore as well as correct. The sort of fracture that deems interest is the horizontal fracture. These fractures are commonly come with by bowing, building, or leaning of the structure wall. These types of cracks may suggest a structure issue, which may be expensive to deal with or if it could be corrected.There are also extra types of fractures that might be connected to structural movement. Included in the severe crack category are splits that have deflection. By this we mean that one side of the split is higher or past the opposite side of the fracture. Additionally cracks that run diagonally across a wall surface, or in a staircase action style. As well as last but not least, cracks on the interior coating (drywall or lathe as well as plaster )that are in the exact same area as fractures on the exterior of the home.Repair of these structural activity or architectural damage splits can include a number of various methods. A lot of them will certainly consist of repair work of the exterior in addition to to the interior section of the

home.That essentially is a conversation of foundation or wall surface splits in a house. If you see these kinds of splits, it might be best to have a qualified expert check

the fractures. The professional can then give you an idea if they are normal working out fractures or among a much more serious nature. drywall repair near me

DIY - How to Repair Drywall Seams

drywall finishing

Best Drywall Repair Services Florida

Drywall repair Greenacres – drywall texture

[post_name sheetrock repair 

How to Repair Drywall Or Plasterboard Walls

drywall repair tips

Repairing a large hole in your sheetrock wall is not as intimidating as one might assume. Adhering to is a fast as well as simple method to do the repair service without a big headache.First, you'll wish to

make the hole square if it isn't already. It only should huge enough to cover the broken area.The finest way to do this is to use a two foot degree and make the two upright lines and also two straight lines with a pencil to develop the square, no measuring is essential. If you don't have a level, compared to merely measure with a leader or measuring tape equal distances to develop the square.The next action is to remove along the lines to get rid of the harmed

item. An economical keyhole saw is the ideal tool for this job. An utility knife can likewise be made use of by making constant passes until you have cut through the sheetrock. If you find on your own cutting over a stud, continue the cut till you have eliminated the entire square. Keep an eye out for any electrical wiring that could be in the wall surface, especially along studs. With the opening currently cut, place a piece of scrap timber, ideally one inch thick product such as a 1x3 or 1x4 in the red on the back side of the sheetrock as well as long sufficient to surpass each edge concerning four inches.So if I made an 8 inch by 8 inch opening the item would be 16 inches long.

It could be positioned vertically or flat in the red. If the cut overlooked a stud, the stud could be used as an anchor point and also the scrap positioned on the opposite side. If the stud remains in the middle, place 2 scraps on either side. Screw the wood pieces in place with a cordless screwdriver from the face of the sheetrock up until the screw head is slightly below the surface. One on each end of the scrap should do.Next reduce a piece of sheetrock to fit the opening. Making the piece one eighth of an inch smaller sized overall will aid in establishing it in. Screw this in position also with drywall screws. The next action is to apply joint compound to the joints to obtain joint tape. Place enough to cover the width of the tape and slightly over. Press the tape in the plaster with a six inch plaster knife. Make certain the tape is in complete contact with the plaster or else the tape could bubble. Wherever the tape overlaps, place a small quantity of joint compound over the hidden tape. When this is dry, place a 2nd coat of substance. It's always best to use a 8 inch plaster knife however a 6 inch will do.Spread the compound over the joints as well as feather it out additionally compared to in the past. Then is dry, gently sand the area to eliminate any ridges or imperfections. The repair work can now be topped with a drywall primer as well as a layer of paint to match the wall.

How to Find the Perfect Drywall Repair Services

Drywall is the most common wall surface lining of the the modern-day house. The drywall is glued as well as nailed/screwed to the wood frame of your house then the signs up with are then plastered as well as sander. During the life of any kind of house damage to the drywall will certainly happen usually when the removaling furnishings or playing inside your home. There are two methods to fix this damage - ring a professional as well as pay them to fix it or learn the best ways to repair it yourself. The majority of fixings are fast and simple with a couple of devices to do the work

Plaster Types

The initial thing you should understand is the sorts of plaster that are used to do the Task. There are three major types:

- Base Layer - A powder that is combined with clean water to make a paste as well as utilized in joints as well as loading openings - sets tough and also is tough to sand.

- Cornice Concrete - A powder that is blended with water to make a paste to glue on cornice - smooth tacky paste that established really difficult and is difficult to sand.

- Completing Substance - This is premixed in pails as well as is prepared to make use of straight from the container - dries (does not established) as well as is extremely easy to sand.

- Glass fiber tape - This tape is self glue and gives stamina to the filling up plaster or skim coat - just needed on bigger holes

To repair a hole of damage to a wall surface you Will only need skim coat as well as completing compound.Tools: There a couple of tools that you will need

to acquire to do the task nonetheless these are straightforward and inexpensive --One wide knife 250mm(10inch)wide

( looks like a wide paint scarper), one 100mm( 4inch) broad blade, one 100mm (4inch) x 250mm (10inch )towel.You will certainly also should mix the base coat for bigger

holes so an electrical drill as well as paint mixing accessory is best. Nevertheless the skim coat can be blended by hand but this is slow.For Example: A hole concerning the dimension of a tennis ball was made while

moving furniture.Step one: See to it the hole in the drywall is clean (no sticking out drywall or paint)

mix your base coat power with clean faucet water to a paste comparable to tooth paste. Note: if the skim coat is as well damp the skim coat will befall of the hole. If you discover the skim coat continuously falls right into the wall surface cavity fill up the behind the hole with newspaper to support the base coat while it sets. Fill the opening making use of the smaller sized broad blade making certain the opening is filled up and also the base coat is flush with the drywall.Step two: When the very first layer of skim coat is set, Cut a percentage of glass fiber tape to simply cover the hole and carefully took into place. Blend a percentage of base layer and also spread over the tape ensuring that you spread out the skim coat beyond the tape. The smoother and flatter the 2nd coat is the better the result will certainly be. Let it established from 45 -60 Min's. Tip three: Spread a slim coat of finishing compound with the huge wide knife and let this dry.

The completing compound has to be spread out a minimum of 100mm (4inches )past the base coat.Step four: Sand your job with 180 grit sand paper ensuring you feather or mix the edges with the existing paintinged wall to ensure that the repair service will not be seen when painted. The purpose is to sand the repair work as level as you can and blend in the edges. After that your repair work is ended up and also ready to paint.Tip: Remember to wash you tools off with tidy water in between actions so the plaster does not set on your tools. drywall repair dent

Drywall Issues at Home: DIY Fixes Vs Professional Drywall Repair

sheetrock repair

Best Drywall Repair Services Florida

Drywall repair Dania Beach – sheetrock prices

[post_name drywall supply 

It's Time to Fix That Hole in the Wall

drywall repair boise

These tips are concerning ways to fix scars and painting chips around your home. Routine damage creates chips, nicks, as well as bruises on the wall surfaces as well as wood job when they are run into. These pointers will certainly assist lengthen the life of your interior paint, as well as prolong the life of the paint to ensure that you do not have to totally paint the inside of the house as regularly. Here you will discover some tips on repairing paint chips around your home.How Deep is the

Chip You should evaluate

the depth of the chip before you just repaint over it. Deep cuts will certainly be almost as noticeable whether it has matching paint in it or otherwise. There are a variety of items on the marketplace that you could make use of to fill cuts in drywall or plaster on your wall surfaces as well as ceilings. If your gouge is under 1/4 deep use a light weight spackle, roll the item into the grove making certain the spackle takes pride in the existing drywall. As soon as the spackle is dry sand the afflicted location with a fining sand block, concerning 150 grit. There are likewise basic spots that are offered if there is a large opening in the wall surface (more compared to 1 inch in diameter) that could be used, layered with joint compound, sanded after that textured. Generally you will intend to make use of either spackle or joint compound to fill these acnes. Joint compound completely dry's slower and also diminishes back when completely dry but it is cheaper as well as functions better with bigger patches. Sand them to the level of the remainder of the wall. As soon as the spot is flat you can texture with among those appearance in a container. Utilize the latex one it will make your life a whole lot easier with your mate if you do, the various other one has a whole lot of nasty solvents in it and also could make your home extremely unpleasant. Make certain you tremble it well prior to you apply. Usage also strokes as well as make numerous lite passes rather than one heavy pass.Paint chips

in timber work has to have the paint that is harmed eliminated as well as then sanded down, feather the sides so that there is no ridges from the paint chip. Make sure not to sand as well deep, one trick is to use a fining sand backer board, this will spread the sanding over a wider area and it will certainly not "meal" the location that is being dealt with. Prime with a oil base primer, when completely dry, sand with 220 grit paper till smooth as well as level. Wipe clean with a tack cloth as well as painting the coating coat on the wood work. If your patch requires a second layer sand with 220 grit and recoat.Matching Shade Paint maintains for several years, so when you do

repaint get an additional gallon when you are buying your paint as well as wait for touch ups. Most homeowners will keep extra paint, so even if you bought your house with the existing color on the wall surfaces, take a look around for extra paint. Another way of being able to duplicate your paint is by replicating down the color code that is placed on the side of paint can. When you go and obtain the brand-new paint blended ensure you obtain the exact same shine, and manufacture. Various codes for various manufactures, they don't always cross referral the different shades. You can utilize this paint to retouch chips as well as dings in the paint around the home. If you do not have access to matching paint, draw a paint chip off the wall surface concerning the dimension of a silver dollar and take it to your local paint store or residence renovation store. They will, normally, have the ability to match the paint color practically specifically, or a minimum of close sufficient that any distinction is not noticeable. Among the advantages of taking in an example is that the color of your walls will certainly transform with time, the sunlight discolors the wall and little hands have a tendency to darken them.Old Painting While paint does maintain for a long period of time, you could need to doa little deal with

the paint to earn it functional again. First, you will wish to thoroughly stir the paint. A mixer utilized with your drill and even a cheap hand mixer can make brief work of completely stirring the paint and remixing any kind of parts that have actually separated. If you have swellings as well as dried little bits in the paint, pour it through a cheese towel to strain out lumps.Brushes and Rollers When painting and also priming drywall as well as plaster utilize a roller, bristle brushes frequently

leave brush strokes where ever before you utilize

them, and also this may be an indicator that there has been a retouch work done. Make use of a good PVA guide on any type of drywall patches that you have made. The bare drywall takes paint at a different rate compared to the unpainted location. PVA primer permits the finish paint to be soaked up at the very same rate. A small paint roller or a sponge brush will certainly leave a structure that will certainly extra conveniently assimilate with any kind of bordering structure, much more effectively concealing any flaws. After the almost all of the patch has been repainted utilize the roller, without adding any more paint to it, to completely dry roll out around the patch. This will certainly blend the colors into the existing wall surface paint as well as further concealing your patch.Paint your timber deal with a top quality bristle brush, brush with the grain, not versus it. For the ideal results a spray coating is required, yet that is for an additional article.Good good luck on your patching as well as painting, and also remember, if you don't like the results you could constantly call an expert to do the job.

Drywall Issues at Home: DIY Fixes Vs Professional Drywall Repair

Drywall Plastering is commonly replaced with other forms of conventional plastering because it is labor intensive and also expensive also. The old made plaster on timber needs three coats of plaster and also it may not be within the skill of lots of people to do it, and also requires professionals most of the time to do even the repair work.In lots of new houses today drywall plastering is certainly the preferred wall covering product. It sets you back reasonably much less and performs well in most applications. It is additionally easy to install and also the finished appearance is likewise excellent, particularly after it is painted properly.There is paperless DP

also. Because there is no paper surface the drywall is covered with fiberglass. The favorable functions of the fiberglass surface area are water-resistance as well as reduction in the spread of mold.The product utilized to patch the plaster for the openings is unique. It is not as well tough to patch plaster wall surfaces, yet it depends on the dimension of the openings to be covered. However, it is recommended not to make use of drywall joint compound as patching material.There are various kinds of tools for this type of plastering, and also they have various degrees of top quality.

If you are interested in doing a great deal of drywall works, it deserves spending in some devices like an array of joint blades, stilts, a taping banjo or other special tools.Drywall plastering is made use of to complete indoor walls. However you need to beware to pick the appropriate sort of smudging for the right place, as

there are different types. For damp areas there is a special sort of gluing which is moisture-resistant. If you utilize routine drywall in such locations, it could drop apart.Sometimes even if the plastering is done correctly, it gets fractures. In such cases the joint compound could hold way too much water and after that fracture when it runs out. Or, due to some movement of the wall surfaces cracks can develop.But in fact DP additionally requires skill. It appears to be quite easy, however it requires to be exercised a couple of years, prior to it can obtain a best look. There are DIY's devices readily available in the marketplace. Attempt and also stay clear of the two usual blunders made.

Never function with lumpy joint substance and also you need to deal with the idea that you could not become a nit-picker in DP after having actually applied only a 2nd coat.Drywall ending up strategies can help you to obtain a professional coating. They are not as basic as they seem to be on TELEVISION or in the DIY's handbook. You have to obtain sufficient practice working with joint substance and drywall insulation. Actually it needs a whole lot of hand-eye co-ordination as well.There are

some typical troubles linked with drywall plastering and also these are blisters on the plastering, and the tape also often tends to diminish at places. The blisters happen usually when there isn't really enough joint substance in between the tape and also the drywall surface area. Right here once more your hand-eye co-ordination is essential. Besides that the blending of the joint substance is essential, since it should have the ideal uniformity. And you need to also have the right tools to avoid the sores. drywall repair self adhesive wall patch

Drywall Finishing and Critical Lighting Problems

drywall supply

Best Drywall Repair Services Florida

Drywall repair Jacksonville Beach – patching drywall

[post_name how to fix a hole in the wall 

Introduction to Drywall Repair Materials

drywall repair how to video

Should you try to do-it-yourself or hire a drywall professional? The response depends on the size as well as sort of the needed repair. If the task is huge as well as needs specialized knowledge, tools and also a substantial investment of your time, you could want to work with a drywall service provider. However, scratches, dents and also tiny to tool sized hole fixings can be conveniently understood by also the beginner.Drywall is genuinely one of the best creations to find along within the last 80 years. And also for some really excellent reasons; it is a low-cost wall surface covering that increases rapidly. It is neutral as well as can be embellished to private preference. The innovation of drywall saved specialists as well as property owners hundreds of dollars in construction prices and also repairs.Drywall, or gypsum board, is made from a crunchy fire immune substance that is wrapped in a thick paper finishing. It is very long lasting and can be easily cut, sawed, pierced, bent, toenailed, glued, screwed, repainted on as well as papered over. It even aids to seem evidence and also insulate an area. However also as long lasting as it is, eventually, you'll should spot some area of drywall in you house or business.Commonly, you will be managing one or even more of 3 different sorts of wall holes-nail holes and damages, tiny doorknob dimension holes and bigger openings brought on by hands as well as furniture. In this article I'll explain a really basic repair service technique for a small drywall holes. This will work fantastic on holes much less than 6 inches, such as doorknob holes.THE "HAT SPOT"REPAIR SERVICE TECHNIQUE Utilizing a keyhole saw, cut a square around the opening(the opening is now square ). Maintain it as small as possible. Sand the sides to the hole gently to get rid of burrs from the sawing. From a brand-new piece of drywall, reduced a square item of drywall regarding 3 inches larger compared to the hole that you're attempting to cover. (Now follow me very closely below, because in this next step you're going to get rid of several of the drywall support from your new spot.)TURN THE NEW PATCH OVER and reduce 1-1/2 inches on each side with a razor blade. Be really mindful not to reduce entirely with the face paper (you intend to leave the facing paper undamaged). Now thoroughly peal the 1-1/2 inch items off the face paper and discard. Tidy the rear of the face paper on the spot to get rid of little little bits still attached.Place joint compound around the sides of the hole for a minimum of 2 inches on each side. Make sure to mud the raw sides of the old drywall. Put the patch right into the opening and also drag mud down each side. Now cover the entire location with a really thin layer of mud as well as allow it dry. When totally dry sand the location extremely lightly.If required, use a 2nd coat and also enable it to completely dry. Sand the area gently and also you are ready to paint.If this appears much more complex that you 'd such as, your regional equipment shop will market you a drywall repair set. The sets come in different dimensions and types for different applications. Just follow the supplier's directions and also you must be ready.

Introduction to Drywall Repair Materials

I uncommitted exactly what your drywall water damages in fact is, the first thing that were mosting likely to have to do is to figure out where the water damage is in fact originating from. One of the most typical perpetrator, will certainly be a roofing leak or a plumbing water supply pipeline that is dripping. Allow's get down to the bottom, literally. That's where most of the drywall water damages repair services will have to be done.If you have water dripping from your roofing, there's an excellent possibility that the drywall ceiling will be harmed and if it has an acoustical or snacks kind ceiling structure on it, a big location of the ceiling appearance will have to be scraped off or removed and after that re-sprayed after the water damage repair works have actually been made.If your ceiling is smooth, this will certainly be the most convenient ceiling repair work that you can make, the majority of the time. In some cases individuals get the impression that a smooth water damaged ceiling from a roof leak, will be simpler to deal with as well as their right. The issue is, after the repair work has been made, if it isn't done effectively, the fixing will certainly stick out like an aching thumb.Now what concerning a water damages ceiling that has a light appearance or a hefty appearance. This will normally be the hardest ceiling repair to make. It's hard to match some kinds of ceiling structures. The heavier the appearance, the more challenging it will certainly be to fix. If you have actually a gently sprayed orange peel kind texture, you could count yourself lucky. This fixing will typically be much easier to end up than a smooth ceiling repair.You repair service the water damage ceiling, as well as you don't like just how it looks. Below's the very best method to fix this problem. You will require to smooth out the whole ceiling, utilizing drywall joint substance, until it is completely flat or smooth or scrape all the acoustic old ceiling structure off and start from scratch.Once the whole ceiling is smooth, you can use your new appearance or acoustic ceiling. Some specialists will in fact figured the task this way, just to save themselves a sight of headaches later.If there is various other water damage to the ceiling, you might also assume regarding removing every one of the drywall, changing it and also re-texturing the whole ceiling. drywall repair bradenton

Drywall Repairs

how to fix a hole in the wall

Best Drywall Repair Services Florida

Drywall repair Lynn Haven – hanging drywall

[post_name how to repair drywall 

Is It Time To Do Some Repair Work On Your Drywall?

drywall repair dent

Fixing split drywall joints can be annoying at best. If there is only a very, extremely small split present, you might have the ability to scrape out the crack to a larger dimension and after that simply use brand-new spackling substance. Using a sharp, pointed device such as an old made could opener (church trick), scratch placed a groove wider as well as a little longer than the fracture. It has to be at the very least 1/8" deep but deeper is better. There are covering compounds offered today made just for patching cracks yet are not planned for huge locations. If this is a painted wall surface some amount sanding will certainly additionally be called for. Spackle will not adhere to a smooth paintinged finish. Sand the area around the crack at the very least a couple of inches larger than the split and afterwards go in advance and use the patching compound seeing to it you require the spackle down right into the split. Right after using the spackle, re-wipe the location with your blade to remove any excess spackle from the location leaving a level surface area. Depending upon just what kind of substance you bought the drying times vary a fair bit from minutes to hours. After the spackle is entirely dry usage a 100 or 120 grit drywall fining sand paper to smooth area so it is flush with the existing wall. Prime the drywall and set up the last paint.In an instance

where the cracks are much larger along the joints, it might brought on by the drywall tape drawing loose, physical damage or probably even excess dampness. Thoroughly get rid of any type of and all loosened products at taped areas. You could not and also I repeat, could not re-spackle old tape. The drywall tape has minute holes that enables the spackle to go through and secure the tape to your joints. The spackle "wets" the tape aiding it not only to stay with the drywall yet allows the spackle to create a bond on both sides to the drywall. Once it is made use of, the holes are loaded therefore making the tape useless. Aiming to route will only cause the joint to re-crack later.After eliminating all loose products, lightly sand the damaged locations taking care not to tear or sand with the paper layer of the drywall beneath. As soon as the area is smooth to the touch make certain you have fined sand evenly into the surrounding area so as not to leave a side that will show via the finished job. Making use of a six inch vast spackle blade, install an also coat of new spackle over the seam. Place your new drywall tape over the joint and utilizing the knife, press the tape firmly into the drywall eliminating all excess spackle as it ejects from under the tape and sides of the blade. Do not eliminate way too much spackle so as to leave the paper dry. As soon as the location is as smooth as you could make it, apply a second lighter coat over the exact same area making certain the new tape is completely installed in fresh spackle.After drying for one day to ensure all the spackle is dry, re-sand the

whole location to once more obtain a smooth feel to the whole repaired area. Using your twelve inch knife, spread out a second layer to the whole fixing seeing to it you blend smoothly onto the adjoining wall surface surfaces. Do not leave any type of ridges or sharp sides where you satisfy the old wall finish.Once this 2nd layer of spackle is completely dry, which will certainly be a lot less than the base coat as it is much thinner, use, using your twelve inch knife, a 3rd very thin coat of fresh spackle. You will certainly almost be able to see with this coat as it is used to load small indents or scrapes left by sanding the second coat. Once again after the 3rd coat dries out, very gently sand the fixing for the last time to assure an entirely smooth completed area. Apply a coat of drywall primer to secure the freshly fixed drywall area and afterwards repaint your wall.If the drywall seams have actually completely broken or divided open there may be a structural issue that has to be re-mediated prior to you fix the drywall seams. Building negotiation, foundation troubles or various other things might impact the drywall ends up so make certain they are fixed first.Once you make certain there are nothing else issues present, as in a minor fixing, remove all loose or damaged products. If the drywall itself is split, cut the drywall back to a stud and also install a brand-new item of drywall. The fixing coincides as a small split just on a much bigger scale.Installing small pieces of drywall for patching produces what are called butt joints which are much harder to conceal. You will be required to spread your spackle over a much larger area to

acquire a smooth appearance as well as not a bump in the wall surface. With method you could do this work and conserve on your own an excellent deal of money.If you are in a rush as well as the repair work is fairly small, there are fast drying materials readily available such as Durobond 90 which when included in spackle makes the spackle rock hard in ninety mins. There is also a forty-five min type readily available however only masters must attempt and also use it. Forty-five mins zips actually fast. When I say it dries out rock hard, it is nearly impossible to sand when dried out so any type of little defects left in the surface with your knife will show later. Be careful.Remember to maintain your devices clean, do not tear open coulds or covers with your knives as it will dent or chip the edges of the blades and also work as tidy as you could to stay clear of tiring clean-up later on.

How to Patch Holes in Dry Wall

If your home is old or was constructed making use of less-than-stellar materials and handiwork, you may see splits, holes, or water damage in your drywall. Some drywall repairs are simple to earn by yourself, if you have the right devices as well as products and a little bit of home improvement experience. Yet in other situations, the problem could be extreme or extensive sufficient to require calling in an expert. When making a choice about Do It Yourself vs. specialist repairs, consider the extent of the task, your experience level, and also exactly what you agree to spend to obtain the job done right.DIY Drywall Repair work Small fractures and nail openings are fairly very easy to deal with, if the trouble is local and also not a signs and symptom of a bigger construction issue. Using drywall compound, drywall tape, and also a drywall blade, you could spot over damaged areas. As a whole, it's ideal to apply the drywall compound in a number of layers, allowing each layer completely dry and also sanding it smooth before using the next layer. Note that you could have to fill in cracks as well as use drywall tape prior to patching them over. If you don't have these tools and materials on hand, but you're confident you can take care of the wall surface repair work yourself, you could check out a local residence enhancement store for recommendations on what to make use of and also the best ways to proceed.Professional Drywall Repair A large, sneaking split or a protruding area of drywall could indicate a deeper problem within your walls. Perhaps the drywall has actually shifted due to wetness or bad installment. Possibly the drywall was not firmly screwed in when it wased initially set up. There could be lots of reasons for a significant drywall trouble, and covering it over will only delay necessary repairs-and can make them much more extensive when the time comes. If you continuously proceeding down a wall surface, a tarnished area of ceiling, an uneven lump where there was not one prior to, or a real opening in the drywall, it's time to contact a drywall repair service professional to assess the circumstance. These pros are experienced in identifying and also resolving ceiling and also wall surface issues. They could come up with a strategy of activity that involves not only aesthetic fixings, however also architectural repair works, as needed.Health Considerations If you choose to finish wall as well as ceiling repair service by yourself, you should be mindful of health factors to consider associated with functioning with drywall elements. Drywall fining sand dust can be a breathing irritant, so it is essential to always wear a mask during and also after sanding. Drywall bits can remain airborne and on floorings and furnishings after the job is done, so make certain to allow every little thing work out as well as to vacuum thoroughly. Furthermore, note that big items of drywall are really heavy; maintain youngsters and also animals out of areas where drywall is being changed or installed, in instance a piece of drywall drops over. Take all needed safety preventative measures to shield the wellness of yourself, your family, and also your family pets. drywall repair dent

Drywall Mudding and Taping - A Simple Process For Do-It-Yourself Homeowners

how to repair drywall

Best Drywall Repair Services Florida