[post_name how to repair Repairing Drywall Water Damage

There are a lot of benefits of having drywall construction in your house. Drywall is easy to place; it is cost-effective and has fireproof qualities. The major thing is this kind of wall can be repainted, wallpapered and also textured too, as well as it is very easy to repair.The upkeep
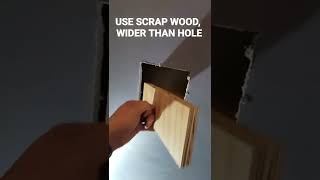
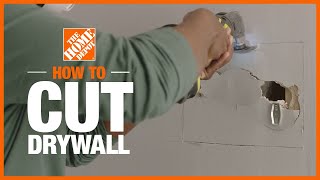
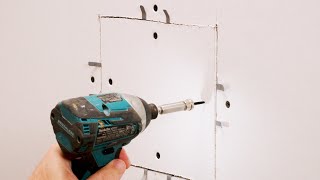
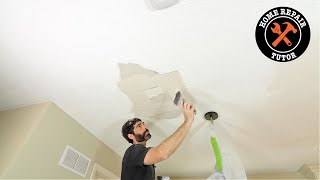
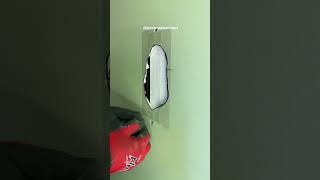
of dry wall is hassle-free as well as Dry wall surface Repair could be done by you. You don't have to call specific individuals, it's that simple!When you are confronted with Dry wall Repair troubles like fractures on the drywall, openings, damages through leak of water, issues of drywall tape, or damage on the ceiling, do not shed sleep. You could recover it which too on your own!To repair service openings there is a really easy technique. You will need the fundamental fixing tools like extra drywall panel, sharp blades, joint compound additionally called drywall mud, measurement scale as well as paint or appearance matching your wall surface. Action the opening to be patched, and also reduced completely dry wall regarding 4 inches bigger than it. Then, removed 2 inches from all four sides of the wall surface patch, using the determining scale as well as blade. Currently, placing this spot over the opening reduced the hole bigger based on the dimension of the patch.Now all you should do is layer the edges of the opening with joint substance and take care of the patch into the opening. Provide the complements like tidying up the extra substance and leave the dry wall to dry. You must leave it overnight. After that use one more layer of the compound and paint as soon as dry.The repair of cracks is additionally an uncomplicated problem.
Drywall Repair Questions Answered by a Professional
If you have actually been a home painter for very lengthy you have undoubtedly entered some form of drywall repair on every interior paint job. Actually, if you don't get good at mastering drywall repair service, your paint jobs will not be as expert as they can be.In this short article I intend to disclose how small drywall fixing works could suggest big revenues for you. I am talking regarding making $350 to $500 on average for just 7 - 10 hours of job. Each work is various naturally as well as may turn out to be simply a $200 repair work or maybe a $1,500 repair.The truth is that when it concerns drywall fixing individuals always call someone to do the job. As a home painter I recognize that most individuals think they recognize exactly how to paint and also the keyword below is "think ". But when it involves points like drywall fixing they go running house to momma.And this is why you could make great money doing small repair service jobs like plumbing technicians and also electricians do. The things that most individuals are unskilled to do themselves are simple and also very easy for us that make a decision to concentrate on them.Some individuals have the money however lack the time and prefer to have somebody else do the work anyway. 99 %of the moment though, people simply do not know the profession. Drywall fixing is a secret art. When it comes to the ones that try to repair their own drywall themselves, the job always transforms out lousy.Where is the target audience for obtaining business? The solution is property, light commercial, rental properties, and so on. As a home painter you could be limited to a greater end market if you want to gain specialist painters incomes. But no so with drywall fixing. Your market can be low end to high-end just due to the remarkable revenues in smaller jobs that many individuals can afford.Most of the time you obtain calls from individuals when they have water damage. In some cases it is from careless teenagers roughhousing.
I had one task where ate an opening in the ceiling. I would state that 95 %of drywall repair service is from water damages and half of that could be from negative pipes, a dripping shower that needs to be re-grouted, and so on. A dripping roofing is typically the other reason.Sometimes you can obtain jobs hanging and also taping tiny jobs like a garage or component of a cellar. You don't have to handle these larger projects though. Several times individuals intend to sell their house so they are motivated to repair their wall surfaces or ceilings finally.You may ask on your own, if drywall repairs are so straightforward how can I get great at doing them? Initially, You require to learn the best ways to duplicate a couple of typical appearances, which is simple once you find out which
tool was used to make it. You will certainly additionally get fixings for typical drywall openings of all sizes, that includes plaster( slim collection as well as turret). And also you will should recognize the best ways to fix loose tape seams.And believe it or not, that has to do with all there is to successful drywall repair service. These methods are hidden to the general public but very easy for you as well as I. If you ever have seen what property owners aim to do to fix their own drywall you will certainly understand quickly that this is an easy profitable business.Here is the outstanding part. The majority of drywall repair services that I see look horrible. Yet the home owner seems pleased with it. The task resembles a person came in and also spilled a little mud on the ceiling as well as left. Yet the repair service man ran off with something like$200 as well as the property owner for some weird reason generally believes the job was done O.K. I have actually seen this too often.On a serious note though, doing good professional looking work at inexpensive costs will certainly offer you bunches of recommendations and repeat company. If you could learn the essentials of appropriate drywall repair work as well as do a little retouch painting later you will certainly do simply great. You can without a doubt make$30 -$70 per hr due to the nature of the work.How can I get company? Buyer guides, categorized advertisements in position like Craig's Listing, regional on the internet advertisements, little Telephone directory advertisements, word-of-mouth, and so on. Why should I start a little drywall repair work service? Exists a big future in it? Yes for two factors. Initially, self-employment is becoming the new work pressure
and second of all, residence repair will always be with us.Who can do this type of job? Anybody who enjoys to recover things can do well. People who are talented at house repair services, house painters, drywall, etc. Any person who finds out a couple of tricks to successful drywall fixing.