[post_name sheetrock repair Drywall Repair Tips

Drywall patching calls for perseverance as well as perseverance. I am going to damage the process down conveniently so you will be much more informed before you start your following dry wall patch.One thing you should think about when working with drywall is the DUST. If you are sensitive to the drywall dirt or plaster you could wish to get a fragment mask, safety and security goggles or handwear covers and also wear a lengthy sleeve t shirt for protection. Do not forget to shield any type of furniture that you want to keep dust complimentary, too!Step1: prep the
opening or area to be patched.If the hole or area to be patched has loosened wall surface board paper you will should eliminate the loose paper and also gypsum. Now if the wall surface board paper intends to proceed destroying the side of the wall, a method to quit this is the take a razor knife as well as reduced from the loose area regarding an inch or so. What you are doing is racking up the wall so when you tear of the loose paper it will certainly come to the scored line as well as not tear more triggering a bigger location to need patch job. If after you have removed the loose paper and the plaster board beneath is crumbled as well as barely hanging to the wall surface, you should knock out all the loosened plaster. Loosened paper as well as gypsum will certainly trigger the drywall compound to not bond strongly and could create a bubble you will certainly see only after coating with substance. As part of the preparation, you might intend to square up the opening so you could extra easily cut the item of sheetrock that will certainly fill the void.OK so the location is prepped and currently we will have to relocate to tip 2, which will certainly advise you on
the best ways to appropriately affix an item of sheetrock cut to fill the hole in your wall or ceiling.Step 2: back framing the hole to attach the sheetrock you will reduce to fill up the void.Just like with new building and construction you will certainly should have timber framing to screw the sheetrock right into. To clarify, I will make use of an instance
spot location of one foot by one foot. You will certainly should cut a 2x4 into two 16 "sizes. You will should gather a cordless or electric drill and also regarding a lots 1 1/4" wood screws. Take among the 2x4's you have actually cut and also glide it in the opening as well as behind the existing sheetrock, along one side of the hole. The reason the 2x4 is longer(16 ")compared to the 12"opening is since we will expand it a number of inches past the top as well as base. So currently you have a 2x4 inside the wall surface on one side, the 2x4 needs to be laying flat against the within the wall, it will not be turned so the 4 "width of the 2x4 is level against the within, this will offer us a bigger surface for add-on as apposed to the typical way of framing which would certainly be with the 2"width facing the sheetrock. You will certainly want to eyeball, best as feasible the 2x4 and also divided the difference of the board size in between the existing sheetrock as well as where you will certainly attach the piece of sheetrock you will certainly reduce for the patch. Now that the 2x4 is held in the correct position you will need to screw the 2x4 right into the existing drywall by holding snugly to the board and also screwing right into it with the face of the existing sheetrock. You will certainly put two screws along the side and one on the top as well as bottom of the existing sheetrock to highly safeguard the 2x4 to approve piece of sheetrock you will certainly reduce. Once you have finished one side, repeat the same treatment on the other side. So when you have actually finished back mounting you currently have a strong frame to affix the patch piece of sheetrock. * Note-if you have an opening to patch where there are mounting, electrical or mechanical problems in the manner in which keep you from sliding the 2x4 behind the wall to screw down the side, you can screw in the top and base of the 2x4 and also this will suffice. You could likewise think about connecting the 2x4 back mounting across the top and also bottom of the opening as apposed to attaching the 2x4's on the sides, just make use of the exact same directions of attachment for the sides or leading as well as bottom.Now that the preparation as well as framing are complete next we will certainly cut a piece of sheetrock to put right into the mounted opening symphonious 3. Step 3: take a dimension of the opening and reduced a piece of sheetrock to
fit and also protect it.It does not need to fit very tight yet it will certainly have to fit and also be screwed to the
back framework you mounted. You ought to put 2-3 screws down each side connecting the piece of sheetrock you cut to the framework. * Note-all the screws will should be "established"below the surface area of the sheetrock but not deep enough that the screw head splits the paper face on the sheetrock, unset screws will certainly reveal as well as hinder the next step. ** Note sheetrock comes in two densities for many household construction -1/ 2" and 5/8 ". 1/2"is usually on the indoor walls/ceilings as well as 5/8"is used on bottom of stairways as well as in the garage.Well you're making development and you have filled the void with sheetrock, currently we will go on to the
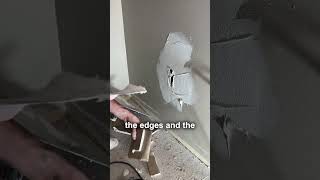
layer or finishing phase of the dry wall substance(mud )discussed in step 4. Step 4: coating the patch with drywall substance (mud). As I was claiming symphonious 3 the piece of sheetrock you reduced to fill the hole does not have to fit very tight. If the sheetrock you reduced has a space around the
border/joint of it and where it meets the existing wall board, you should pre fill the area prior to using the drywall tape. So just take a little substance and fill in the edges and also smooth the excess level wit the wall, enable to completely dry. Following is to use the drywall tape so that after we are all ended up there will not be a fracture around the joint of the covered hole. For patch work I such as to make use of a"mesh "or "fiber" tape, it supplies a more powerful hold and the mesh tape is much a lot more forgiving compared to normal drywall tape, in the because you do not have to pre mud the wall to stick the tape. The mash tape has a sticky backing, so all you do is cut the mesh tape to the length you require, stick it on the wall with the center of the mesh tape running right in line with the joint or crack. The mesh tape should always run past the joint at least an inch. Repeat this process for all four sides of the patch. Following use a coat of compound around the boundary of the patch, over the mesh tape. The mesh will be slightly visible after just one coat. * Note-If you relate to much compound(mud )you will certainly have a hump in the surface area. Enable this coat to completely dry, sand gently, primarily to knock of any blade edges that dried in the substance as well as could trigger the following layer to develop to much. You do not wish to attempt and also mud the patch in just 1 layer, it is much better to apply a moderate/thin coat permit to dry, sand and also coat once again. Nevertheless the layers( a minimum of two) have actually dried and also you are pleased that the surface is coated uniformly, sand the mud to also the surface. * Note -a less than excellent finishing job can be ravelled with sanding. Fining sand along the outdoors side of the mud too, will blend the patched area much better into the existing surface area. An actually neat trick wants you have actually fined sand the patch, take a damp sponge or dustcloth and"clean" the outdoors mud of the patch mixing it also better right into the existing surface, this method will certainly aid you prevent seeing a mud line around the patch when it is completed. If your house has a smooth structure, this is the last action, your ready to repaint. If you do not have a smooth texture you will certainly should check out on.Only another step as well as the drywall part of your patch will be total, texture. We will discuss various appearances and ways to apply the in step 5. Tip 5: there are many appearances and you need to first recognize the best ways to identify your existing structure before going forward.Older residences may have a swirl, crows foot, hand or smooth structure. More recent homes essentially make use of smooth, orange peel, knockdown and hand textures. For a crows foot you will certainly require a crows foot or stomp appearance brush. For swirl structure you might need to speak with a dry wall surface distributor store for the right texture brush or explore a couple of different brushes. For a hand texture you could make use of a dry wall surface knife or trowel. Every one of the above discussed structures need a tool or brush to apply drywall substance to attain the texture. The following 2 textures could be purchased in a spray can, orange peel and also knock down. * Note- with all appearances it readies to obtain an old piece of plywood or cardboard and experiment initially to locate the correct amount of pressure, thickness of mud, strategy and also established up time to produce the best want to finest hide that a fixing was ever made. As always if you structure the wall surface as well as are not delighted with the results you could was the texture of quickly with a wet sponge of rag, allow to dry and attempt texturing again or sand of a bad structure if you are not pleased with it after it has been allowed to completely dry. * Note- Knockdown structure size can be manipulated by allowing the splashed on appearance established or dry for much less or more time relying on the desired look.We have reviewed the 5 actions should skillfully fix a drywall patch. 1 )properly prep the area to be covered. 2)back frame the opening. 3 )size as well as cut the sheetrock to load the opening. 4 )apply mesh tape and also mud to smooth the surface area. 5)pick and use ideal texture.So go out and" get your drywall on". You can take a look at my short article on paint wall surfaces if you need support with the paint. Don't hesitate to leave a comment regarding any various other subject you would like me to compose on referring to drywall. Please inspect out our internet site, dennardbloss.com, it
is about our construction finishes.
How to Repair Drywall Or Plasterboard Walls
Tough as it is, drywall can just withstand restricted abuse. A door flung open with wonderful force could make a doorknob-size opening in your wall. This damage looks bad. However, also large openings can be easy to fix.The most convenient way to repair holes in dry wall surface is to get a drywall repair service package by gauging the opening and check out your local hardware shop or residence improvement store to buy a set. There are different types and also dimensions for various applications. For example, a drywall patch for ceiling is thicker than for the wall. Prior to making use of the kit, make certain to get rid of any loosened plaster or paper around the hole edges.
For fixing small drywall hole, follow the tips below:1. Prepare a tin could cover at least one and also a half inches in size compared to the opening in the drywall. Utilize a keyhole saw in removing a narrow horizontal slit in each side of the hole. See to it that your dimensions of the hole need to be equal in diameter or lid to be able to insert lid into the opening.
2. Utilize an awl to punch two holes in the lid center then thread a 12-inch piece of string or wire through the openings.
3. While holding completions of wire, slide the cover with and also pull it in the direction of you up until it is flat versus the within the wall. Set stick or scrap timber over the hole to hold it in position and bent the cord tight over the stick. The can cover should be securely held against the within the wall.
4. Use a putty blade when using pre-mixed drywall-patching compound over the patch by following maker's directions. You can likewise blend plaster of paris with water to produce a thick paste. Load the substance or plaster to the opening versus the backing and behind stick. Keep the substance inside the drywall opening as well as cover the support and fill the slits. Nevertheless, do not spread it on the wall surface area. Permit the spot completely dry till it transforms intense white, a minimum of for 1 Day. When it is dry, reduced the string or wire as well as get rid of the stick.For taking care of
big drywall hole, adhere to these suggestions:1. Cut a square area bigger compared to the hole making use of a keyhole saw or energy blade.
2. Cut 2 backer boards so they are two or 3 inches wider compared to the drywall opening.
3. Put a backer board inside the hole at the top side and secure it with a one and 1/4 drywall screws as well as holding it on location as you work. Tighten up until the screw heads are below the surface, position a second backer board inside the reduced side of the opening, and secure with screws.
4. Cut the spot to fit in the opening, screw the spot to the backer and also tighten up with screws till the screw heads are listed below the surface area.
5. Apply pieces of fibreglass tape over the joints.
6. Cover tape utilizing a slim layer of substance and sand gently when completely dry. You could after that apply two more coats. Sand as well as feather every layer till the surface area is smooth.

Repairing Drywall Water Damage
Drywall repair Clermont - handyman