[post_name sheetrock prices Sheetrock - What Is It?

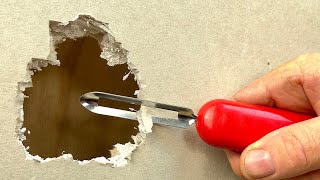
Drywall patching needs persistence and also perseverance. I am going to damage the procedure down conveniently so you will certainly be extra notified before you begin your following completely dry wall surface patch.One thing you need to consider when collaborating with drywall is the DUST. If you are sensitive to the drywall dirt or plaster you might intend to get a particle mask, security goggles or handwear covers and also use a long sleeve tee shirt for defense. Remember to safeguard any type of home furnishings that you wish to keep dust totally free, too!Step1: prep the
opening or location to be patched.If the opening or location to be patched has loose wall surface board paper you will certainly should eliminate the loose paper and gypsum. Now if the wall board paper intends to continue destroying the side of the wall surface, a method to stop this is the take a razor knife as well as reduced back from the loose location about an inch approximately. Just what you are doing is scoring the wall so when you tear of the loosened paper it will pertain to the racked up line and not tear further causing a larger area to need spot work. If after you have gotten rid of the loosened paper and the gypsum board underneath is crumbled and barely hanging to the wall, you should knock senseless all the loosened plaster. Loose paper and gypsum will create the drywall substance to not bond highly as well as may create a bubble you will see just after layer with compound. As part of the prep, you may desire to settle up the hole so you could extra quickly cut the piece of sheetrock that will fill up the void.OK so the location is prepped as well as currently we will certainly need to removal to tip 2, which will certainly instruct you on
the best ways to correctly attach a piece of sheetrock cut to load the hole in your wall or ceiling.Step 2: back framing the opening to attach the sheetrock you will certainly cut to load the void.Just like with new building you will certainly have to have wood framing to screw the sheetrock into. To clarify, I will use an instance
spot area of one foot by one foot. You will should reduce a 2x4 right into two 16 "lengths. You will certainly need to collect a cordless or electric drill and regarding a dozen 1 1/4" timber screws. Take one of the 2x4's you have actually reduced and slide it in the red and also behind the existing sheetrock, along one side of the opening. The reason the 2x4 is much longer(16 ")than the 12"opening is because we will expand it a few inches beyond the top as well as base. So now you have a 2x4 inside the wall on one side, the 2x4 should be laying flat against the within the wall, it will certainly not be transformed so the 4 "width of the 2x4 is level against the in, this will provide us a larger surface for attachment as apposed to the standard means of mounting which would certainly be with the 2"size facing the sheetrock. You will certainly wish to eyeball, best as feasible the 2x4 and split the distinction of the board size in between the existing sheetrock and where you will connect the piece of sheetrock you will certainly cut for the patch. Since the 2x4 is kept in the appropriate placement you will certainly need to screw the 2x4 right into the existing drywall by holding securely to the board and also screwing right into it via the face of the existing sheetrock. You will put two screws along the side as well as one on the top and also bottom of the existing sheetrock to strongly safeguard the 2x4 to approve piece of sheetrock you will certainly reduce. As soon as you have completed one side, repeat the exact same procedure on the various other side. So when you have completed back framing you currently have a strong frame to attach the patch item of sheetrock. * Note-if you have a hole to spot where there are framing, electric or mechanical problems in the way that maintain you from moving the 2x4 behind the wall surface to screw down the side, you can screw in the top and also bottom of the 2x4 and this will suffice. You could additionally think about affixing the 2x4 back framing across the top as well as bottom of the hole as apposed to attaching the 2x4's on the sides, just utilize the exact same directions of add-on for the sides or leading and bottom.Now that the prep and framing are complete next we will certainly reduce an item of sheetrock to insert right into the framed opening symphonious 3. Step 3: take a dimension of the opening and cut a piece of sheetrock to
fit and safeguard it.It does not need to fit extremely limited but it will certainly have to fit and also be screwed to the
back framing you installed. You need to place 2-3 screws down each side connecting the item of sheetrock you cut to the framing. * Note-all the screws will should be "established"listed below the surface of the sheetrock yet not deep sufficient that the screw head rips the paper face on the sheetrock, unset screws will show and also conflict with the following step. ** Note sheetrock can be found in two densities for a lot of domestic construction -1/ 2" as well as 5/8 ". 1/2"is normally on the interior walls/ceilings and also 5/8"is utilized on underside of staircases and in the garage.Well you're making development as well as you have loaded the void with sheetrock, currently we will certainly go on to the
covering or ending up stage of the completely dry wall surface compound(mud )described symphonious 4. Step 4: covering the patch with drywall substance (mud). As I was saying in action 3 the piece of sheetrock you reduced to load the hole does not need to fit extremely limited. If the sheetrock you reduced has a void around the
border/joint of it as well as where it fulfills the existing wall surface board, you ought to pre fill the location prior to using the drywall tape. So just take a little substance as well as fill in the sides and smooth the excess level wit the wall, enable to completely dry. Following is to use the drywall tape to ensure that after we are all finished there will not be a fracture around the joint of the patched opening. For patch job I such as to make use of a"mesh "or "fiber" tape, it gives a stronger hold as well as the mesh tape is a lot more forgiving compared to routine drywall tape, in the considering that you do not have to pre mud the wall surface to stick the tape. The mash tape has a sticky backing, so all you do is cut the mesh tape to the size you need, stick it on the wall surface with the center of the mesh tape running right according to the joint or fracture. The mesh tape should always run past the joint at the very least an inch. Repeat this process for all 4 sides of the spot. Following use a layer of compound around the perimeter of the spot, over the mesh tape. The mesh will be somewhat visible after just one coat. * Note-If you apply to much compound(mud )you will have a bulge in the surface. Permit this coat to dry, sand gently, primarily to knock of any kind of knife borders that dried out in the compound and also could cause the next coat to develop to a lot. You do not intend to attempt and also mud the spot in just 1 coat, it is better to apply a moderate/thin layer enable to completely dry, sand as well as layer again. Nevertheless the layers( at the very least two) have actually dried as well as you are completely satisfied that the surface area is coated evenly, sand the mud to also the surface. * Note -a less compared to excellent coating task could be ravelled with sanding. Sanding along the outside edge of the mud also, will certainly mix the patched area better right into the existing surface. An actually neat method seeks you have actually sanded the spot, take a damp sponge or cloth as well as"laundry" the outdoors mud of the spot mixing it even much better into the existing surface, this method will help you prevent seeing a mud line around the spot when it is finished. If your home has a smooth texture, this is the last action, your ready to repaint. If you do not have a smooth texture you will certainly should check out on.Only one even more action and the drywall component of your patch will certainly be complete, appearance. We will certainly go over various structures and the best ways to apply the in step 5. Tip 5: there are lots of appearances and also you should initially understand exactly how to determine your existing appearance prior to going forward.Older residences might have a swirl, crows foot, hand or smooth texture. More recent houses essentially use smooth, orange peel, knockdown as well as hand textures. For a crows foot you will certainly need a crows foot or stomp appearance brush. For swirl structure you could need to get in touch with a completely dry wall supplier shop for the right texture brush or trying out a couple of various brushes. For a hand structure you can make use of a completely dry wall surface knife or trowel. Every one of the above stated appearances need a device or brush to use drywall compound to attain the appearance. The next 2 textures could be bought in a spray can, orange peel and tear down. * Note- with all textures it excels to obtain an old item of plywood or cardboard and experiment initially to locate the appropriate amount of pressure, density of mud, technique and also established time to create the right aim to best hide that a repair was ever before made. As constantly if you texture the wall surface and also are not satisfied with the results you could was the appearance of promptly with a damp sponge of dustcloth, enable to completely dry and also try texturing once again or sand of a poor appearance if you are not satisfied with it after it has been allowed to completely dry. * Note- Knockdown appearance dimension can be manipulated by allowing the sprayed on appearance established or completely dry for much less or even more time relying on the desired look.We have actually reviewed the 5 actions required to professionally fix a drywall patch. 1 )effectively prep the area to be patched. 2)back frame the opening. 3 )dimension and cut the sheetrock to load the opening. 4 )apply mesh tape as well as mud to smooth the surface. 5)pick and also apply proper texture.So go out and also" obtain your drywall on". You can look into my article on painting walls if you require help with the paint. Don't hesitate to leave a remark regarding other subject you would like me to write on pertaining to drywall. Please have a look at our website, dennardbloss.com, it
is all regarding our building surfaces.
DIY - How to Repair Drywall Seams
It's a regular situation you're taking a seat staircases enjoying the TV or reviewing a book, then you listen to a loud bag from upstairs. Startled, you run upstairs to see what is going on, as well as you see your kid's leg, arm or head sticking from the wall surface. Nevertheless the dust clears, you ensure that everyone is alright, and the proper punishments are divvied out, it's time to deal with the gaping opening that is left in your wall.Now depending
on the size of the hole that is in the drywall. depends on exactly how it is mosting likely to be taken care of. If you have a small door manage dimension opening it's mosting likely to be less complicated to do it one means (which ill discuss later). Yet if you have a larger opening it may be much easier to set up a big brand-new piece of drywall that runs from one stud to an additional. I'll describe that also.Now with a
smaller sized opening First we should cut out the pieces that are hanging everywhere. We will do this with a drywall saw as well as an energy knife. After that once we have a great tidy location to deal with, we desire to remove concerning 1/2inch to 1 inch strip of paper off the drywall to ensure that it looks like torn cardboard. Then we want to reduce an item of drywall that is a little larger compared to the hole that is going to be dealt with. After that begin to carve away at the rear end of the item till the piece fits the opening as well as the paper is left. This item is called a "spot hat".
Now put drywall mud on the sides of the patch hat and area it in the red. After that when in location apply a layer of mud over the patch, allow completely dry. When completely dry, chip off any kind of portions and also sand smooth, and afterwards mud once more. Allow that dry, as well as do the same point. Do this up until the spot behaves as well as smooth and prepared to be painted.That's how you can repair a tiny opening in drywall. Currently to fix a larger opening it's basically the very same thing other than that we are going to intend to eliminate the opening totally. Take the drywall saw and cut till you struck a stud, now determine to the mark as well as minus & frac34; of an inch to make sure that you will certainly be half on the stud. Make two marks as well as break a line, or with a flat side draw a line with both marks, that's the line you desire to cut. Now that you have actually that done we intend to make use of the saw to cut to the stud beyond of the opening. Take a measurement from the exact same location that you did for the other mark as well as include & frac34; of an inch to it. That will get you half on the various other stud. Make two marks a draw a line with it. With a framing square, utilize the line to make a square line on top as well as at the base of the hole. You ought to have a square opening currently. Now you intend to eliminate the piece that you have actually noted. Procedure the hole that you have as well as reduce a piece to fit in it. Once reduce location the item in the opening and also nail to 2 sides where the studs are with some drywall nail. Then mud it like in the various other example and you are prepared. These are some instances of the best ways to repair an opening in your wall surface.

Introduction to Drywall Repair Materials
Drywall repair Winter Springs - drywall tools