[post_name handyman Repairing a Hole in Drywall

Drywall is one of the most typical wall surface cellular lining of the the modern home. The drywall is glued and nailed/screwed to the hardwood framework of the home and after that the joins are then smudged as well as sander. During the life of any kind of residence damages to the drywall will happen frequently when the relocating furnishings or playing inside. There are 2 means to repair this damage - ring a specialist and also pay them to fix it or learn how you can repair it on your own. Most repair services are fast as well as easy to do with a few tools to do the work
Plaster Kinds
The initial thing you have to recognize is the kinds of plaster that are made use of to do the Work. There are three main types:
- Skim coat - A powder that is mixed with tidy water to make a paste and utilized in joints as well as loading holes - sets hard and also is difficult to sand.
- Cornice Cement - A powder that is combined with water making a paste to adhesive on cornice - smooth tacky paste that set really tough as well as is tough to sand.
- Finishing Compound - This is premixed in buckets and also prepares to use straight from the container - dries (does not established) as well as is extremely easy to sand.
- Glass fiber tape - This tape is self adhesive and also gives toughness to the loading plaster or skim coat - just needed on larger holes
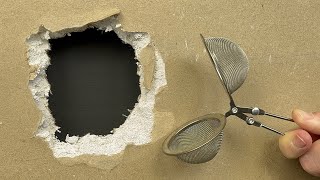
To repair a hole of damage to a wall you Will only need base layer and finishing compound.Tools: There a few tools that you will certainly require
to purchase to do the task however these are easy as well as affordable --One broad blade 250mm(10inch)large
( looks like a wide paint scarper), one 100mm( 4inch) broad blade, one 100mm (4inch) x 250mm (10inch )towel.You will certainly also should blend the skim coat for larger
openings so an electric drill and paint mixing attachment is best. Nevertheless the base coat could be mixed manually yet this is slow.For Instance: An opening concerning the size of a tennis round was made while
moving furniture.Step one: Make certain the opening in the drywall is tidy (no protruding drywall or paint)
mix your skim coat power with tidy faucet water to a paste just like tooth paste. Keep in mind: if the base coat is also damp the skim coat will befall of the hole. If you find the skim coat consistently falls under the wall surface tooth cavity fill the behind the hole with newspaper to sustain the base layer while it establishes. Fill the hole using the smaller broad knife seeing to it the opening is loaded and also the skim coat is flush with the drywall.Step two: When the first coat of base coat is established, Cut a small amount of glass fiber tape to just cover the hole as well as very carefully put into area. Mix up a small quantity of base layer as well as spread over the tape making certain that you spread out the base layer beyond the tape. The smoother and also flatter the 2nd coat is the much better the outcome will be. Allow it established from 45 -60 Minutes's. Step 3: Spread a thin coat of ending up compound with the big broad knife and also let this completely dry.
The completing compound needs to be spread out a minimum of 100mm (4inches )past the base coat.Step four: Sand your collaborate with 180 grit sand paper making sure you feather or blend the edges with the existing paintinged wall surface to make sure that the repair will not be seen when paintinged. The aim is to sand the repair service as flat as you could as well as assimilate the sides. Then your fixing is ended up as well as ready to paint.Tip: Bear in mind to wash you tools off with tidy water in between steps so the plaster does not established on your devices.
Does Your Concrete Foundation or Drywall Have Cracks?
So you have a new home and also everything looks superb. One day, late in the afternoon, you are late to fulfill a close friend. You hurriedly toss your layer on and also start towards the door. Boiling down the long corridor you notice that the sun is setting as well as the light is coming through the window that makes you so glad you have such a wonderful residence, yet you additionally notice something that you haven't seen before; the walls look rougher and also unequal in some locations. On your way house you begin to think of what you had actually observed as you were leaving for your meeting, and also you wish to take a closer check out it when you obtain back.As you get back and also search for the rough areas of wall that you had seen, to your amazement, you can't find them.Were you thinking of things?Not really;
these are issues that newer residences have now. With the more recent larger windows located in some cases from floor to ceiling, as well as more and also brighter lighting, the chances of this taking place is much greater.Welcome to the world of
drywall finishing and also critical lights problems. A designer may establish a wall or ceiling surface area for a specific layout impact, or simply by coincidence you might locate areas of your office or home that drop into what is called extreme important lighting locations. These locations are located in areas such as a lengthy hallway, a lobby wall surface, or smooth ceiling where the light from any kind of source comes streaming across the face of the wall or ceiling at just the ideal angle.The combination of any type of type of gloss paint and also smooth walls will certainly make these blemishes much more exaggerated. This may make the regarded look unacceptable to the individual, or property owner, after the finest workmanship. Source of light, appearance of wall surface, as well as sheen of paint are key factors influencing the look of drywall as well as surface. As with any type of framework male develops, with a top quality installation as well as appropriate paint procedures the end result generally ends up fine, however allow's assume concerning this.The whole nature of drywall setup is crude at ideal. Four foot vast sections of drywall are butted with each other over the timber mounting participants, after that toenailed and screwed to the framing, and afterwards drywall mud is used to fill out all the nails and joints. All this as well as the walls are supposed to end up resembling one continuous smooth wall sections, totally free from aesthetic defects. As we stated previously, most of the times you will certainly not see defects, however we are chatting regarding important lights locations, where instance you will see some defects, also from the very best drywall finish work.So currently we understand that walls are not completely directly, and also there is actually no method we could make them excellent in some lights situations.
What can we do to earn them look as smooth as well as level as we can? 1. Relocate any lights located in the ceiling a minimum of three feet far from any type of converging walls.2. Walls and also ceiling in critical light areas ought to have a small quantity of appearance on the surface such as orange peel, or brocade. This will separate the reflection of light into many various directions, enabling the walls to look smoother and straighter.3. Wall surfaces should never be painted with any kind of gloss paint, not also velour, or eggshell luster.4. Add drapes that could limit, or change the direction of light being available in from large windows.5. Use plants to damage up lengthy wall surfaces.6. Make use of a cozy off-white level shine paint on ceilings. Paint produces make specifically made level sheen
paints for ceilings.7. Usage lights from several areas in the area to combat one big light source.These are
just a couple of ideas.
You will need to play around with how to separation the illumination in these rooms. Bear in mind lots of sources of light in a room will certainly be better that one source. John Howell Residence Paint Vancouver, WA

How to Repair a Drywall Hole
Drywall repair Oviedo - general labor