[post_name drywall Drywall Plastering - A Great New Method

Drywall texture is basic and a budget-friendly method for wall design. Drywall is popularly referred to as gypsum board or plasters board and is utilized to earn interior wall and also ceilings. It is great if greater than 2 people are included in the procedure of drywall installation, due to the fact that it calls for substantial training of hefty material.Partitioning Drywall is
extremely much preferred for dividing. This is since a multitude of benefits are connected with it like convenience, flexibility, completely dry construction, outstanding performance, aesthetic charm, as well as excellent speed in total process of setup. The setup of drywall requires technique and also artistry. Drywall is available in huge sheet with a dimension of 4'x12'.
Taping Drywall
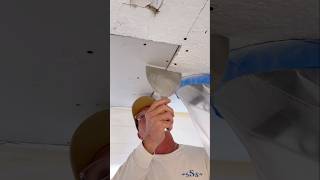
The installation of the drywall is extremely easy. It is only the taping of joints between panels which call for some method. Once the dangling of the drywall is complete, the following action is the taping of drywall joints. There are 2 kind of tapes made use of for this function. One is the airplane paper black tape and also the other is self-adhesive fiberglass tapes. The fiberglass tape could be directly pasted over the drywall.Materials Required
For Taping The general devices required for the process of taping are: & bull; A banjo & bull; 12 inch trowel & bull; Roll of paper• tape & bull; Setting compounds & bull; 6 inch versatile putty knife & bull; Four inch flexible putty blade Sanding, Primarying as well as Ending up The primary step while preparing the surface area of drywall is to
inspect the whole wall surface, due to the fact that the majority of the time there are small openings and swellings in the wall surface. If there is any type of nail or obstacle, after that with the aid of hammer tap them. After this procedure, you could go on with the sanding of the wall in order to get perfect drywall surface.The next off essential step is priming, which is done simply prior to paint.
Topping the drywall ensures that paint lasts for longer period as well as sticks well. In order to avoid leaking of the paint, work from the leading and also continue in the direction of the base. After finishing this, you can proceed for painting.The final action is drywall ending up. It excels to obtain stuck to level paint, because the touch up deal with flat paint is extremely simpler. Below, it is very important to keep the void or 24 hours before two coats and also ensure that wall is completely dry prior to you opt for the next coat. It is frequently observed that drywall looks totally different once the paint dries out off.Fiberglass to avoid mold development The sheet of drywall is typically constructed from paper yet nowadays it is replaced by fiberglass. Fiberglass protects against the development
of mold and mildew, which is typical with paper drywall. It has been observed a number of times that when paper drywall was revealed to water via leakage or floodings, it causes the growth of mold. Mold not just impacts the local hygiene but additionally reduces the total charm of the area.
Drywall Finishing and Critical Lighting Problems
Drywall installation is among the most common home enhancement tasks numerous homeowners locate themselves confronted with. Whether you're changing drywall in your house or adding a new wall as part of a bigger home improvement job, you may locate yourself in a circumstance where you require to change drywall in your house. This article covers a few tips for making sure the surface on your drywall fixing is done correctly so it will certainly assimilate with the rest of your home.Gather the Right Tools and also Products There are a couple of tools and
supplies you'll have to tackle your drywall project. First, you wish to have adequate joint compound for the work ... about 1 gallon for every single 100 square feed of area. Naturally, you'll also require a mud pan or comparable container to hold the joint compound as you apply it. In addition, you'll require a few taping knives or putty blades. I suggest having a slim one and one that's a little bit wider for feathering out the seam. You'll additionally need drywall tape to leave the joint. Lastly, you'll need sandpaper or something much like sand down the joint substance between coats after it dries.Applying the Very first Layer of Mud The very first thing you intend to do is use the drywall tape along the seam between the two pieces of drywall or sheetrock. Aim to do this so the joint runs along the center of the tap. Once the tape remains in place, you could begin using joint substance utilizing among the putty knives. Liberally use the joint compound as you leave the size of the joint as well as be certain the joint substance gets pushed right into the seam to fill up the gap. Likewise, make sure you cover every one of the tape with joint compound. You may wish to stumble upon the size of the joint a number of times with joint substance, feathering out the mud as you continuously do so. You can care for the edges similarly, by taping and using joint substance to the seam that forms the edge in between both pieces of drywall. Last, you'll wish to also apply joint substance to any nails standing up the items of drywall. Simply use your putty blade for this while using a liberal quantity, after that smoothing it out with the side of the knife. After that allow the joint compound dry.Applying the Second and 3rd Coats You'll intend to use regarding 3 coats of joint substance. After the initial coat dries out, make certain to sand down the joint compound on the joints as well as the nails before proceeding. This will certainly make certain that the surface area is smooth asyou use the next layer. Then use a 2nd layer of joint compound to the joints likewise as the very first layer , but spreading out the joint substance out bigger as you run along the joint. Do the same for the nails and also allow this layer completely dry . As you most likely guessed, using the 3rd coat is the exact very same process.Getting Ready to Painting When you have actually used the 3rd coat of joint substance and also allow it dry, be sure to sand around the edges of the seams and nails one last time to ensure the surface area is as smooth as possible. You'll likewise desire to wipe down the wall surface with a completely dry dustcloth to obtain rid of any kind of dust that gets on the surface.Now you're prepared to prime as well as paint your walls.
Drywall repair Okeechobee - drywall texture

How to Install Your Own Drywall