[post_name drywall tools Drywall - Methodologies and Benefits

Fixing split drywall seams can be discouraging at best. If there is just an extremely, extremely small split existing, you might have the ability to scrape out the crack to a larger dimension and afterwards simply apply new spackling compound. Making use of a sharp, sharp device such as an old made could opener (church key), scrape put a groove wider and a little longer compared to the crack. It should go to the very least 1/8" deep however deeper is better. There are patching compounds available today made just for patching splits however are not planned for big areas. If this is a paintinged wall surface some quantity sanding will certainly likewise be called for. Spackle will not adhere to a smooth painted finish. Sand the location around the fracture at the very least a couple of inches larger compared to the crack and afterwards go ahead and also apply the patching compound making sure you compel the spackle down right into the fracture. Right after using the spackle, re-wipe the area with your blade to eliminate any kind of excess spackle from the location leaving a flat surface. Depending upon just what type of substance you bought the drying times vary a fair bit from mins to hours. After the spackle is totally dry usage a 100 or 120 grit drywall sanding paper to smooth location so it is flush with the existing wall. Prime the drywall as well as mount the final paint.In a situation
where the fractures are a lot larger along the joints, it may created by the drywall tape drawing loose, physical damages or perhaps even excess dampness. Carefully get rid of any as well as all loose materials at taped locations. You could not and I repeat, could not re-spackle old tape. The drywall tape has minute openings that enables the spackle to travel through and also anchor the tape to your seams. The spackle "wets" the tape assisting it not only to stay with the drywall but permits the spackle to create a bond on both sides to the drywall. Once it is utilized, the openings are filled thereby making the tape worthless. Aiming to route will just create the seam to re-crack later.After getting rid of all loose products, lightly sand the harmed areas bewaring not to tear or sand through the paper layer of the drywall underneath. As soon as the location is smooth to the touch see to it you have sanded evenly onto the bordering area so as not to leave an edge that will certainly show through the ended up work. Using a six inch wide spackle knife, install an also layer of new spackle over the joint. Put your new drywall tape over the seam and using the knife, press the tape securely into the drywall eliminating all excess spackle as it squeezes out from under the tape as well as sides of the knife. Do not eliminate way too much spackle so as to leave the paper completely dry. As soon as the area is as smooth as you could make it, apply a second lighter coat over the same area making certain the brand-new tape is completely embedded in fresh spackle.After drying out for someday to guarantee all the spackle is dry, re-sand the
whole location to again get a smooth feeling to the entire repaired area. Utilizing your twelve inch knife, spread out a second coat to the entire fixing making sure you mix smoothly onto the adjoining wall surface areas. Do not leave any type of ridges or sharp sides where you meet the old wall finish.Once this second coat of spackle is dry, which will certainly be a lot less than the skim coat as it is much thinner, apply, using your twelve inch blade, a third extremely thin layer of fresh spackle. You will certainly virtually be able to see through this coat as it is made use of to fill up little indents or scratches left by fining sand the 2nd layer. Again after the third layer dries, really lightly sand the repair for the last time to guarantee a totally smooth ended up location. Apply a layer of drywall guide to seal the freshly fixed drywall location and afterwards paint your wall.If the drywall joints have totally cracked or split open there might be an architectural issue that has to be re-mediated prior to you deal with the drywall seams. Structure negotiation, foundation problems or various other products may effect the drywall finishes so make certain they are repaired first.Once you make certain there are nothing else issues present, as in a minor repair work, get rid of all loose or broken materials. If the drywall itself is split, reduced the drywall back to a stud and also set up a brand-new item of drywall. The repair work is the very same as a small crack only on a much larger scale.Installing tiny items of drywall for patching produces what are called butt joints which are much more challenging to conceal. You will certainly be compelled to spread your spackle over a much larger location to
acquire a smooth look and not a bump in the wall surface. With method you can do this work and save on your own a large amount of money.If you remain in a hurry and also the repair is fairly tiny, there are fast drying out materials offered such as Durobond 90 which when included in spackle makes the spackle rock hard in ninety minutes. There is also a forty-five min kind offered however just masters must attempt and utilize it. Forty-five minutes zips truly quick. When I claim it dries rock hard, it is almost impossible to sand when dried so any kind of little flaws left in the surface area with your knife will certainly show later on. Be careful.Remember to keep your tools tidy, do not tear open cans or covers with your blades as it will certainly damage or chip the edges of the knives as well as work as clean as you could to prevent strenuous cleaning later.
Drywall Mudding and Taping - A Simple Process For Do-It-Yourself Homeowners
So you have a brand-new residence and also every little thing looks superb. One day, late in the afternoon, you are late to meet a buddy. You hurriedly throw your coat on and start towards the door. Coming down the long hallway you notice that the sun is setting and also the light is coming through the window that makes you so grateful you have such a good house, but you additionally notice something that you have not discovered before; the wall surfaces look rougher and also irregular in some locations. On your means home you begin to assume regarding just what you had noticed as you were leaving for your conference, and also you wish to take a more detailed consider it when you obtain back.As you get back and also seek the harsh areas of wall that you had noticed, to your amazement, you can not discover them.Were you visualizing things?Not truly;
these are problems that newer residences have currently. With the more recent bigger windows situated often from flooring to ceiling, and more and brighter illumination, the possibilities of this occurring is much greater.Welcome to the globe of
drywall finishing as well as essential illumination issues. A designer may create a wall surface or ceiling surface for a particular design impact, or simply by coincidence you may find sections of your office or home that come under just what is called serious vital lighting locations. These locations lie in locations such as a long hallway, a lobby wall, or smooth ceiling where the light from any source comes streaming across the face of the wall or ceiling at just the ideal angle.The mix of any type of kind of gloss paint and smooth wall surfaces will certainly make these flaws much more overstated. This could make the viewed look unacceptable to the individual, or house owner, after the very best handiwork. Light, appearance of wall surface, and also shine of paint are crucial aspects influencing the look of drywall and surface area. As with any type of framework male develops, with a high quality installment as well as appropriate painting treatments completion result typically turns out fine, yet allow's consider this.The whole nature of drywall installation is unrefined at best. Four foot large areas of drywall are butted with each other over the wood framing participants, then nailed as well as screwed to the framework, then drywall mud is related to complete all the nails and also joints. All this and also the walls are intended to wind up looking like one continual smooth wall surface sections, without visual flaws. As we specified earlier, for the most parts you will not see problems, however we are speaking about essential lights locations, in which situation you will see some defects, even from the most effective drywall surface work.So currently we understand that wall surfaces are not perfectly straight, as well as there is really no other way we can make them best in some lighting circumstances.
What can we do to earn them look as smooth as well as level as we can? 1. Relocate any lights found in the ceiling a minimum of three feet far from any kind of converging walls.2. Walls and ceiling in essential light locations ought to have a percentage of structure externally such as orange peel, or brocade. This will damage up the reflection of light into various instructions, permitting the wall surfaces to look smoother as well as straighter.3. Walls need to never ever be paintinged with any kind of kind of gloss paint, not also velour, or eggshell sheen.4. Add curtains that can limit, or change the instructions of light coming in from large windows.5. Usage plants to separate lengthy walls.6. Utilize a cozy beige level sheen paint on ceilings. Paint manufactures make particularly developed flat luster
paints for ceilings.7. Use source of lights from numerous areas in the area to counteract one big light source.These are
just a couple of ideas.
You will need to play about with how you can breakup the lights in these spaces. Remember many resources of light in an area will be better that one resource. John Howell House Painting Vancouver, WA

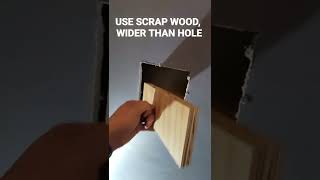
Dry Wall Patching - 5 Steps to Successfully Repairing a Hole in the Wall
Drywall repair Pahokee - sheetrock prices