[post_name drywall texture Dry Wall Patching - 5 Steps to Successfully Repairing a Hole in the Wall

Repairing fractured drywall joints can be annoying at ideal. If there is just a really, extremely small crack present, you could be able to scrape out the split to a bigger size and afterwards simply apply brand-new spackling substance. Using a sharp, pointed device such as an old fashioned could opener (church trick), scrape placed a groove broader and somewhat longer than the fracture. It has to go to the very least 1/8" deep yet much deeper is better. There are covering compounds offered today made just for patching splits yet are not intended for large locations. If this is a painted wall surface some amount sanding will certainly also be needed. Spackle will not stay with a smooth painted coating. Sand the location around the fracture a minimum of a number of inches broader than the split and then go ahead and also apply the patching compound ensuring you require the spackle down into the split. Right after applying the spackle, re-wipe the area with your blade to eliminate any type of excess spackle from the location leaving a flat surface. Depending after just what type of compound you purchased the drying out times vary quite a bit from mins to hours. After the spackle is completely dry usage a 100 or 120 grit drywall fining sand paper to smooth area so it is flush with the existing wall surface. Prime the drywall as well as mount the final paint.In a situation
where the splits are much bigger along the joints, it may brought on by the drywall tape drawing loose, physical damage or probably even excess moisture. Meticulously get rid of any kind of and all loose products at taped locations. You can not and also I repeat, can not re-spackle old tape. The drywall tape has minute holes that enables the spackle to go through as well as anchor the tape to your joints. The spackle "damps" the tape helping it not just to stick to the drywall yet enables the spackle to form a bond on both sides to the drywall. Once it is used, the openings are loaded consequently making the tape ineffective. Trying to brief cut will just create the seam to re-crack later.After removing all loosened materials, gently sand the damaged locations taking care not to tear or sand via the paper layer of the drywall beneath. As soon as the area is smooth to the touch ensure you have sanded evenly onto the surrounding area so as not to leave an edge that will certainly reveal through the ended up work. Making use of a six inch broad spackle blade, mount an also coat of brand-new spackle over the joint. Position your new drywall tape over the joint as well as utilizing the knife, push the tape strongly onto the drywall removing all excess spackle as it ejects from under the tape as well as sides of the blade. Do not eliminate way too much spackle so about leave the paper dry. When the area is as smooth as you could make it, apply a second lighter coat over the very same area making certain the new tape is entirely installed in fresh spackle.After drying out for one day to ensure all the spackle is dry, re-sand the
entire area to once more get a smooth feel to the whole repaired area. Utilizing your twelve inch knife, spread a 2nd coat to the whole repair ensuring you blend smoothly into the adjacent wall surfaces. Do not leave any type of ridges or sharp edges where you satisfy the old wall finish.Once this 2nd coat of spackle is completely dry, which will be a lot less than the base coat as it is much thinner, use, utilizing your twelve inch knife, a 3rd really thin layer of fresh spackle. You will certainly almost be able to translucent this layer as it is utilized to fill up small indents or scratches left by sanding the second coat. Once again after the 3rd layer dries out, extremely lightly sand the repair work for the last time to guarantee an absolutely smooth finished area. Apply a coat of drywall primer to secure the newly fixed drywall location and after that paint your wall.If the drywall joints have actually completely split or divided open there could be an architectural problem that has to be re-mediated prior to you deal with the drywall seams. Building settlement, structure troubles or other products might effect the drywall finishes so be sure they are repaired first.Once you are sure there are no other problems existing, as in a minor fixing, get rid of all loose or broken products. If the drywall itself is broken, reduced the drywall back to a stud and install a new piece of drywall. The repair work is the exact same as a small split just on a much bigger scale.Installing tiny items of drywall for patching produces just what are called butt joints which are much more difficult to hide. You will be compelled to spread your spackle over a much bigger location to
obtain a smooth appearance and not a bump in the wall surface. With method you could do this job and also save yourself a fantastic deal of money.If you are in a rush as well as the fixing is relatively little, there are fast drying out materials readily available such as Durobond 90 which when included to spackle makes the spackle rock hard in ninety minutes. There is also a forty-five minute type available but only actual pros should try and also use it. Forty-five mins zips actually rapid. When I state it dries rock hard, it is nearly impossible to sand when dried out so any kind of little issues left in the surface with your knife will show later on. Be careful.Remember to maintain your devices tidy, do not pry open coulds or lids with your blades as it will dent or chip the sides of the knives and work as clean as you could to avoid strenuous cleanup later.
Drywall - Methodologies and Benefits
Hard as it is, drywall could just stand up to minimal misuse. A door flung open with terrific pressure can make a doorknob-size opening in your wall surface. This damage looks poor. Nevertheless, also huge openings could be simple to fix.The most convenient method to repair openings in dry wall is to buy a drywall repair service set by gauging the opening as well as inspect out your local equipment store or home improvement store to purchase a package. There are various kinds and dimensions for various applications. As an example, a drywall spot for ceiling is thicker than for the wall. Before making use of the package, ensure to remove any kind of loosened plaster or paper around the opening edges.
For repairing tiny drywall hole, comply with the suggestions listed below:1. Prepare a tin can cover at the very least one and also a half inches in size than the opening in the drywall. Utilize a keyhole saw in removing a narrow straight slit in each side of the hole. Make certain that your measurements of the hole need to be equivalent in size or lid to be able to insert lid right into the hole.
2. Utilize an awl to punch two holes in the lid center and afterwards string a 12-inch item of string or cord through the holes.
3. While holding the ends of wire, slide the lid with and pull it towards you up until it is level versus the within the wall. Establish stick or scrap timber over the hole to hold it in location and also turn the cable tight over the stick. The could lid should be strongly held against the in of the wall.
4. Utilize a putty knife when applying pre-mixed drywall-patching compound over the spot by complying with supplier's instructions. You might additionally mix plaster of paris with water to produce a thick paste. Load the compound or plaster to the hole versus the support and behind stick. Keep the compound inside the drywall hole and cover the backing and fill up the slits. Nonetheless, do not spread it on the wall surface area. Allow the spot dry up until it turns brilliant white, at the very least for 1 Day. When it is completely dry, cut the string or wire and also get rid of the stick.For repairing
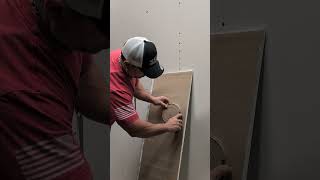
big drywall hole, comply with these pointers:1. Cut a square area bigger compared to the hole making use of a keyhole saw or energy knife.
2. Cut 2 backer boards so they are 2 or 3 inches bigger compared to the drywall opening.
3. Place a backer board inside the hole on top side and also safeguard it with a one and 1/4 drywall screws and also holding it on place as you function. Tighten up until the screw heads are below the surface, place a second backer board inside the lower edge of the opening, and also safeguard with screws.
4. Cut the patch to suit the opening, screw the patch to the backer as well as tighten up with screws until the screw heads are below the surface area.
5. Apply items of fibreglass tape over the seams.
6. Cover tape utilizing a slim coat of compound as well as sand gently when dry. You could after that apply 2 more coats. Sand as well as plume every coat up until the surface is smooth.

Drywall Finishing and Critical Lighting Problems
Drywall repair Lake Park town - hanging drywall