[post_name hanging drywall How to Install Your Own Drywall

Drywall patching requires perseverance and also perseverance. I am going to damage the process down easily so you will be a lot more informed prior to you start your following dry wall surface patch.One thing you need to take into consideration when working with drywall is the DIRT. If you are delicate to the drywall dust or gypsum you might wish to get a bit mask, security goggles or handwear covers as well as put on a lengthy sleeve shirt for protection. Always remember to safeguard any kind of furnishings that you want to keep dirt complimentary, too!Step1: prep the
opening or location to be patched.If the hole or area to be patched has loosened wall board paper you will have to get rid of the loose paper as well as plaster. Currently if the wall board paper intends to proceed destroying the side of the wall, a means to quit this is the take a razor blade and reduced back from the loose location regarding an inch approximately. Just what you are doing is scoring the wall surface so when you tear of the loose paper it will come to the scored line as well as not tear additional triggering a bigger location to need patch work. If after you have actually eliminated the loosened paper and the plaster board underneath is crumbled and hardly hanging to the wall, you need to knock out all the loose gypsum. Loosened paper and gypsum will trigger the drywall substance to not bond highly and might develop a bubble you will certainly see only after finishing with substance. As part of the preparation, you might intend to settle up the opening so you could extra quickly cut the piece of sheetrock that will certainly fill the void.OK so the location is prepped and currently we will certainly should relocate to step 2, which will certainly advise you on
ways to appropriately affix a piece of sheetrock cut to load the opening in your wall or ceiling.Step 2: back mounting the opening to connect the sheetrock you will certainly reduce to fill the void.Just like with brand-new construction you will should have timber framing to screw the sheetrock into. To clarify, I will certainly make use of an instance
patch area of one foot by one foot. You will should cut a 2x4 into two 16 "lengths. You will certainly require to collect a cordless or electric drill and concerning a loads 1 1/4" wood screws. Take one of the 2x4's you have actually reduced as well as glide it in the red as well as behind the existing sheetrock, along one side of the hole. The factor the 2x4 is longer(16 ")than the 12"hole is because we will expand it a few inches beyond the top and also base. So currently you have a 2x4 inside the wall on one side, the 2x4 has to be laying level versus the within the wall, it will certainly not be transformed so the 4 "size of the 2x4 is flat against the inside, this will give us a bigger surface area for add-on as apposed to the typical way of mounting which would certainly be with the 2"width dealing with the sheetrock. You will intend to eyeball, best as feasible the 2x4 as well as split the distinction of the board width between the existing sheetrock and where you will connect the item of sheetrock you will reduce for the patch. Since the 2x4 is kept in the right setting you will need to screw the 2x4 into the existing drywall by holding tightly to the board and screwing into it with the face of the existing sheetrock. You will place 2 screws along the edge and also one on the top and base of the existing sheetrock to highly secure the 2x4 to accept item of sheetrock you will certainly reduce. Once you have completed one side, repeat the same procedure beyond. So when you have actually completed back mounting you currently have a solid framework to connect the spot item of sheetrock. * Note-if you have an opening to spot where there are framing, electrical or mechanical issues in the manner in which keep you from gliding the 2x4 behind the wall surface to screw down the side, you could screw in the top and also bottom of the 2x4 and also this will suffice. You could likewise consider connecting the 2x4 back mounting throughout the top and base of the opening as apposed to affixing the 2x4's on the sides, just make use of the very same directions of attachment for the sides or top and bottom.Now that the preparation as well as framing are full next we will certainly reduce an item of sheetrock to place into the framed opening in step 3. Action 3: take a measurement of the hole and reduced a piece of sheetrock to
fit as well as secure it.It does not need to fit incredibly limited however it will need to fit and also be screwed to the
back framing you set up. You need to put 2-3 screws down each side connecting the item of sheetrock you reduced to the framework. * Note-all the screws will need to be "established"listed below the surface area of the sheetrock however not deep enough that the screw head rips the paper face on the sheetrock, unset screws will certainly show as well as disrupt the next step. ** Note sheetrock can be found in 2 thicknesses for the majority of property building and construction -1/ 2" and 5/8 ". 1/2"is typically on the indoor walls/ceilings as well as 5/8"is made use of on bottom of staircases and in the garage.Well you're making development and you have actually filled up the gap with sheetrock, currently we will certainly move on to the
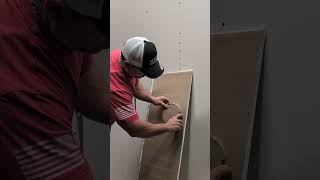
finishing or finishing phase of the completely dry wall surface substance(mud )clarified in action 4. Step 4: finish the spot with drywall substance (mud). As I was saying symphonious 3 the piece of sheetrock you reduced to fill up the opening does not need to fit very tight. If the sheetrock you cut has a space around the
border/joint of it and where it fulfills the existing wall board, you must pre fill the area before applying the drywall tape. So just take a little substance as well as fill in the sides as well as smooth the excess flat wit the wall, allow to dry. Following is to apply the drywall tape to ensure that after we are all finished there will not be a split around the joint of the covered hole. For patch job I prefer to use a"mesh "or "fiber" tape, it gives a stronger hold and also the mesh tape is far more forgiving compared to normal drywall tape, in the given that you do not need to pre mud the wall surface to adhere the tape. The mash tape has a sticky support, so all you do is reduced the mesh tape to the size you require, stick it on the wall surface with the middle of the mesh tape running right in line with the joint or fracture. The mesh tape ought to constantly run past the joint at least an inch. Repeat this process for all 4 sides of the patch. Following use a layer of substance around the boundary of the patch, over the mesh tape. The mesh will be somewhat noticeable after just one coat. * Note-If you put on much substance(mud )you will certainly have a bulge in the surface area. Permit this coat to completely dry, sand lightly, mainly to knock of any type of blade edges that dried out in the compound and might cause the next layer to accumulate to a lot. You do not intend to attempt and mud the patch in simply 1 coat, it is better to apply a moderate/thin coat allow to completely dry, sand and coat again. After all the layers( at the very least two) have actually dried out and you are pleased that the surface is layered uniformly, sand the mud to even the surface. * Note -a less than best finish task can be ravelled with sanding. Sanding along the outside side of the mud too, will blend the patched location much better right into the existing surface area. A really neat method seeks you have actually fined sand the patch, take a damp sponge or rag as well as"laundry" the outside mud of the spot blending it even better into the existing surface area, this trick will help you avoid seeing a mud line around the spot when it is finished. If your residence has a smooth structure, this is the last step, your ready to paint. If you do not have a smooth structure you will require to check out on.Only one even more action and the drywall component of your patch will be full, texture. We will talk about various appearances and just how to apply the in action 5. Tip 5: there are several appearances and you should initially recognize how you can identify your existing structure before going forward.Older residences may have a swirl, crows foot, hand or smooth appearance. Newer houses generally use smooth, orange peel, knockdown and hand textures. For a crows foot you will certainly require a crows foot or stomp appearance brush. For swirl texture you may have to seek advice from a dry wall surface distributor shop for the right appearance brush or experiment with a couple of different brushes. For a hand structure you could make use of a dry wall surface knife or trowel. All the above discussed textures need a tool or brush to apply drywall compound to accomplish the structure. The next two structures can be purchased in a spray can, orange peel as well as tear down. * Note- with all structures it readies to obtain an old piece of plywood or cardboard and experiment initially to locate the correct amount of pressure, density of mud, technique and set up time to create the ideal planning to ideal hide that a repair service was ever before made. As always if you structure the wall and also are not satisfied with the results you can was the structure of right away with a wet sponge of dustcloth, allow to completely dry as well as attempt texturing again or sand of a bad appearance if you are not happy with it after it has been allowed to dry. * Note- Knockdown structure dimension can be adjusted by letting the splashed on structure established or dry for much less or more time depending upon the desired look.We have actually discussed the 5 steps had to expertly repair a drywall spot. 1 )effectively prep the area to be patched. 2)back frame the opening. 3 )dimension as well as reduced the sheetrock to fill up the opening. 4 )use mesh tape and mud to smooth the surface area. 5)select as well as apply proper texture.So head out as well as" get your drywall on". You could have a look at my post on painting wall surfaces if you need aid with the paint. Don't hesitate to leave a remark regarding any type of other subject you would certainly like me to compose on relating to drywall. Please examine out our website, dennardbloss.com, it
is everything about our building coatings.
How to Install Your Own Drywall
Drywall texture is straightforward and a budget-friendly way for wall surface design. Drywall is commonly referred to as gypsum board or plasters board and also is utilized making interior wall and ceilings. It excels if greater than two individuals are included in the procedure of drywall setup, since it calls for substantial training of heavy material.Partitioning Drywall is
significantly preferred for partitioning. This is due to the fact that a lot of advantages are related to it like flexibility, adaptability, completely dry building, outstanding performance, visual appeal, and also excellent speed in total process of installation. The setup of drywall requires method and also artistry. Drywall can be found in large sheet with a dimension of 4'x12'.
Insulation Drywall
The installation of the drywall is really simple. It is just the taping of joints between panels which call for some technique. When the hanging of the drywall is complete, the following action is the insulation of drywall joints. There are 2 sort of tapes made use of for this objective. One is the aircraft paper black tape as well as the various other is self-adhesive fiberglass tapes. The fiberglass tape could be straight pasted over the drywall.Materials Required
For Taping The basic devices needed for the process of taping are: & bull; A banjo & bull; 12 inch trowel & bull; Roll of paper• tape & bull; Setting substances & bull; 6 inch versatile putty blade & bull; 4 inch flexible putty blade Fining sand, Keying and Finishing The primary step while preparing the surface area of drywall is to
check the entire wall surface, since the majority of the moment there are little holes and lumps in the wall surface. If there is any kind of nail or obstacle, after that with the aid of hammer touch them. After this process, you could go on with the sanding of the wall surface in order to acquire perfect drywall surface.The next off essential action is priming, which is done prior to painting.
Keying the drywall guarantees that paint lasts for longer duration as well as adheres well. In order to avoid trickling of the paint, work from the top as well as continue towards the bottom. After finishing this, you can proceed for painting.The final action is drywall finishing. It excels to get stuck to level paint, since the touch up deal with flat paint is really less complicated. Right here, it is necessary to keep the void or 24 Hr before two layers as well as make certain that wall is totally dry before you choose the next layer. It is commonly observed that drywall looks totally different once the paint dries out off.Fiberglass to stop mold and mildew development The sheet of drywall is usually made of paper yet nowadays it is replaced by fiberglass. Fiberglass protects against the development
of mold and mildew, which is extremely typical with paper drywall. It has actually been observed a number of times that when paper drywall was revealed to water via leakage or floods, it triggers the growth of mold and mildew. Mold and mildew not only influences the neighborhood health however likewise reduces the general elegance of the area.

Sheetrock - What Is It?
Drywall repair Lighthouse Point - drywall patch