[post_name drywall patch
Drywall Repair Tips

Drywall is one of the most typical wall surface cellular lining of the the modern house. The drywall is glued and also nailed/screwed to the wood framework of your house then the signs up with are after that glued as well as sander. During the life of any kind of residence damages to the drywall will certainly happen often when the removaling furniture or playing inside. There are two methods to fix this damages - ring a specialist as well as pay them to fix it or discover ways to fix it yourself. The majority of repair works are quick and simple with a couple of tools to do the work
Plaster Types
The first thing you need to understand is the types of plaster that are made use of to do the Task. There are three primary kinds:
- Base Layer - A powder that is blended with tidy water to earn a paste and utilized in joints as well as loading openings - sets tough and is hard to sand.
- Cornice Concrete - A powder that is combined with water to earn a paste to glue on cornice - smooth tacky paste that established really difficult and also is tough to sand.
- Completing Substance - This is premixed in buckets as well as prepares to use straight from the container - dries (does not established) and is really easy to sand.
- Glass fiber tape - This tape is self glue and also gives strength to the loading plaster or base coat - just required on larger holes
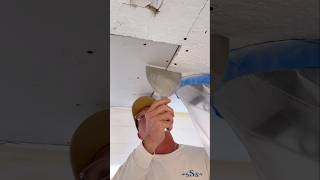
To fix an opening of damage to a wall surface you Will only need skim coat as well as completing compound.Tools: There a few devices that you will need
to buy to do the job nonetheless these are easy and also cost-effective --One wide knife 250mm(10inch)large
( appears like a broad paint scarper), one 100mm( 4inch) wide blade, one 100mm (4inch) x 250mm (10inch )towel.You will certainly additionally have to blend the base layer for bigger
holes so an electrical drill and also paint mixing accessory is best. Nevertheless the base coat could be blended manually however this is slow.For Instance: A hole regarding the size of a tennis round was made while
relocating furniture.Step one: Make certain the hole in the drywall is tidy (no protruding drywall or paint)
mix your base coat power with clean faucet water to a paste much like toothpaste. Note: if the base layer is too damp the base layer will certainly befall of the hole. If you find the base coat continually falls under the wall cavity fill up the behind the opening with paper to support the base coat while it sets. Load the hole utilizing the smaller sized broad knife making certain the hole is filled up and also the base coat is flush with the drywall.Step 2: When the very first coat of skim coat is established, Cut a percentage of glass fiber tape to simply cover the opening as well as meticulously placed right into place. Mix up a percentage of base layer and spread over the tape making sure that you spread out the skim coat beyond the tape. The smoother as well as flatter the 2nd layer is the much better the result will be. Allow it set from 45 -60 Min's. Tip 3: Spread a slim coat of completing compound with the huge broad knife as well as let this dry.
The finishing substance needs to be spread a minimum of 100mm (4inches )past the base coat.Step 4: Sand your collaborate with 180 grit sand paper making certain you feather or blend the edges with the existing painted wall to make sure that the repair work will not be seen when paintinged. The goal is to sand the fixing as level as you could and assimilate the sides. Then your repair work is finished and prepared to paint.Tip: Keep in mind to wash you tools off with tidy water in between steps so the plaster does not set on your tools.
Drywall Mudding and Taping - A Simple Process For Do-It-Yourself Homeowners
So you have a new residence as well as everything looks superb. Eventually, late in the afternoon, you are late to meet a pal. You hurriedly toss your layer on and start towards the door. Coming down the lengthy hallway you see that the sun is setting as well as the light is coming through the home window which makes you so glad you have such a nice home, yet you additionally see something that you have not noticed prior to; the walls look rougher as well as uneven in some locations. On your method residence you begin to think of just what you had observed as you were leaving for your meeting, as well as you intend to take a more detailed look at it when you obtain back.As you get back and also search for the rough areas of wall that you had actually observed, to your awe, you can't locate them.Were you imagining things?Not actually;
these are issues that newer residences have now. With the more recent bigger home windows located in some cases from floor to ceiling, and also even more as well as brighter illumination, the opportunities of this occurring is much greater.Welcome to the world of
drywall finishing as well as important illumination problems. A designer could develop a wall or ceiling surface for a particular design result, or simply by coincidence you may discover areas of your office or home that come under what is called extreme crucial lights areas. These locations lie in locations such as a long hallway, an entrance hall wall, or smooth ceiling where the light from any type of source comes streaming throughout the face of the wall or ceiling at simply the ideal angle.The combination of any kind of kind of gloss paint and smooth wall surfaces will certainly make these blemishes even much more overstated. This could make the regarded appearance undesirable to the user, or house owner, also after the best workmanship. Light source, texture of wall surface, and sheen of paint are crucial elements influencing the look of drywall and surface area. As with any structure man builds, with a top quality setup and also appropriate paint treatments the end result normally ends up fine, but let's believe about this.The whole nature of drywall installment is unrefined at finest. 4 foot wide sections of drywall are butted with each other over the timber framing members, after that toenailed and also screwed to the framework, and afterwards drywall mud is put on fill out all the nails and joints. All this and the walls are expected to end up looking like one constant smooth wall surface areas, without visual defects. As we mentioned previously, for the most parts you will certainly not see problems, however we are speaking about crucial lighting areas, where case you will see some defects, also from the most effective drywall surface work.So currently we understand that walls are not flawlessly straight, as well as there is truly no method we could make them ideal in some lights scenarios.
What can we do to make them look as smooth and level as we can? 1. Move any lights located in the ceiling at the very least three feet far from any kind of intersecting walls.2. Wall surfaces and ceiling in important light areas must have a small amount of appearance externally such as orange peel, or brocade. This will certainly damage up the representation of light into several directions, allowing the walls to look smoother as well as straighter.3. Walls ought to never be painted with any sort of gloss paint, not even velour, or eggshell shine.4. Include drapes that could restrict, or transform the instructions of light can be found in from large home windows.5. Use plants to break up lengthy walls.6. Utilize a cozy beige level shine paint on ceilings. Paint produces make especially developed flat shine
paints for ceilings.7. Use lights from several locations in the room to counteract one huge light source.These are
just a couple of pointers.
You will certainly have to play around with ways to breakup the lights in these areas. Bear in mind many sources of light in a space will be much better that source. John Howell Residence Paint Vancouver, WA

How to Find the Perfect Drywall Repair Services
Drywall repair Fernandina Beach - how to repair