[post_name drywall installation How to Repair a Large Hole in a Sheetrock Wall

Drywall setup is just one of the most common home enhancement tasks several homeowners find themselves faced with. Whether you're replacing drywall in your home or including a brand-new wall as component of a larger house improvement task, you could find yourself in a circumstance where you have to replace drywall in your house. This post covers a few pointers for seeing to it the surface on your drywall repair work is done appropriately so it will mix in with the rest of your home.Gather the Right Devices as well as Materials There are a few tools and
supplies you'll should tackle your drywall project. Initially, you wish to have sufficient joint substance for the work ... about 1 gallon for every 100 square feed of location. Naturally, you'll likewise require a mud frying pan or similar container to hold the joint substance as you apply it. In addition, you'll require a couple of taping blades or putty blades. I advise having a narrow one as well as one that's a bit larger for feathering out the joint. You'll additionally require drywall tape to leave the seam. Finally, you'll need sandpaper or something much like sand down the joint compound in between layers after it dries.Applying the Very first Coat of Mud The very first point you intend to do is apply the drywall tape along the seam between the 2 pieces of drywall or sheetrock. Aim to do this so the joint runs along the facility of the faucet. When the tape is in place, you could begin applying joint substance making use of one of the putty knives. Freely apply the joint compound as you leave the size of the joint and also be sure the joint substance gets pressed right into the joint to fill the space. Also, make sure you cover all of the tape with joint compound. You might desire to encounter the length of the seam several times with joint compound, feathering out the mud as you continuously do so. You can take care of the edges similarly, by taping and using joint substance to the seam that develops the edge between the two items of drywall. Last, you'll intend to likewise use joint compound to any nails holding up the pieces of drywall. Simply use your putty knife for this while applying a liberal quantity, then smoothing it out with the side of the blade. After that let the joint compound dry.Applying the Second and 3rd Coats You'll desire to use about 3 coats of joint substance. After the very first layer dries out, be certain to sand down the joint compound on the seams and the nails before proceeding. This will ensure that the surface area is smooth asyou apply the following layer. After that apply a 2nd coat of joint compound to the seams likewise as the very first layer , but spreading out the joint compound out bigger as you leave the joint. Do the same for the nails as well as let this coat completely dry . As you most likely guessed, applying the third layer is the exact very same process.Getting Ready to Painting Once you have actually applied the third layer of joint substance and allow it completely dry, make sure to sand around the edges of the seams and also nails one last time to guarantee the surface is as smooth as possible. You'll likewise wish to wipe down the wall surface with a dry dustcloth to obtain eliminate any dust that gets on the surface.Now you prepare to prime and also paint your walls.
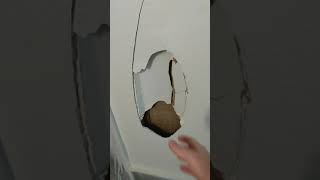
Challenging as it is, drywall can just withstand limited abuse. A door flung open with fantastic force can make a doorknob-size opening in your wall surface. This damages looks negative. Nonetheless, even large openings could be very easy to fix.The most convenient way to repair holes in dry wall is to purchase a drywall repair work package by measuring the hole and check out your regional equipment shop or residence enhancement store to acquire a package. There are various kinds as well as sizes for various applications. For circumstances, a drywall spot for ceiling is thicker compared to for the wall. Prior to using the package, ensure to remove any loosened plaster or paper around the opening edges. large drywall hole, adhere to these suggestions:1. Cut a square area bigger compared to the hole making use of a keyhole saw or energy blade.
Drywall repair Opa-locka - drywall contractors
DIY Versus Professional Drywall Installation and Repair
For repairing small drywall opening, adhere to the pointers below:1. Prepare a tin can lid a minimum of one and a half inches in size than the opening in the drywall. Use a keyhole saw in removing a slim straight slit in each side of the opening. See to it that your dimensions of the opening ought to be equivalent in size or lid to be able to place lid right into the opening.
2. Use an awl to punch 2 openings in the cover facility and afterwards thread a 12-inch piece of string or cable through the holes.
3. While holding the ends of wire, slide the lid with as well as pull it towards you until it is flat versus the within the wall. Set stick or scrap wood over the opening to hold it in position and twist the cord tight over the stick. The could lid needs to be firmly held against the inside of the wall.
4. Utilize a putty blade when applying pre-mixed drywall-patching substance over the spot by complying with supplier's guidelines. You could additionally mix plaster of paris with water to produce a thick paste. Load the compound or plaster to the opening against the backing as well as behind stick. Maintain the compound inside the drywall opening and cover the backing and fill up the slits. Nonetheless, do not spread it on the wall surface area. Permit the patch dry till it turns brilliant white, at the very least for 24-HOUR. When it is dry, reduced the string or cord and eliminate the stick.For dealing with
2. Cut two backer boards so they are 2 or three inches broader than the drywall hole.
3. Place a backer board inside the hole on top side as well as safeguard it with a one as well as 1/4 drywall screws and holding it on place as you work. Tighten until the screw heads are below the surface area, position a 2nd backer board inside the reduced side of the opening, as well as secure with screws.
4. Cut the patch to suit the opening, screw the patch to the backer and also tighten up with screws up until the screw heads are below the surface area.
5. Apply items of fibreglass tape over the seams.
6. Cover tape making use of a thin coat of compound as well as sand lightly when dry. You could after that use two more layers. Sand and plume every layer until the surface is smooth.
Drywall Finishing and Critical Lighting Problems