Drywall repair South Daytona – ceiling texture

[post_name how to repair 

Does Your Concrete Foundation or Drywall Have Cracks?
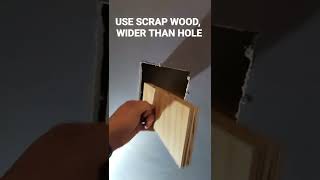
drywall repair tape

Drywall patching requires persistence and also perseverance. I am mosting likely to damage the procedure down conveniently so you will be a lot more informed prior to you begin your next dry wall patch.One thing you should think about when working with drywall is the DIRT. If you are delicate to the drywall dirt or gypsum you might want to get a fragment mask, safety and security goggles or handwear covers as well as wear a long sleeve tee shirt for protection. Do not neglect to shield any furniture that you intend to keep dirt cost-free, too!Step1: prep the

opening or location to be patched.If the hole or location to be patched has loosened wall surface board paper you will require to eliminate the loose paper and plaster. Currently if the wall surface board paper desires to proceed destroying the side of the wall, a means to quit this is the take a razor knife and reduced back from the loose location regarding an inch or two. Just what you are doing is racking up the wall surface so when you tear of the loosened paper it will certainly involve the racked up line and not tear more creating a larger area to require patch job. If after you have eliminated the loose paper and the plaster board below is crumbled and also hardly hanging to the wall surface, you have to knock out all the loose plaster. Loosened paper and also plaster will certainly create the drywall compound to not bond highly and also could develop a bubble you will see only after covering with compound. As component of the prep, you could desire to make even up the opening so you can extra easily cut the piece of sheetrock that will certainly fill up the void.OK so the area is prepped and now we will certainly have to transfer to tip 2, which will instruct you on

ways to properly affix an item of sheetrock cut to fill the hole in your wall surface or ceiling.Step 2: back framing the opening to attach the sheetrock you will cut to fill the void.Just like with new building you will certainly require to have wood mounting to screw the sheetrock right into. To clarify, I will utilize an example

patch area of one foot by one foot. You will certainly should reduce a 2x4 right into two 16 "lengths. You will have to gather a cordless or electric drill and also regarding a dozen 1 1/4" wood screws. Take among the 2x4's you have cut and glide it in the hole as well as behind the existing sheetrock, along one side of the hole. The factor the 2x4 is longer(16 ")than the 12"opening is because we will prolong it a pair of inches beyond the top and base. So now you have a 2x4 inside the wall on one side, the 2x4 has to be laying flat versus the inside of the wall surface, it will not be turned so the 4 "size of the 2x4 is flat against the in, this will offer us a bigger surface for attachment as apposed to the conventional means of framing which would certainly be with the 2"width dealing with the sheetrock. You will desire to eyeball, best as feasible the 2x4 and also split the distinction of the board size between the existing sheetrock and also where you will certainly connect the piece of sheetrock you will certainly reduce for the patch. Now that the 2x4 is held in the correct position you will certainly should screw the 2x4 into the existing drywall by holding securely to the board and screwing into it via the face of the existing sheetrock. You will certainly put 2 screws along the side as well as one on the top and base of the existing sheetrock to highly protect the 2x4 to accept item of sheetrock you will cut. As soon as you have finished one side, repeat the very same treatment on the various other side. So when you have finished back framing you now have a strong frame to attach the spot piece of sheetrock. * Note-if you have an opening to spot where there are mounting, electric or mechanical issues in the means that maintain you from sliding the 2x4 behind the wall to screw down the side, you could screw in the top as well as base of the 2x4 and this will certainly suffice. You may likewise take into consideration connecting the 2x4 back framing throughout the top and also bottom of the hole as apposed to connecting the 2x4's on the sides, simply make use of the very same instructions of add-on for the sides or leading as well as bottom.Now that the preparation and framework are full next we will cut a piece of sheetrock to insert right into the framed hole symphonious 3. Step 3: take a measurement of the hole and also reduced a piece of sheetrock to

fit and also protect it.It does not need to fit super limited however it will need to fit and be screwed to the

back framing you set up. You ought to put 2-3 screws down each side affixing the item of sheetrock you reduced to the framing. * Note-all the screws will need to be "set"listed below the surface of the sheetrock but not deep sufficient that the screw head tears the paper face on the sheetrock, unset screws will certainly show as well as hinder the following step. ** Note sheetrock can be found in two densities for many household building -1/ 2" and 5/8 ". 1/2"is usually on the indoor walls/ceilings and 5/8"is used on underside of staircases as well as in the garage.Well you're making progress as well as you have actually filled deep space with sheetrock, now we will certainly proceed to the

coating or finishing phase of the completely dry wall surface compound(mud )explained symphonious 4. Step 4: finish the patch with drywall compound (mud). As I was stating symphonious 3 the piece of sheetrock you reduced to fill the hole does not need to fit incredibly limited. If the sheetrock you reduced has a void around the

border/joint of it and where it meets the existing wall surface board, you must pre fill the location before applying the drywall tape. So just take a little compound and fill in the sides as well as smooth the excess flat wit the wall surface, permit to completely dry. Next is to use the drywall tape so that after we are all completed there will not be a fracture around the joint of the covered hole. For patch job I want to use a"mesh "or "fiber" tape, it supplies a stronger hold and the mesh tape is far more flexible compared to routine drywall tape, in the since you do not have to pre mud the wall to adhere the tape. The mash tape has a sticky support, so all you do is reduced the mesh tape to the size you require, stick it on the wall surface with the middle of the mesh tape running right in line with the joint or fracture. The mesh tape should always run past the joint at the very least an inch. Repeat this process for all 4 sides of the patch. Next apply a layer of compound around the border of the spot, over the mesh tape. The mesh will certainly be slightly noticeable after just one layer. * Note-If you use to much substance(mud )you will have a hump in the surface. Allow this coat to dry, sand lightly, mainly to knock of any blade borders that dried out in the compound as well as could cause the next layer to accumulate to much. You do not wish to attempt and also mud the patch in just 1 coat, it is far better to apply a moderate/thin coat allow to dry, sand as well as layer once more. Nevertheless the coats( a minimum of 2) have actually dried as well as you are satisfied that the surface area is coated equally, sand the mud to also the surface area. * Note -a much less compared to excellent layer task can be smoothed out with sanding. Fining sand along the outside side of the mud too, will certainly mix the patched location much better right into the existing surface. A really neat technique seeks you have actually sanded the patch, take a damp sponge or rag and"clean" the outside mud of the spot blending it also better right into the existing surface, this method will help you prevent seeing a mud line around the patch when it is completed. If your home has a smooth texture, this is the last action, your prepared to painting. If you do not have a smooth texture you will have to read on.Only another action as well as the drywall component of your spot will be total, structure. We will review different textures and also the best ways to use the in step 5. Tip 5: there are numerous structures and you need to first understand how to recognize your existing structure prior to going forward.Older homes may have a swirl, crows foot, hand or smooth appearance. Newer residences for the a lot of component use smooth, orange peel, knockdown and hand textures. For a crows foot you will certainly require a crows foot or stamp structure brush. For swirl appearance you could have to get in touch with a dry wall surface vendor store for the right appearance brush or trying out a couple of different brushes. For a hand structure you could use a completely dry wall surface knife or trowel. Every one of the above pointed out appearances require a tool or brush to use drywall compound to achieve the structure. The next two structures could be purchased in a spray can, orange peel and tear down. * Note- with all appearances it is good to get an old item of plywood or cardboard and also experiment first to locate the right amount of stress, thickness of mud, technique and also established time to develop the right want to best hide that a repair work was ever before made. As constantly if you texture the wall surface and also are not pleased with the outcomes you could was the appearance of quickly with a wet sponge of rag, permit to completely dry and also try texturing again or sand of a negative structure if you are not satisfied with it after it has actually been allowed to completely dry. * Note- Knockdown structure dimension could be adjusted by allowing the splashed on texture established or dry for much less or more time depending on the wanted look.We have actually reviewed the 5 actions had to expertly repair a drywall spot. 1 )appropriately prep the area to be patched. 2)back frame the opening. 3 )dimension and also cut the sheetrock to load the opening. 4 )use mesh tape as well as mud to smooth the surface area. 5)select and apply proper texture.So head out as well as" get your drywall on". You could take a look at my short article on painting wall surfaces if you need assistance with the painting. Do not hesitate to leave a remark concerning other subject you would like me to compose on pertaining to drywall. Please look into our internet site, dennardbloss.com, it

is about our construction surfaces.

Drywall - Methodologies and Benefits

Sheetrock is a kind of drywall and also is produced and also a trademarked item by US Plaster Company, among the leading suppliers of drywall worldwide. It is likewise referred to as gypsum wallboard. Sheetrock is a blend of natural plaster, water, and sand that is pressed between two hefty sheets of paper. It is a building and construction material that is used around the world to construct architectural aspects like ceilings and walls. It was invented in 1916 however it took another thirty to forty years before it captured on with builders, who had generally created walls from plaster.Benefits of sheetwork vs plaster & bull; It is much faster to set up sheetrock compared to it is to

• mount plaster & bull; Sheetrock can be painted or primed instantly after• it has actually been mounted so the building of the office or home can be proceeded with no hold-up. With plaster it requires days and even weeks to totally dry & bull; Plaster considers even more than sheetrock so there is much less damage on the
• building's foundation as well as architectural systems & bull; There is a greater degree of fire-resistance with sheetrock than there is with plate. This can offer the ones in the building more time to exit the structure securely in an emergency like a fire.Size of sheetrock The basic sheet of sheetrock steps 4 feet by 8 feet but also for buildings with specialty demands

or have high ceilings the building contractor can obtain larger areas. Generally, the interior walls of a structure are created from drywall that is one-half inch thick. If the building's wall surfaces are mosting likely to be subjected to even more deterioration, the building contractor can find thicker sheets of five-eights thick. If there is a rounded wall, a contractor can use sheetrock that is one-fourth inch thick. The sheets of sheetrock can be shaped since they are reasonably flexible.Types of sheetrock There are several various sorts of sheetrock that can be utilized for different applications. & bull; Traditional-it is naturally fire-resistant but the home builder could choose Type-X,

which is fire-rated sheetrock. This sheetrock is enhanced with vermiculite and perlite to boost its resistance to flames and also warm.

• Home builders use Type-X drywall in commercial buildings, which has fire-rated rankings from twenty to one hundred eighty mins. & bull; Greenboard-this gets its name from its green paper coating, which is a product that is moisture-proof and is made use of in restrooms and kitchens. & bull; Blueboard-this is the type that a home builder would select if the owners desire the walls to have the look of plaster. & bull; Soundboard-this kind of sheetrock is created to obstruct the transmission of noise in between different rooms.
• It could be mounted in numerous layers to make sure that the levels of noise could be preserved. drywall repair boise

How to Repair Wet Drywall

how to repair

Best Drywall Repair Services Florida

Drywall repair South Daytona - ceiling texture

Drywall repair South Daytona - ceiling texture