[post_name how to patch drywall Drywall Hole Repair Made Easy!

Difficult as it is, drywall could only withstand minimal abuse. A door flung open with terrific pressure could make a doorknob-size hole in your wall. This damage looks poor. Nonetheless, also big openings can be very easy to fix.The most convenient method to repair openings in dry wall surface is to purchase a drywall repair work kit by measuring the hole and check out your local equipment store or residence improvement store to acquire a kit. There are different kinds and also dimensions for numerous applications. For instance, a drywall spot for ceiling is thicker than for the wall. Prior to using the kit, make certain to eliminate any type of loose plaster or paper around the opening sides.
For repairing tiny drywall opening, follow the suggestions listed below:1. Prepare a tin can cover at the very least one and also a half inches in size compared to the opening in the drywall. Make use of a keyhole saw in removing a slim straight slit in each side of the opening. Make certain that your measurements of the opening need to be equivalent in size or cover to be able to place lid into the hole.
2. Make use of an awl to punch 2 openings in the cover facility then thread a 12-inch item of string or cable via the holes.
3. While holding the ends of cord, slide the cover with and also pull it to you up until it is flat versus the within the wall. Set stick or scrap timber over the opening to hold it in area as well as bent the cable tight over the stick. The can cover ought to be strongly held against the inside of the wall surface.
4. Make use of a putty knife when using pre-mixed drywall-patching substance over the patch by complying with manufacturer's instructions. You can also blend plaster of paris with water to produce a thick paste. Load the compound or plaster to the opening against the backing and behind stick. Keep the compound inside the drywall hole and also cover the backing and fill up the slits. Nevertheless, do not spread it on the wall surface. Enable the spot completely dry until it transforms bright white, at the very least for 1 Day. When it is dry, reduced the string or cord and remove the stick.For fixing
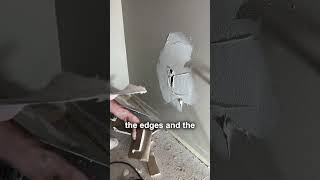
large drywall hole, adhere to these tips:1. Cut a square location bigger than the hole utilizing a keyhole saw or utility blade.
2. Cut two backer boards so they are two or 3 inches bigger compared to the drywall hole.
3. Place a backer board inside the opening at the top edge and also protect it with a one and 1/4 drywall screws and also holding it on area as you function. Tighten up until the screw heads are below the surface area, place a second backer board inside the reduced edge of the opening, as well as safeguard with screws.
4. Cut the spot to fit in the opening, screw the patch to the backer and tighten up with screws up until the screw heads are listed below the surface area.
5. Apply pieces of fibreglass tape over the joints.
6. Cover tape using a thin coat of compound and sand gently when completely dry. You could after that apply 2 even more layers. Sand and feather every coat until the surface is smooth.
Drywall Repair Questions Answered by a Professional
Drywall is the requirement in wall surface building and construction for many residences and also businesses in the United States Its affordable, wide schedule as well as convenience of setup makes it a budget-friendly alternative for both builders and also homeowner. Although drywall has many advantages, it has some drawbacks too. Particularly, the material does not hold up well to influences and water leakages leave big, unsightly bubbles as well as creases. Depending on the seriousness of the damage, home owners can usually carry out drywall repair works themselves. In various other situations, it makes sense to let a drywall professional do the work.DIY Drywall Repairs Saving money is the major factor that house owners try to fix drywall themselves. If the damage is minor, such as a little opening, most homeowners could carry out the work well. Equipment shops even offer patching packages for these tiny tasks that include everything you need to repair the drywall. Added help could be gotten from Web videos, as well as house repair service books.If the broken area is bigger, such as from a busted water pipeline, homeowners should thoroughly
consider the benefits and drawbacks of fixing it themselves. Those seeking to construct a totally new home addition need to likewise think about the negative aspects of installing the drywall themselves. In these instances, hiring an expert might be a much better choice. Professionals are likewise a much better choice for complicated or hard to reach locations, such as ceilings or around plumbing pipelines where reducing the drywall is required.Hiring a Specialist Drywall Professional Professionals that function for drywall firms could cost you much more, however they provide lots of advantages over doing it yourself.
Primarily, a completely dry wall surface specialist can complete the repair service much faster than a nonprofessional. Furthermore, they currently own all the tools should complete the work. A lot of home owners do not have the needed tools, which leads to pricey services or purchases. Another benefit is that professionals are bound as well as guaranteed, which implies that if they harm your home their insurance policy pays for it. Fixing do-it-yourself mistakes comes out of the property owner's pocket.Prices Costs differ extensively when employing drywall business to carry out repairs, with the majority of the cost being labor. If the repair is little, take into consideration working with a handyman or a general repair service individual that could perform other household repair services too. For larger jobs, such as new additions, ceiling fixings or complete wall substitutes, employ a drywall business that focuses on just this sort of work.While drywall installation could look simple, it could in fact be difficult to create a smooth, seamless finish. While some home owners could cherish the satisfaction of tackling the task themselves, others might finish up creating extra troubles to repair. Most of the times, homeowners must conserve themselves time and also initiative by employing a specialist to obtain the job done right.
Drywall repair Port St. Lucie - drywall mud

How to Repair Drywall Or Plasterboard Walls