[post_name drywall repair Is It Time To Do Some Repair Work On Your Drywall?

Repairing a big hole in your sheetrock wall surface is not as frightening as one might believe. Complying with is a fast and also easy way to do the fixing without a huge headache.First, you'll intend to
make the opening square if it isn't currently. It just has to be large enough to cover the broken area.The best means to do this is to use a 2 foot degree as well as make the 2 upright lines as well as 2 straight lines with a pencil to develop the square, no measuring is required. If you do not have a level, than simply gauge with a ruler or measuring tape equivalent distances to create the square.The following action is to remove along the lines to get rid of the harmed
piece. A cost-effective keyhole saw is the very best tool for this task. An utility blade can also be utilized by making regular passes until you have cut through the sheetrock. If you find on your own reducing over a stud, continue the cut until you have reduced out the whole square. Look out for any electrical wiring that may remain in the wall surface, especially along studs. With the opening currently reduced, position a piece of scrap wood, ideally one inch thick product such as a 1x3 or 1x4 in the opening on the rear end of the sheetrock and enough time to exceed each edge about four inches.So if I made an 8 inch by 8 inch hole the item would be 16 inches long.
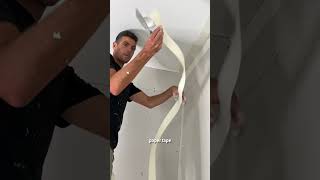
It could be placed vertically or horizontally in the hole. If the cut overlooked a stud, the stud can be utilized as an anchor point as well as the scrap put on the opposite side. If the stud remains in the center, area 2 scraps on either side. Screw the wood pieces in place with a cordless screwdriver from the face of the sheetrock up until the screw head is a little below the surface area. One on each end of the scrap need to do.Next cut an item of sheetrock to fit the opening. Making the item one eighth of an inch smaller sized generally will certainly assist in establishing it in. Screw this in position too with drywall screws. The following step is to apply joint substance to the joints to receive joint tape. Place enough to cover the width of the tape as well as a little over. Press the tape in the plaster with a six inch plaster blade. Make sure the tape remains in complete contact with the plaster or else the tape can bubble. Wherever the tape overlaps, position a percentage of joint compound over the hidden tape. Once this is completely dry, position a 2nd coat of compound. It's constantly best to utilize an eight inch plaster blade however a 6 inch will do.Spread the substance over the joints as well as feather it out further than before. Hereafter is completely dry, gently sand the location to remove any ridges or imperfections. The repair can currently be primaried with a drywall guide as well as a coat of paint to match the wall surface.
Drywall Water Damage Ceiling Repairs
By the time you end up reviewing this short article, you will certainly be able to execute standard repair services to damaged drywall. There are some basic devices that you must keep around your house, if you have an energetic family and also are prone to obtain dings in the wall surfaces. This short article will certainly not provide sufficient information to do significant repair works to drywall. Major fixings are straightforward, but you need to find out the fundamentals first.Here is a list of some devices you will need. Your neighborhood large box can supply you with some fundamental devices. They run in price variety from cheap to professional quality. They have plastic putty blades for less than a dollar right approximately stainless-steel that with care, will last a lifetime. If you expect a really handful of repairs, the plastic will suffice. Also, get a carriage screw, a little hammer, a canister of drywall joint substance, 150 to 220 grit sandpaper as well as a paint brush. These standard devices will repair most little dings as well as dents in drywall.An instance of a ding would be where the securing
switch on a door knob has actually left an impression in the wall behind it. This is normal of a fast and also very easy repair work. Consider the damage. Is there anything extending above the wall surface? If so, utilize the carriage screw to press the outcropping listed below the wall surface area. Use the hammer to assist encourage the outcropping to go listed below the surface of the wall and round the sides. Next, take the putty knife as well as some joint substance or as it is commonly called, drywall mud, and fill up the hole. Wait up until the mud dries out, sand gently as well as fill the opening once again to bring the product to the exact same degree as the wall surface. Sand the surface area again up until the wall is smooth as well as level. Do not over sand. This will rough up the drywall allowing the paper to battle royal as well as needing even more mud to seal the harsh surface. There should not be any type of distinctions in the surface. A number of tiny applications will last a lot longer compared to one huge application and provide you far better results.Is everything smooth? If not, apply some more drywall mud to even the wall surface areas. Sand again. When the wall is smooth, use the paint guide. When the paint guide is dry, use your routine wall surface paint. The paint primer is to secure the wall so the brand-new paint does not completely dry as well quickly allowing the spot to be visible.That is the standard approach of repairing damaged drywall.

It's Time to Fix That Hole in the Wall
Drywall repair Palatka - hanging drywall