[post_name drywall Sheetrock - What Is It?

There are a great deal of benefits of having drywall building and construction in your residence. Drywall is easy to mount; it is economical as well as has fire-resistant high qualities. The important point is this sort of wall could be painted, pictured and textured too, as well as it is easy to repair.The maintenance
of dry wall surface is hassle-free and also Dry wall surface Repair could be done by you. You do not should hire specific individuals, it's that simple!When you are confronted with Dry wall surface Repair service issues like cracks on the drywall, holes, damages via leakage of water, issues of drywall tape, or damage on the ceiling, don't lose sleep. You can restore it and that too on your own!To fixing holes there is a very easy strategy. You will need the fundamental fixing tools like extra drywall panel, sharp knives, joint substance additionally called drywall mud, measurement range and also paint or structure matching your wall. Measure the hole to be patched, and also cut dry wall regarding 4 inches larger than it. Then, cut off 2 inches from all 4 sides of the wall surface patch, making use of the determining scale and knife. Currently, placing this spot over the hole reduced the hole larger as per the size of the patch.Now all you need to do is layer the sides of the opening with joint substance and also deal with the spot right into the hole. Give the finishing touches like cleaning up the additional compound and leave the completely dry wall to completely dry. You ought to leave it overnight. After that use an additional layer of the substance as well as paint when dry.The repair work of cracks is likewise a straightforward issue.
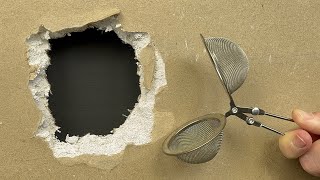
How to Patch Holes in Dry Wall
Do it yourself drywall setup is among the much more functional works you can deal with as a home owner. Whether you have actually got a ceiling that's been damaged by a leaking roofing system or a/c unit frying pan, or some new wall surfaces that are part of a renovating task, at some factor, you'll need drywall work with your house. The fantastic point is; with the appropriate knowledge, the correct tools, and also some practice; practically any person could do it. The basic point you should understand consist of:
Materials-This might appear pretty noticeable, however there are a couple of various alternatives.
- Density-Drywall or sheetrock is available in 1/4", 1/2", as well as 5/8" thicknesses. One of the most usual in domestic is 1/2". 5/8" is extra typically utilized in business work as well as is a requirement of building ordinance in numerous locations as a result of it's higher fire immune ranking. 1/4" is mostly used over various other materials such as paneling or plaster when a different sort of wall surface is preferred. If you're doing a spot or repair; inspect the density of the existing drywall before purchasing your new product to guarantee that it matches.
- Application-The majority of wall surfaces as well as ceilings will certainly have standard grey sheetrock. Nevertheless, in high moisture areas, such as bathrooms and also kitchens; use the more water immune green rock. There is also, now, a drywall that contains the same sort of cement fiber products used in ceramic tile backer boards for use on wall surfaces that will certainly end up with tile.
- Joint Compound-Also called sheetrock mud, this is the vital component to a successful do it on your own drywall setup. This will certainly come in pre-mixed paste like kind in boxes or buckets or powdered, in bags, that have to be blended with water. There are additionally fast drying out kwikset products that could be utilized for spots and also fixings.
- Joint Tape-This can be acquired in the standard paper kind, which need to be used with joint compound or in fiber tape, which is typically used in repair works because it removes one action of the process.
- Nails or Screws-Generally, nails have actually been utilized in property job and also screws in industrial (as a result of the usage of steel studs. Nonetheless, screws have come to be much more in domestic due to the rate of screw weapons.
- Drywall Knives-These kinds of blades are not used for cutting, but for spreading the mud, taping the seams, as well as floating and skimming; and, in fact appear like a spatula more compared to a knife. They are available in a range of widths from regarding 3" (used for taping seams) approximately 12" (for drifting as well as skimming). You will, most likely, need a minimum of 3 sizes for any job, as each skim coat gets a little larger.
- Mud Frying pan-These lengthy rectangular frying pans come in metal or plastic and are utilized for holding the joint substance. They're narrow adequate to accept one hand, while using the knife with the other.
- Utility Knife/Sheetrock Saw-A lot of the cutting of sheetrock is currently performed with utility blades with interchangeable blades. Adjustment them as often as required for a clean very easy cut. Sheetrock saws are long (concerning 10") triangular saws with little takes care of and also are used mainly for reducing openings for pipes as well as electric.
- High Powered Drill & & Paddle Bit-If you're doing a small fixing; you can blend the mud by hand with a drywall blade. But also for bigger do it on your own drywall installation jobs, it's necessary that you have a strong sufficient drill to mix the mud with a paddle for the correct uniformity and also to remove lumps.
- Safeguard it Excellent-Do not stint nails or screws. You don't desire movement when a person leans against the wall surface. Failing to appropriately attach it will cause fractures in the mud.
- View For Cutouts-Maintain a close eye on switches, plugs, as well as phone jacks. They're simple to conceal and also difficult to find later.
- Have Sufficient Help-Sheetrock is hefty. See to it you have a person to assist you hold it while you get the screws or nails in. This is especially true when hanging ceilings.
- Countersink the Bolts-See to it the nails or screws penetrate past the surface area to make sure that they can be covered with mud.
- Tape the Seams-This can be maded with either the paper or fiber tape. With paper, spread a slim layer of mud over the joint, the, using a drywall knife; press the tape into the mud as well as over the seam. Then utilize the knife to eliminate the excess mud. When this procedure is finished; you have to wait on the mud to dry before using the very first skim layer. The advantage of the fiber tape is; it sticks to the sheetrock without the demand for mud. So, you can quickly use a skim layer.
- Float and Skim-This may be performed in one coat or it might take 2 or 3. The idea is to have an also surface without rises, bumps, and also dips. One of the secrets to a successful do it yourself drywall setup is mixing the mud to the best uniformity so it spreads quickly. The other is just great old made technique. Some individuals take to it quicker compared to others. However, the more you do it, the much better you'll be.

How to Remove Drywall Texture
Drywall repair Haines - hanging drywall