[post_name sheetrock prices Does Your Concrete Foundation or Drywall Have Cracks?

A hole in your roofing system is a whole lot even worse than one in the wall. When it comes time to deal with a hole on the within your residence, cool down, it's not all that poor or that tough to repair it if you have some tools and the time to see it with. Drywall fixing can appear out of reach to the homeowner, specifically if you have never done it before. Allows created a fast check checklist of items you will certainly have to obtain this done ...
- An item of drywall a little bigger than the hole itself, pay focus to the density
- A drywall saw, a pointed type saw that you could press right into the wall to reduce
- Scrap item of thin timber or other product to screw into
- Handful of course drywall screws
- A putty knife 2" - 4", metal or plastic
- Drywall substance or 'Mud'
- 100 grit sandpaper
Normally, fixing drywall is a multiple action process. Implying that the initial step is getting a substitute item of drywall to fit over the hole size depending how huge it might be. That was the initial step ... seemed like a great deal of work ...
The continuing to be steps are using drywall compound (mud) to putty blade over the screws that are sunk just below the surface as well as the joints of the repair item. Utilize just enough mud to a little load the dimples because you will certainly mud over them once more after they dry ... generally over night (maybe much faster).
When you are sure the holes are loaded you will have to sand the excess mud down flush with the wall surface. Move your hand over your job ... does it feel smooth/ equivalent or does it have a bump to it? Obtain the surface to match the surrounding location as well as you are done with the exception of the paint to match your wall.This strategy
takes a few times to get the hang of it but, it is certainly do-able by the house owner. Larger openings are approached similarly ... you are simply covering more location and also you will have the framework in the wall surface to secure the drywall to. I hope this worked as though you might wish to attempt this sort of fixing on your very own someday. For a more in-depth take a look at this repair work, check out the website listed below.
Drywall Plastering - A Great New Method
A hole in drywall might show up to several people to be challenging to repair, however in truth it is a simple solution that the majority of house owners could repair themselves. The repair service method outlined in this post takes a few hours, yet if done correctly will leave you with a flat, smooth wall surface. There are 7 steps that you should adhere to in order to achieve an excellent repair on your drywall.1.
Mark off the location to be covered. Utilize a square to note off a location somewhat bigger than the opening that you are repairing.2.
Making use of a drywall blade, reduced around the four sides that you have currently marked off, leaving you with a square hole in the wall surface.3.
Prepare an item of timber to enhance the patch. To do this, cut a thin strip of 1x2 or 1x4 somewhat bigger compared to the height of the opening. Slide the wood right into the hole and also setting it to make sure that the wood expands similarly above and listed below the hole. Attach the timber using drywall screws affixed with the bordering drywall.4.
Produce a drywall spot for the hole. Utilizing a measuring tape, utility blade and a square reduced a piece of drywall to fit inside of the hole.5.
Safeguard the spot utilizing drywall screws connected through the support board that you have actually already installed. Screw down the patch up until it is flush with the surrounding wall surface.6.
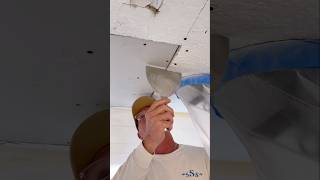
Spread a slim layer of joint substance on the spot making use of a drywall knife. If needed, apply drywall tape around the boundary and spread on another thin coat of joint substance. Allow the area dry and after that sand the location making use of a great grit sandpaper.7.
After the joint substance is completely dry, apply another coat of joint substance making use of the drywall blade, assimilating the repaired location with the surrounding wall. Permit to dry completely and also sand once again with great grit sandpaper. Once you have actually finished the actions, you must have a smooth patch.All that is
entrusted to do now is painting the repaired location and your job is total. To do this you need to prime the newly repaired area first. You could use a latex based primer to do this such as Kilz or Zinsser. After keying the fixed area and also enabling it to dry, you are ready for the surface coat. If you have repair paint it may not match flawlessly because also indoor paint will certainly fade over an amount of time. If your paint does not match, there are 2 different alternatives. The very first option is to repaint the entire room which is an additional job completely or you can painting from edge to edge of the repaired wall. I would certainly recommend you to attempt and also painting from edge to edge of the repaired wall initially and if it does not match with the remainder of the space you could constantly paint the whole room.So the next time you have some damages to your sheetrock, if you adhere to these steps you must have no issue fixing it to its initial state. All the best.

How to Repair Popped Nails in Drywall
Drywall repair Clewiston - how to patch drywall